


Sampling and Live Mode
Setting Up For Sampling
14-1
Chapter 14
Sampling and Live Mode
Setting Up For Sampling
Before you begin sampling, you’ll need to connect the proper cables from your sample source to
your K2661. The cables and input jacks you use depend on the sample format you choose, and
the output configuration of your sample source.
Note that sampling requires the K2661 sampling option. Even without the sampling option,
however, you still have access to all of the sample editing features covered in Chapter 14 of the
Musician’s Guide (on the CD-ROM). Samples can be loaded from disk, or dumped into the K2661
via MIDI Sample Dump Standard (SDS) or over SCSI using the SMDI protocol. See the
Musician’s Reference for information on the MIDI Sample Dump Standard and SMDI. Also see
SIMM Specifications in the Musician’s Reference for information about sample RAM requirements.
Cables and Input Jacks
If you’re going to be sampling from an analog source, you have two options:
• For unbalanced signals, use a 1/4-inch mono or stereo cable connected to the 1/4-inch (HiZ)
stereo analog input jack
• For balanced signals, use balanced XLR (cannon) cables connected to one or both of the XLR
mono analog inputs
Although it’s possible to send a balanced signal on a 1/4-inch cable, avoid sending a balanced
signal to the 1/4-inch jack when you’re making stereo samples, since doing so can cause phase
cancellation in your signals.
Using a mono cable sends the signal to the K2661’s left channel. If you use a mono cable, be sure
to set the Mode parameter on the SampleMode page to a value of Mono(L).
If you will be sampling from a digital source in AES digital format (either AES/EBU or S/PDIF),
connect the input cable to the AES/SPDIF In jack in the sampling section of the rear panel. This
jack is covered by a small plug which is easily removed before connecting the cable. This plug
should be left in place whenever the optical input is not in use, since dust and dirt can cause the
optical input to malfunction.
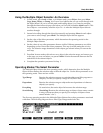
Entering The Sampler
There are two different ways to get to the SampleMode page. The method you choose depends
on the type of sampling you are doing—how many samples you are making and whether you
need custom keymaps.
The difference between the two methods is primarily a matter of ease of access to the Keymap
Editor. Once you have made your samples, you need to assign to a keymap and assign that
keymap to a layer in a program. Refer to the Musician’s Guide for a step-by-step explanation of
how to create keymaps.