


106
Sampling and editing in Sampling
mode
In Sampling mode, you can record samples, and edit sam-
ple data that you sampled or loaded from media (includ-
ing WAVE and AIFF formats). You can also assign the
edited samples to indexes (zones) to create a multisample.
For an example of sampling, refer to p.37–.
Here we will explain sampling operations that are specific
to Sampling mode, and how to edit a multisample or sam-
ple.
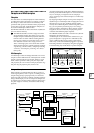
Creating multisample indexes and
sampling
Here’s how to create indexes for a multisample, and how
to assign a sample to each index.
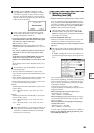
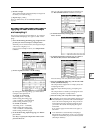
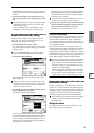
1 Select the P0: Recording, Recording page.
2 Select “MS (Multisample Select),” and create a multi-
sample.
To create a new multisample, press the “MS (Multi-
sample Select)” popup button. Then press a Multisam-
ple No. in the list for which no name has been entered,
or use the numeric keys [0]–[9] to input a number and
then press the [ENTER] key.
A dialog box will appear.
If you want to create a stereo multisample, check the
“Stereo” box, and press the OK button.
If you want to create a monaural multisample, uncheck
the “Stereo” box, and press the OK button.
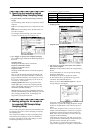
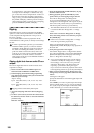
3 Press the Create button to create an index.
Immediately after the power is turned on, the “Index”
will be indicated as 001/001. This means that there is
only one index.
The range that is highlighted in the keyboard & Index
is the range of the selected index.
Press the Create button several times. Each time you
press it, an index will be created. The keyboard display
will indicate the zone and original key location of each
index.
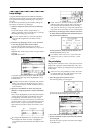
The index that is created when you press the Create
button will be created according to the P0: Recording,
Pregerence page Create Zone Preference settings.
(These settings can also be made in P3: Multisample,
Preference page Create Zone Preference. ☞PG p.99, 119)
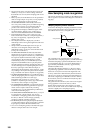
Immediately after the power is turned on, “Position”
will be Right (to selected index), “Zone Range” will
be 12 Keys, and “Original Key Position” will be Bot-
tom, so that indexes will be created as shown below.
If you set “Zone Range” to 1 Key, an index will be
created for each note of the keyboard. It is convenient
to use 1 Key when you wish to sample numerous
takes in succession, such as when recording phrases
or rhythm loops.
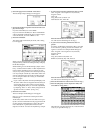
4 Select “Index.”
“Index” can also be selected by holding down the
[ENTER] key and playing a note on keyboard. For this
example, select 001.
5 Assign a sample to the “Index.”
If sample memory (RAM) already contains samples,
use “Sample Select” to select the sample and assign
it.
If you want to record a new sample, you can sample it
now.
The sample you record will be automatically assigned
to the index you selected in step 4.
The assigned sample will sound when you play the
keyboard in the range of the index to which the sample
is assigned.
6 Repeat steps 4 and 5 to assign a sample to each
index.
The number and order of the indexes in a multisam-
ple, the range of each index, and the original key
position can be freely changed later if desired. (“Mul-
tisample editing” ☞p.111)
Creating multiple samples
In the example procedure described above, several
indexes were created (by pressing the Create button sev-
eral times), and then samples were assigned to each
“Index.”
As an alternative method, it is also possible to create one
index, sample into it, and then repeat these two steps.
1 Press the Create button once to create an index.