110
Loop settings
Using the default settings after the TRITON STUDIO is
first turned on, the sounds you sample will automatically
be looped (P0: Recording, Preference page “Auto Loop
On” On)
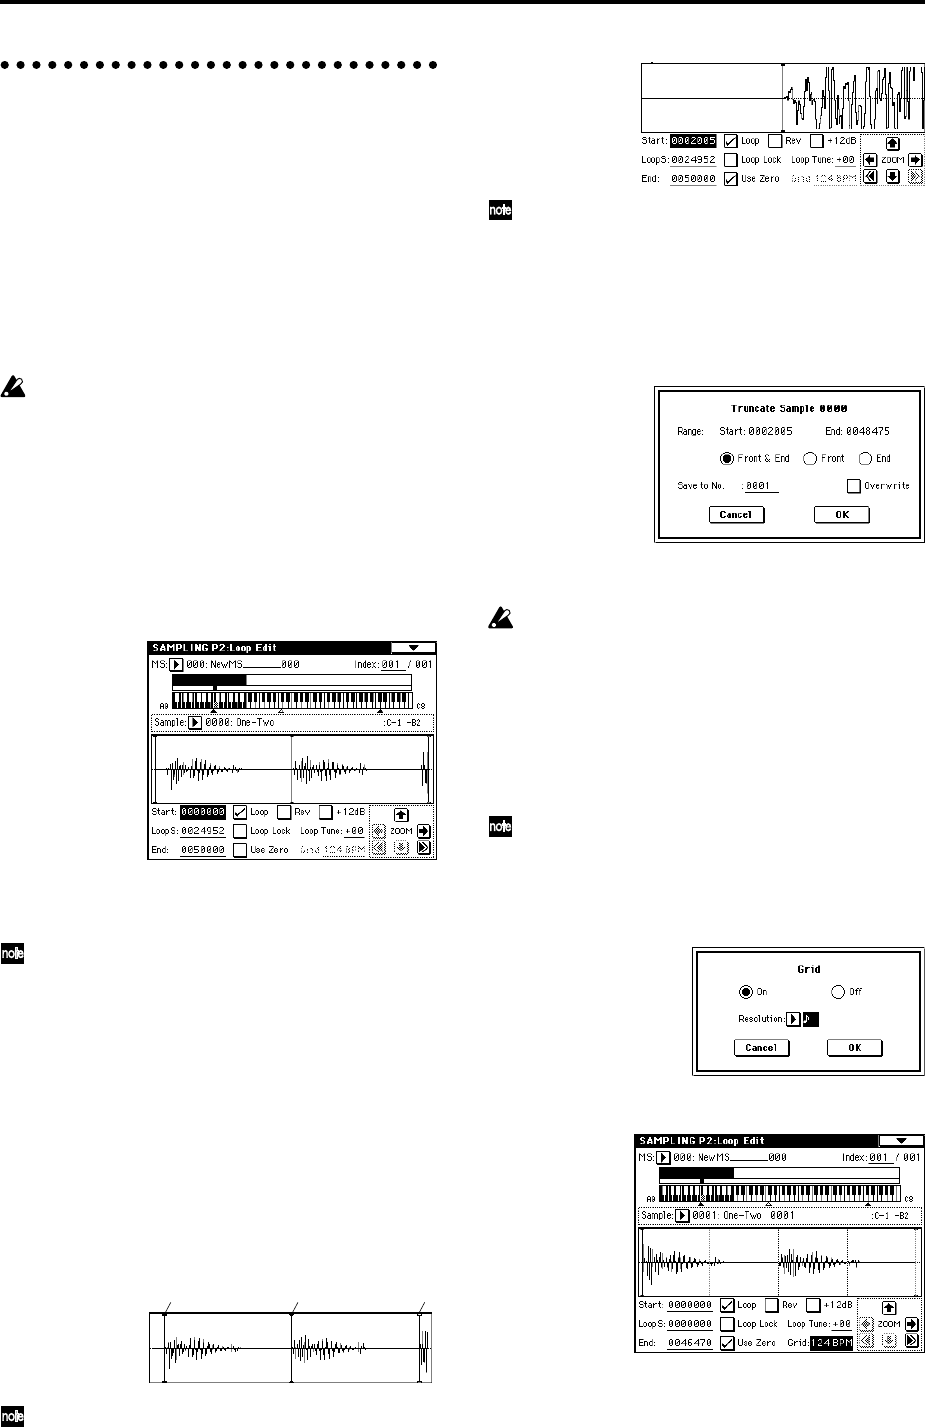
To edit the loop and other playback address settings for
the sample, use the P2: Loop Edit page.
1 Select the sample for which you wish to make loop
settings.
To select the sample, use the “Sample Select” or
“Index” parameters of P2: Loop Edit page or of the P0:
Recording, Recording page. (☞p.106)
If you use “Sample Select” to select the sample, be
aware that the assignment to the index will also
change.
2 In the P2: Loop Edit page, use the “Loop” check box
to turn loop playback on/off for the sample.
Looping will be turned on if the box is checked.
This will operate between the addresses you specify in
step 3.
Loop On: Start→End→LoopS→End→ (LoopS→End is
repeated)
Loop Off: Start→End
To play the sample, press the key to which the sample
is assigned (the key range that is highlighted in “Key-
board & Index”).
A sample waveform that was sampled with “Sample
Mode” set to Stereo will be displayed in two levels.
The upper level is the L channel, and the lower level
is the R channel.
3 Specify the start address in “Start,” the loop start
address in “LoopS (Loop Start),” and the end address
in “End.”
Select “Start” (highlighted), and use the [VALUE] dial
or other VALUE controllers to modify the value. The
corresponding vertical line will move. Set “LoopS
(Loop Start)” and “End” in the same way. In the exam-
ple shown below, “Start” is set immediately before the
first waveform, “LoopS (Loop Start)” is set immedi-
ately before the second waveform, and “End” is set as
desired.
By using the ZOOM button you can change the range
that is displayed. When “S (Start)” is highlighted,
zoom will be performed from the start address (☞PG
p.100).
If the “Use Zero” check box is checked, only those
addresses where the waveform data crosses the zero
level will be found automatically when searching,
and can be set. This lets you easily make address set-
tings where noise is less likely to occur when looping.
4 If necessary, use the page menu command “Truncate”
to delete unwanted data that falls outside the start (or
loop start) and end addresses.
Set the parameters, and press the OK button to exe-
cute the operation. (☞PG p.101)
For cautions on the “Save to No.” and “Overwrite”
check boxes, refer to “About “Overwrite”” (☞PG
p.101).
The grid display
The page menu command “Grid” overlays the waveform
display with a grid based on the BPM tempo value. This
makes it easy to make loop settings that are synchronized
to the tempo.
In the same way, the grid display can also be used in
P1: Sample Edit page. The grid can help you to edit
the waveform in sync with the tempo.
1 Select the page menu command “Grid”.
The following dialog box will appear.
Turn “Grid” On, set the desired “Resolution,” and
press the OK button. Dotted grid lines will appear.
2 Set “Grid” to the desired BPM tempo value.
3 Set the end address so that it coincides with a dotted
line of the grid.
This will cause the loop interval to be the same length
as the BPM value.
Start LoopS (Loop Start) End


