109
Basic functions
Saving dataLoading dataProgram
settings
Combination
settings
Producing
songs
Sampling
settings
Creating a
CD
SMF
playback
System
settings
Drum kit
settings
Arpeggiator
settings
Effects
settings
Other
functions
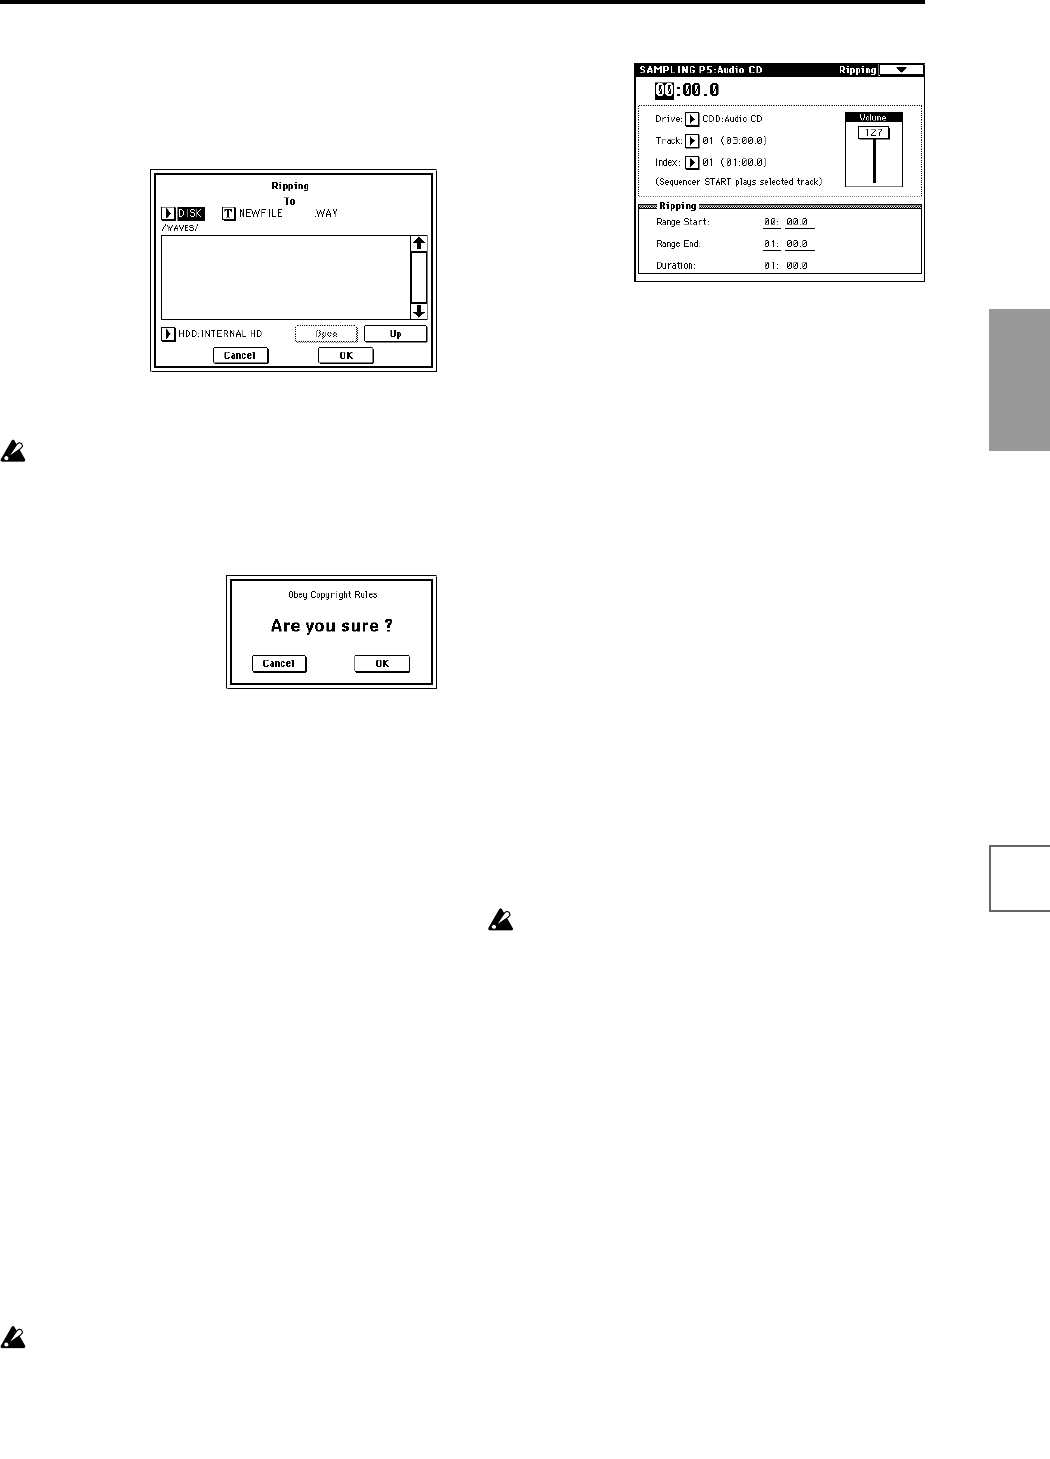
Select DISK if you want to rip the sample to hard disk.
Use drive select to select the drive, and use the Open
and Up buttons to select the directory in which the
data will be saved. Also specify a name for the WAVE
file that will be saved.
9 Press the OK button to execute ripping, or press the
Cancel button to cancel without executing.
When you press the OK button, the “Obey Copyright
Rules” dialog box will appear.
Carefully read “About copyright” (☞p.iii), and if you
consent to the terms, press the OK button to begin
ripping. If you do not consent to the terms, press the
Cancel button to cancel the operation.
Reading the analog audio output of an
audio CD into a sample
Here’s how analog audio data from an audio CD track can
be loaded into a sample.
In the same way as when you send the audio output of a
CD player to the TRITON STUDIO’s AUDIO INPUT 1
and 2, use audio cables to connect the audio outputs of
your SCSI-connected CD-ROM or CD-R/RW drive to the
TRITON STUDIO’s AUDIO INPUT 1 and 2.
You can use the TRITON STUDIO’s SEQUENCER
[START/STOP] key etc. to control operations such as
playback and stop on your CD-ROM or CD-R/RW drive.
When using the CDRW-1 option, the analog output can be
internally connected to AUDIO INPUT 1 and 2, so it is not
necessary to make connections using audio cables.
1 If you are using a SCSI-connected CD-ROM or CD-
R/RW drive, use audio cables to connect its audio
outputs to the TRITON STUDIO’s AUDIO INPUT 1
and 2.
2 Insert an audio CD.
3 Access the Sampling mode P5: Audio CD, Ripping
page.
4 Use “Drive” (drive select) to select the drive that con-
tains the audio CD, and use “Track” to select the track
that you want to read.
Raise the “Volume.”
Some SCSI-connected CD-ROM or CD-R/RW drives
cannot be controlled in this way, so this setting may
not affect the volume.
5 In the P0: Recording, Input/Setup page, make Input
settings as follows.
“Input” Analog
Input1 “Level” 127, “Pan” L000, “BUS Select” L/R
Input2 “Level” 127, “Pan” R127, “BUS Select” L/R
6 Specify the recording method in Recording Setup.
“Source BUS” L/R
“Trigger” Sampling START SW
Sampling will start when you press the SAMPLING
[START/STOP] key.
“Resampling” Manual
7 In REC Sampling Setup, make settings for the sample
that will be recorded.
8 Adjust the recording level.
Press the SAMPLING [REC] key.
When you press the SEQUENCER [START/STOP] key
to play back the audio CD, the level meter will indicate
the volume that will be sampled. If the display indi-
cates “ADC OVERLOAD !!,” adjust the “Volume” in
the P5: Audio CD, Ripping page.
If you are using an external SCSI drive, you can also
make adjustments using the volume control of the
drive, or the rear panel [LEVEL] knob.
If the display indicates “CLIP!!,” use the VALUE con-
trollers to lower the “Recording Level” slider below
+0.0 until an appropriate level is reached.
When you finish making adjustments, press the
SEQUENCER [START/STOP] key to stop playback of
the audio CD. Press the [LOCATE] key to return the
location to the beginning of the track.
Press the SAMPLING [REC] key once again.
9 Execute sampling.
Press the SAMPLING [REC] key.
Press the SEQUENCER [START/STOP] key to start
playback of the audio CD track.
At a point slightly earlier than where you want to sam-
ple, press the SAMPLING [START/STOP] key to begin
sampling.
At the point where you want to stop sampling, press
the SAMPLING [START/STOP] key to stop sampling.
“Save to” RAM: if you want to write the sample into
sample memory (RAM)
“Save to” DISK: if you want to write the sample to
hard disk
“Sample Mode” Stereo
“Sample Time” maximum


