


17
Introduction
FeaturesFront &
rear panel
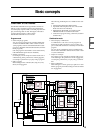
LCD screenConnectionsBasics
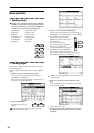
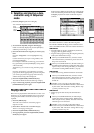
3. Setting a parameter
The parameter value in the edit cell can be set by using the
front panel VALUE controllers ([VALUE] slider, [ ][ ]
keys, [VALUE] dial, numeric keys [0]–[9], [–] key,
[ENTER] key, and [./10’s HOLD] key). As necessary, you
can also use the [BANK] keys and the [COMPARE] key.
For some parameters, the value can be set by pressing a
popup button to display the popup menu and then select-
ing a parameter value, or by holding down the [ENTER]
key and playing a note on the keyboard to input a note
number or velocity value.
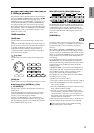
VALUE controllers
[VALUE] slider
Use this when you wish to make major changes in the
value.
In Program mode and Combination mode, this slider can
also be used as a control source for alternate modulation
or dynamic modulation. (This is active in Program or
Combination P0: Play when the “Program Select” or
“Combination Select” (the large characters in the upper
part of the LCD) is selected).
[ ][ ] keys
Use these when you wish to make small changes in the
value.
[VALUE] dial
Use this when you wish to make large changes in a value.
Numeric keys [0]–[9], [ENTER] key, [–] key,
[./10’s HOLD] key
Use these when you know the parameter value that you
wish to input.
After using the numeric keys [0]–[9] to input a number,
press the [ENTER] key to finalize the parameter value.
Use the [–] key to enter negative numbers.
Use the [./10’s HOLD] key to enter a decimal point.
In Program and Combination mode P0: Play page other
than the Sampling page, the [./10’s HOLD] key performs
the 10’s Hold function. (☞p.23, 24)
BANK [INT-A]–[INT-G], [EXB-A]–[EXB-G] keys
The BANK [INT-A]–[INT-G], [EXB-A]–[EXB-G] keys are
used in Program mode to select the program bank and in
Combination mode to select the combination bank. In
combination, Sequencer and Song Play modes, these keys
are used to select the bank of the program used by each
timbre/track.
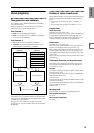
[COMPARE] key
Use this key when you wish to compare the edits you
have made to a program or combination’s sound with the
un-edited original (i.e., the sound that is written into
memory).
When editing a program or combination, press this key.
The LED will light, and the last-written settings for that
program number or combination number will be recalled.
When you press the [COMPARE] key once again, the LED
will go dark and you will return to the settings that you
were editing.
If you edit the settings that are recalled by pressing the
[COMPARE] key (i.e., the settings that are written into
memory), the LED will go dark, and it will not be possible
to return to the previous edits by pressing the [COM-
PARE] key again.
In Sequencer mode, you can use the [COMPARE] key to
make “before and after” comparisons immediately after
using realtime recording or step recording to record a
song, or after performing a track edit operation.
For example, this can be used effectively when realtime-
recording a track for a song.
1 Realtime-record a track. (Take 1)
2 Once again, realtime-record on the same track. (Take 2)
3 Press the [COMPARE] key. The LED will light, and
take 1 will be recalled.
4 Press the [COMPARE] key once again. The LED will go
dark, and take 2 will be recalled.
5 If at step 3 you once again realtime-record on the
same track (take 3), the object of the Compare function
will now be take 1. If at step 4 you once again real-
time-record on the same track (take 3), the object of the
Compare function will be take 2.
In this way, the Compare function lets you recall the pre-
vious recording or the previous state of event editing.
The Compare function is not available Sampling,
Song Play, Global, or Disk modes.