


108
In “Sample Select,” assign the sample that you will
resample, and set “Resample” to Manual. Set “Trig-
ger” to Note On, and set “Sample Mode” to Stereo as
desired. Then set the bus and effect as described in
steps 3 and 4, press the SAMPLING [REC] and then
the [START/STOP] key, and then press the C2 key to
start resampling. When you want to stop resampling,
press the SAMPLING [START/STOP] key.
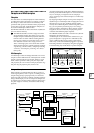
Ripping
Digital data from an audio CD inserted in the CDRW-1
option or a SCSI-connected CD-ROM or CD-R/RW drive
can be sampled in the digital domain. This process is
known as “ripping.”
You can either read the audio CD playback from the
AUDIO INPUT as analog audio, or directly read it as digi-
tal data.
In order to perform this operation, you must either
install the CDRW-1 option, or connect an external
CD-ROM or CD-R/RW drive to the SCSI connector.
For details on installing the CDRW-1, refer to PG
p.286. For details on SCSI connections, refer to PG
p.298. If you are using a SCSI-connected CD-ROM or
CD-R/RW drive, use audio cables to connect the
audio outputs of the drive to the TRITON STUDIO’s
AUDIO INPUT 1 and 2.
Ripping digital data from an audio CD as a
sample
Here’s how digital data from an audio CD track can be
captured as a sample.
1 Insert an audio CD into the CDRW-1 option or a
SCSI-connected CD-ROM or CD-R/RW drive.
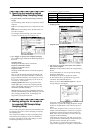
2 In the Sampling mode P0: Recording, Input/Setup
page, make Input settings so that you can monitor the
audio that you want to rip.
Ripping will not be affected by these inputs.
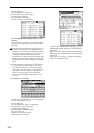
3 Access the Sampling mode P5: Audio CD, Ripping
page.
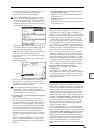
4 In “Drive” (drive select), select the drive that contains
the audio CD, and use “Track” to select the track that
you want to rip.
Raise the “Volume.”
5 Press the SEQUENCER [START/STOP] key to play
back the audio CD track.
6 During playback, press the [ENTER] key at the
points where you want ripping to begin and end.
This will set “Range Start” and “Range End.”
If you press the [ENTER] key three or more times,
“Range Start” and “Range End” will respectively be set
to the next-to-last point at which you pressed the key,
and the last point at which you pressed the key.
The method described above is used when the cursor
is located at other than “Range Start” or “Range
End.”
If the cursor is located at “Range Start” or “Range
End,” that setting will be re-set each time you press
the [ENTER] key.
If the cursor is located at “Range Start” or “Range
End,” this region will be played back.
When you finish making settings, press the
SEQUENCER [START/STOP] key to stop playback of
the audio CD.
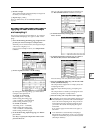
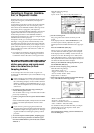
7 Verify the region that will be ripped.
Select either “Region Start” or “Region End” (the dis-
play will be highlighted), and press the SEQUENCER
[START/STOP] key. The CD will play from “Range
Start” to “Range End” and then stop.
If you want to adjust the location, use the VALUE
controllers to modify the “Range Start” or “Range
End” settings, or move the cursor to a parameter
other than “Range Start” and “Range End” and
repeat step 5 to make the setting once again.
If you want to move the track playback start location
to the beginning of the track, press the [LOCATE] key.
8 When you have finished setting “Range Start” and
“Range End,” select the page menu command “Desti-
nation.”
A dialog box will appear.
Specify the destination to which the ripped sample will
be written.
Select RAM if you want to rip the sample into sample
memory (RAM). In this case, you can also set Sample
No. (L), (R) to specify the sample number that will be
written. Normally you can leave this unchanged.
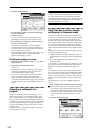
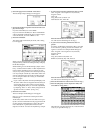
“Input”: Analog
Input1 “BUS (IFX/Indiv.)” L/R, “Level” 127, “Pan”
L000
Input2 “BUS (IFX/Indiv.)” L/R, “Level” 127, “Pan”
R127