


84
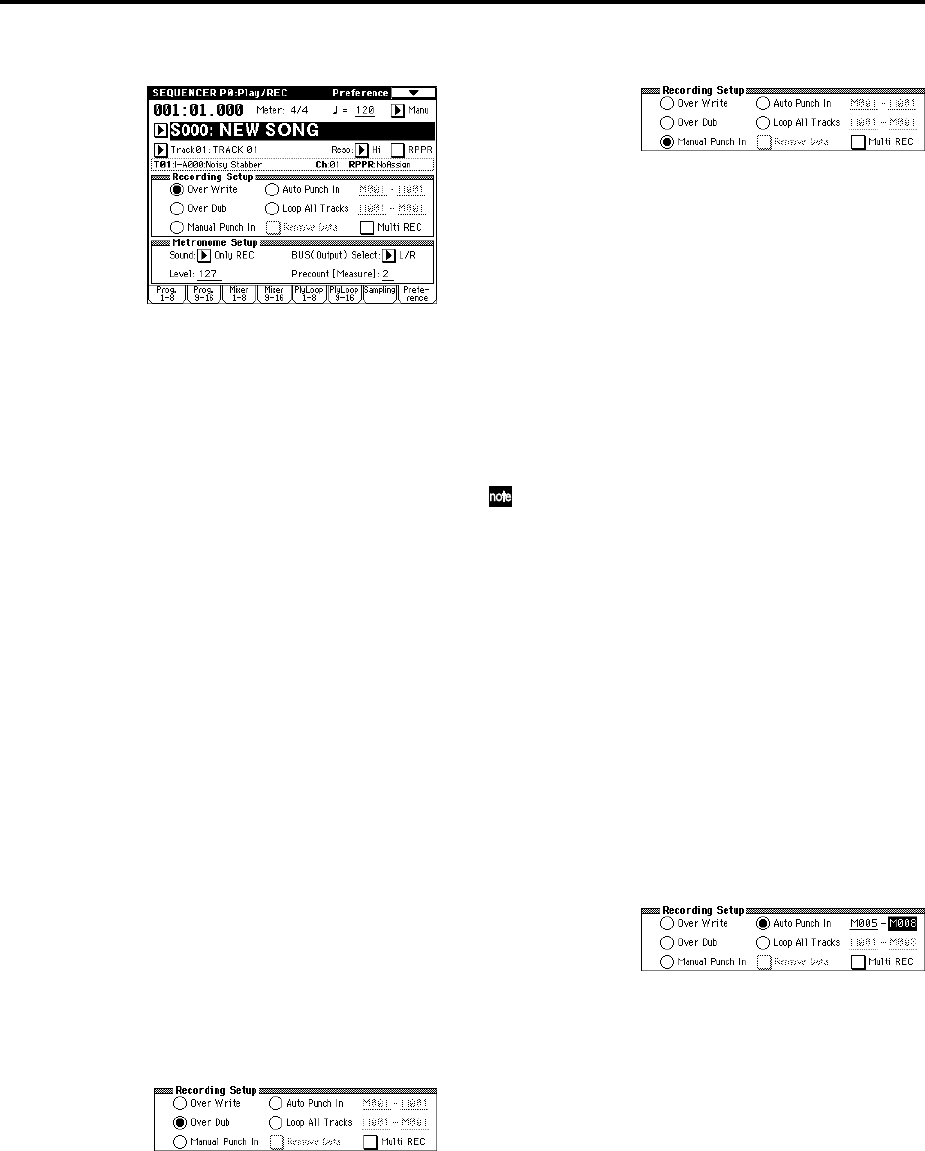
2 Set the “Recording Mode” to Over Write.
3 In “Location,” specify the location at which you wish
to begin recording.
4 Press the SEQUENCER [REC/WRITE] key, and then
press the SEQUENCER [START/STOP] key.
If the “Metronome Setup” is still set to the default set-
tings, the metronome will sound for a two-measure
pre-count, and then recording will begin.
Play the keyboard and move controllers such as the
joystick to record your performance.
5 When you finish playing, press the SEQUENCER
[START/STOP] key.
Recording will end, and the location will return to the
point at which you begin recording.
If you press the [PAUSE] key instead of the
SEQUENCER [START/STOP] key, recording will
pause. When you press the [PAUSE] once again,
recording will resume. When you are finished, press
the SEQUENCER [START/STOP] key to stop record-
ing.
• Overdub
With this method, the newly recorded musical data is
added to the existing data.
When you perform overdub recording on a previously-
recorded track, the newly recorded data will be added
to the previously-recorded data.
It is best to select this mode if you will be recording
additional control data, recording a drum pattern, or
recording the tempo in the master track. With this
mode, data can be added without erasing the existing
performance data.
1 Use “Track Select” to select the track that you want to
record.
2 Set the “Recording Mode” to Over Dub.
3 For the rest of the procedure, refer to steps 3–5 of
“Overwrite.”
• Manual punch-in
While the song is playing, you can press the
SEQUENCER [REC/WRITE] key or a connected pedal
switch at the desired location to start or stop recording.
With this method, the musical data previously on the
track is overwritten by the newly recorded data.
1 Use “Track Select” to select the track that you want to
record.
2 Set the “Recording Mode” to Manual Punch In.
3 In “Location,” specify a location several measures
earlier than the point at which you wish to begin
recording.
4 Press the SEQUENCER [START/STOP] key.
Playback will begin.
5 At the point at which you wish to begin recording,
press the SEQUENCER [REC/WRITE] key.
Recording will begin. Play the keyboard and operate
controllers such as the joystick to record your perfor-
mance.
6 When you finish recording, press the SEQUENCER
[REC/WRITE] key.
Recording will end (playback will continue).
Instead of pressing the SEQUENCER [REC/WRITE]
key in steps 5 and 6, you can use a foot switch con-
nected to the ASSIGNABLE SWITCH jack.
Set the Global P2: Controller page “Foot SW Assign”
to Song Punch In/Out (☞p.125).
7 Press the SEQUENCER [START/STOP] key.
Playback will stop, and you will return to the location
that you specified in step 3.
• Auto punch-in
First you must specify the area that will be re-recorded.
Then recording will occur automatically at the speci-
fied area.
With this method, the musical data previously on the
track is overwritten by the newly recorded data.
1 Use “Track Select” to select the track that you want to
record.
2 Set the “Recording Mode” to Auto Punch In.
3 In “M (Auto Punch In Start Measure), “M (Auto
Punch In End Measure)” specify the area that you
wish to record.
For example if you specify M005–M008, recording will
occur only from measure 5 to measure 8.
4 In “Location,” specify a location several measures
earlier than the point at which you wish to begin
recording.
5 Press the SEQUENCER [REC/WRITE] key, and then
press the SEQUENCER [START/STOP] key.
Playback will begin.
When you reach the starting location you specified in
step 3, recording will begin. Play the keyboard and
operate controllers such as the joystick to record your
performance. When you reach the ending location you
specified in step 3, recording will end. (Playback will
continue.)
6 Press the SEQUENCER [START/STOP] key.
Playback will stop, and you will return to the location
you specified in step 4.