


4
[SAMPLING] key
Sampling mode will be selected.
[S.PLAY] key
Song Play mode will be selected.
[GLOBAL] key
Global mode will be selected.
[DISK] key
Disk mode will be selected.
7. [COMPARE] key
Use this key when you wish to compare the sound of the
program or combination that you are currently editing
with the un-edited sound already in memory. You can also
use this key to make “before and after” comparisons
when recording or editing in Sequencer mode (☞p.17).
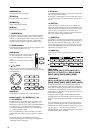
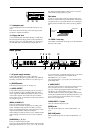
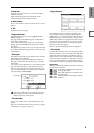
8. VALUE controllers
The following VALUE controllers are used to set the value
of the selected parameter (☞p.17).
[VALUE] slider
Use this to modify the value of a parame-
ter. This controller is convenient when
you wish to make large changes in the
value.
This slider can also be used as a modula-
tion source.
[ ][ ] keys
These are used to increase or decrease the parameter
value in steps of one. It is convenient to use these to make
fine adjustments.
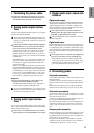
[VALUE] dial
Use this dial to modify the value of the parameter.
Numeric keys [0] – [9], [ENTER] key, [–] key
[./10’s HOLD] key
Use these keys to numerically input a parameter value.
Use numeric keys [0]–[9], the [–] key, and the [./10’s
HOLD] key to enter the value, and press the [ENTER] key
to confirm it. The [./10’s HOLD] key lets you input a
value with a decimal point. The [–] key inverts the sign
(+/–) of the parameter value.
The [./10’s HOLD] key is also used when you wish to
hold the 10’s place while selecting programs or combina-
tions.
By holding down the [ENTER] key and pressing a
numeric key [0]–[9], you can select up to ten page menu
commands in the current page.
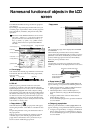
9. LCD screen
The TRITON STUDIO features a Touch-View system that
uses a touch-panel LCD screen.
By touching on objects that are shown in the LCD screen,
you can select pages, tabs, and parameters, and set values
(☞p.8).
10. [EXIT] key
When a dialog box is open, this key will cancel the set-
tings made in the dialog box and close the dialog box (cor-
responds to the Cancel button). If a popup menu or page
menu is open, pressing [EXIT] will close the menu.
When in P (page) 1–9 of each mode, pressing the [EXIT]
key will move to P (page) 0 of that mode.
11. [MENU] key
Use this key to move between pages. When you press the
[MENU] key, a list of the pages in the mode will appear in
the LCD screen. Press the desired page, and you will
move to that page. You can also move to a page by hold-
ing down the [MENU] key and pressing the correspond-
ing numeric key [0]–[9] (☞p.16).
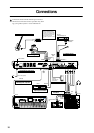
12. BANK keys
These keys are used to switch the program/combination
bank.
PROG BANK:
[INT-A], [INT-B], [INT-C], [INT-D], [INT-E] (SMPL),
[INT-F] (MOSS), [INT-G] (GM), [EXB-A], [EXB-B],
[EXB-C], [EXB-D], [EXB-E], [EXB-F], [EXB-G]
COMBI BANK:
[INT-A], [INT-B], [INT-C], [INT-D], [INT-E], [EXB-A],
[EXB-B], [EXB-C], [EXB-D], [EXB-E], [EXB-F], [EXB-G]
In Program mode, these keys select the program bank.
In Combination mode, these keys select the combination
bank. When assigning a program to the various timbres in
a combination, then these keys will select the program
bank. In this case, the LED of the program bank selected
for the timbre will light.
In Sequencer and Song Play modes when the edit cell
(highlighted area) is located at the program of each track,
these keys select the program bank just as in Combination
mode.
If you repeatedly press the [INT-G] key when selecting a
program, the bank selection will cycle through all of the
GM(2) banks and drum banks in the order of G, g(1), g(2)–
g(8), g(9), g(d), G ... each time you press the key.
The [INT-F] bank can be selected in Program mode only if
the EXB-MOSS option is installed.