


115
Basic functions
Saving dataLoading dataProgram
settings
Combination
settings
Producing
songs
Sampling
settings
Creating a
CD
SMF
playback
System
settings
Drum kit
settings
Arpeggiator
settings
Effects
settings
Other
functions
Sampling in Program, Combina-
tion, or Sequencer modes
External audio sources can be sampled from the various
input jacks in Program, Combination, and Sequencer
modes as well.
A performance in the above modes can also be internally
resampled in digital form. You can resample a perfor-
mance that uses the TRITON STUDIO’s full range of fea-
tures (filters, effects, arpeggiator, and sequencer).
You can also sample the TRITON STUDIO’s performance
together with audio from an external input source, or
monitor the performance of the TRITON STUDIO’s
arpeggiator and sequencer etc. while you sample only the
external audio from the input jacks.
In Sequencer mode, you can sample external audio while
listening to a song play back, and automatically create
note data in the track that will play the sample when the
track is played back. This allows you to sample vocals or
guitar while the sequencer runs, just as though you were
using a multitrack recorder. (This function is called “In-
Track Sampling.”)
☞ For examples of sampling in Program and Combina-
tion modes, refer to p.45. The sampling procedure in
Combination mode is the same as in Program mode.
Record an external audio input source
while a song plays, and create event
data at the same time (In-Track
Sampling function)
As an example, here’s how the sound of a guitar con-
nected to the AUDIO INPUT 1 jack can be added to a song
you created.
In this example we will send the external audio input
source to INDIVIDUAL 1, so if you want to monitor
the sound being sampled, connect AUDIO OUTPUT
(MAIN) L/MONO, R, and (INDIVIDUAL) 1 to your
mixer, and use headphones etc. to monitor the output
of the mixer.
1 In Sequencer mode, select the song to which you
want to add the guitar sound.
You can either create a song, or use Disk mode to load a
previously-created song.
2 Connect your guitar to the rear panel AUDIO INPUT
1 jack.
Set the AUDIO INPUT [MIC/LINE] switch to the LINE
position, and set the [LEVEL] knob near the center
position.
If you connect a passive-type guitar (without an
internal preamp), the impedance mismatch will make
it difficult to sample at an appropriate level. This type
of guitar should be sent through a preamp or effect
processor.
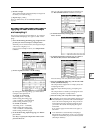
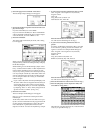
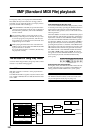
3 Access the Sequencer P0: Play/REC, Sampling page.
4 Set the various Input parameters so that the signal
from the AUDIO INPUT 1 jack will be sent to INDI-
VIDUAL 1.
Make the following settings.
“Input”: Analog
Input1 “Level”: 127, “Pan”: L000, “BUS Select”: 1/2
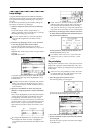
5 Set the recording level.
Play your guitar at the volume at which you will
record.
If the display indicates “ADC OVERLOAD !!” (AD
converter input overload), adjust the rear panel
[LEVEL] knob toward MIN until the level is appropri-
ate.
Press the SAMPLING [REC] key.
When you play your guitar, the level meter will indi-
cate the volume at which the guitar will be sampled.
If the display indicates “CLIP!!,” use the VALUE con-
trollers to lower the “Recording Level” slider (in the
right of the display) below +0.0 to an appropriate level.
This adjustment will not affect the output volume, but
will affect the data that will be sampled.
When you have finished making adjustments, press
the SAMPLING [REC] key.
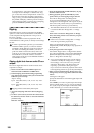
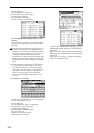
6 Set the various Sampling Setup parameters.
Make the following settings.
“Source BUS”: Indiv. 1/2
“Trigger”: Threshold, “Level”: as desired
“Save to”: RAM, “Mode”: Mono
Sample Time”: as desired
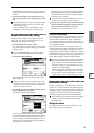
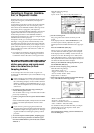
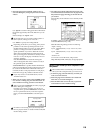
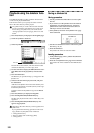
7 Select the page menu command “Select Bank & Smpl
No.,” and make the following settings.
“Bank”: as desired
“Program,” “Seq.Event”: On
“Track”: a track that contains no recorded data
“Auto +12 dB On”: Off (unchacked)
You should normally turn this Off when you sample
external audio sources in Sequencer mode. (The
power-on default is On.)
After making these settings, press the OK button to
close the dialog box.