


MIDI Remote Layer 95
01V96i—Reference Manual
Remote Control
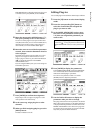
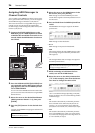
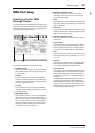
2. Press the DISPLAY ACCESS [DIO/SETUP] but-
ton repeatedly until the DIO/Setup |
MIDI/Host page appears.
3. Move the cursor to the REMOTE parameter
box (
1) in the SPECIAL FUNCTIONS section,
rotate the Parameter wheel to select MIDI,
then press [ENTER].
If the MIDI port is already in use, a window confirming
the assignment change appears. Move the cursor to the
YES button, then press [ENTER].
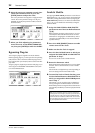
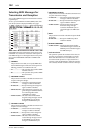
4. Press the DISPLAY ACCESS [DIO/SETUP] but-
ton repeatedly until the DIO/Setup | Remote
page appears.
5. Move the cursor to the TARGET parameter
box, rotate the Parameter wheel to select
USER DEFINED, then press [ENTER].
The confirmation window for changing the setting
appears. Move the cursor to the YES button, then press
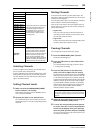
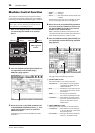
[ENTER]. The display changes as follows:
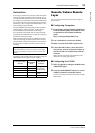
1 TRANSMIT ENABLE/DISABLE
This button switches the MIDI Remote function between
enable and disable.
2 INITIALIZE
This button resets the settings stored in the bank selected
by the BANK parameter their default settings.
3 BANK
This parameter enables you to select one of four banks.
4 ID, SHORT, LONG
These parameters display the channel names. The ID
parameter displays the channel ID (RM01–RM16) for the
currently-controlled MIDI device.
5 ON section
This section displays the type of MIDI messages (in hexa-
decimal or alphabet) assigned to the [ON] buttons for the
currently-selected channels (RM01–RM16).
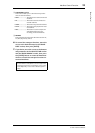
• L ATCH/UNL ATCH
This button toggles between Latch and Unlatch for [ON]
button operation.
•LEARN
When you turn on this button, MIDI messages received
at the MIDI IN port are assigned to the DATA parameter
boxes.
•DATA parameter boxes
These boxes display the type of MIDI messages (in hexa-
decimal or alphabets) assigned to the [ON] button).
6 FADER section
This section displays the type of MIDI messages (in hexa-
decimal or alphabet) assigned to the faders for the cur-
rently-selected channels (RM01–RM16).
6. Move the cursor to the desired bank button
(BANK parameter buttons 1–4), then press
[ENTER].
7. Press the LAYER [REMOTE] button to select
Remote layer.
You can now use the MIDI Remote function.
8. Use the faders and [ON] buttons to control
the MIDI device.
Tip: If the REMOTE parameter box is grayed out, proceed to
Steps 4 and 5 to set the TARGET parameter, then return to
Steps 2 and 3.
1
214
5
6
3