


100
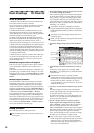
7 Set “Step No.” to 07, and press the [0] key.
Set “Pitch Offset” to +00.
8 Set “Step No.” to 08, and press the [0] key.
Set “Pitch Offset” to –02.
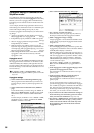
Chordal pattern
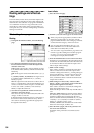
1 Set “Step No.” to 01, and press the [0] key.
Set “Gate” to Legato.
2 For “Step No.” 02, do not enter a tone.
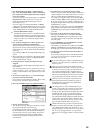
3 Set “Step No.” to 03, and press the [1], [2], [3], [4]
keys.
4 Set “Step No.” to 04, and press the [1], [2], [3], [4]
keys.
5 For “Step No.” 05, do not enter a tone.
6 Set “Step No.” to 06, and press the [1], [2], [3], [4]
keys.
Set “Gate” to Legato.
7 For “Step No.” 07, do not enter a tone.
8 Set “Step No.” to 08, and press the [1], [2], [3], [4]
keys.
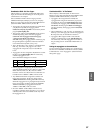
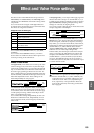
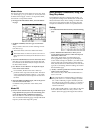
To simulate the timing nuances of a strummed guitar
chord, select “Flam.” In Program mode, select an
acoustic guitar program, and choose the user arpeg-
gio pattern that you created here. In the Arpeg. Setup
page of Program P7: Edit-Arpeggiator, set “Gate” to
Step.
Then return to the Global P6: User Arpeggio, Pattern
Edit page. For odd-numbered steps, set “Flam” to a
positive (+) value. For even-numbered steps, set
“Flam” to a negative (–) value.
Drum pattern
You can use the arpeggiator to play a rhythm pattern by
using “Fixed Note” with a drum program.
1 In Program mode, select a drum kit program.
For this example, select the preset program J036: Stan-
dard Kit 1.
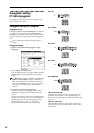
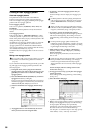
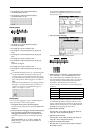
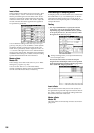
2 In Global P6: User Arpeggio, select the Pattern Setup
page, and make Arpeggio Pattern Setup settings.
“Arpeggio Tone Mode”: Set this to Fixed Note. This
will cause the tone to always sound at the specified
pitch.
“Fixed Note Mode”: If you set this to Trigger All
Tones, playing a single note on the keyboard will
sound all tones.
If you set this to Trigger As Played, the tones will be
sounded according to the notes you play on the key-
board (☞PG p.171).
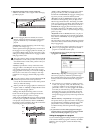
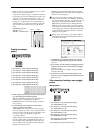
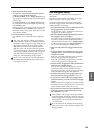
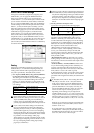
3 Select the Pattern Edit page.
Let’s input the following rhythm pattern.
4 Make settings for “Tone No.” and “Fixed Note No.”
Select “Tone No.,” and set “Fixed Note No.” to the
note number that will be sounded by that tone. For
each horizontal line (Tone) in the screen, you will spec-
ify the drumsample (note number) of the drum kit.
Each Tone will be displayed as a small circle.
For this example, set “Tone No.” and “Fixed Note No.”
as follows.
The drumsamples that correspond to each note num-
ber will differ depending on the drum kit. It is conve-
nient to audition the drum sounds from the keyboard,
and then input “Fixed Note No.” by holding down the
[ENTER] key and playing the desired key.
5 Input the kick (Tone00).
Set “Step No.” to 01, and press the [0] key. Then set
“Step No.” to 05, and press the [0] key.
6 Input the snare (Tone01).
Set “Step No.” to 03, and press the [1] key. Then set
“Step No.” to 07, and press the [1] key.
7 Input the closed hi-hat (Tone02).
Set “Step No.” to 01, 02, 03, 05, 06, and 07, and press
the [2] key for each.
Tone No. Fixed Note No.
00 C2 (kick)
01 F2 (snare)
02 F#3 (closed hi-hat)
03 A#3 (open hi-hat)