


65
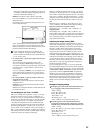
4 For Input1 and Input2, set “BUS (IFX/Indiv.) Select”
to specify the destination to which the external audio
signal you selected in “Input” will be sent.
L/R: Send to the L/R bus.
IFX1–IFX5: Send to the corresponding insert effect.
1, 2, 3(Tube), 4(Tube), 1/2, 3/4(Tube): Send to the jINDI-
VIDUAL 1–4, 1/2, or 3/4 bus(es).
Use “Level” to adjust the signal level. Normally you
will set this to 127. Use “Pan” to specify the stereo posi-
tion.
In the Input section (COMBI, PROG, SEQ, S.PLAY,
MEDIA) you can specify the send levels “Send1
(MFX1)” and “Send2 (MFX2)” to master effects 1 and 2.
These settings can be made if “BUS (IFX/Indiv.)
Select” is L/R or Off.
“Send1 (MFX1)” and “Send2 (MFX2)” cannot be set
in Sampling mode.
• The input from the AUDIO INPUT 1 jack is set by
Input1, and the input from the AUDIO INPUT 2 jack is
set by Input2.
• The L channel of the input from the S/P DIF IN jack is
set by Input1, and the R channel is set by Input2.
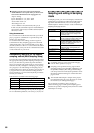
Example:
Send the signal from the AUDIO INPUT 1 jack in mono
to the L/R bus
Example:
Send the signal from the AUDIO INPUT 1 and 2 jacks
in stereo to the L/R bus
When “BUS (IFX/Indiv.) Select” is changed from Off
to L/R or IFX, please be aware that the volume level
of the AUDIO OUT L/MONO and R jacks and the
headphones may rise excessively.
An easy way to make these settings is to use the Auto
Sampling Setup “REC Audio Input” function. You
can do this in Sampling P0: Recording or in Program
P0: Play, Sampling.
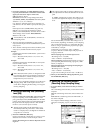
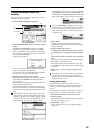
2. Setting the recording level (Recording
Level [dB])
1 Produce sound at the volume that you want to record.
If you are inputting via the AUDIO INPUT 1 and 2
jacks, gradually turn the [LEVEL] knob from the MIN
position toward MAX. Set the level immediately below
the point where the display indicates “ADC OVER-
LOAD !!” (AD converter input overload).
The best audio quality will be obtained at a level
immediately below the point where “ADC OVER-
LOAD !!” is displayed (i.e., the highest level that does
not produce an overload).
2 Press the SAMPLING [REC] key.
Produce sound at the volume that you want to record.
Watch the level meters to check the input volume.
Use the “Recording Level” slider to adjust the record-
ing level.
The output volume will not change at this time, but
your adjustment will affect the data that will be sam-
pled.
If “CLIP!!” is displayed, lower the “Recording Level”
(located at the right of the display) to an appropriate
level.
We recommend that you set the “Recording Level” as
shown below, depending on whether you are sampling
only an external input source, or resampling the play-
back of a song or a performance played on a program,
combination, or sample.
At this time you can also set “Auto +12 dB On”
(☞p.67) so that the recorded sample will play back at
an appropriate level.
When sampling only an external input source:
“Recording Level”: +0.0 (dB)
“Auto +12 dB On”: off (unchecked)
When resampling (sampling the playback of a song, or
your keyboard performance using a program, combi-
nation, or sample) or
When simultaneously resampling and sampling an
external audio source:
“Recording Level”: –12.0 (dB)
“Auto +12 dB On”: on (checked)
(☞p.67 “The recording level and “Auto +12 dB On””)
3 When you have finished making adjustments, press
the SAMPLING [REC] key.
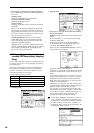
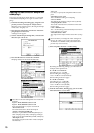
3. Specifying the recording method
(Recording Setup/Sampling Setup)
1 In “Source BUS,” select the source that you want to
sample.
The sound being sent to the bus you select here will be
sampled.
L/R: The sound being sent to the L/R bus will be sam-
pled.
Indiv.1/2: The sound being sent to the Individual 1, 2
bus will be sampled.
For examples of these settings, refer to the various
examples of sampling. (☞p.67, 70, 75, 82, 83, QS p.19,
22)
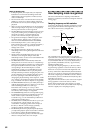
Input1 “BUS (IFX/Indiv.) Select” L/R, “Level” 127,
“Pan” L000
Input1 “BUS (IFX/Indiv.) Select” L/R, “Level” 127,
“Pan” L000
Input2 “BUS (IFX/Indiv.) Select” L/R, “Level” 127,
“Pan” R127
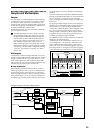
Program
Combination
SequencerSamplingSong PlayGlobalEffectMedia, etcPresetOther