72
If the edit cell is located at “Range Start” or “Range
End,” this region will play back.
When you finish making settings, press the
SEQUENCER [START/STOP] key to stop playback of
the audio CD.
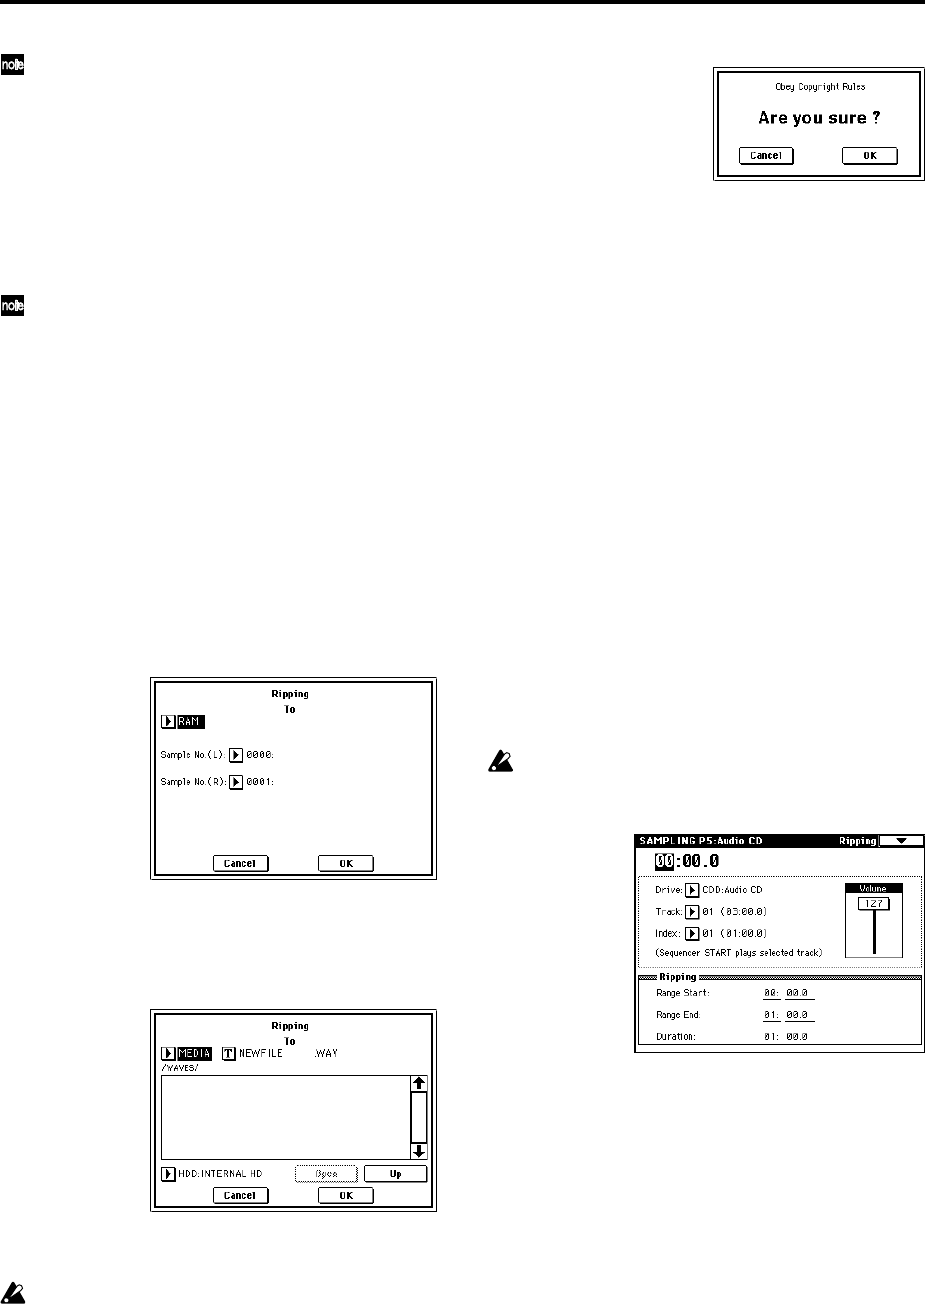
7 Verify the region that will be ripped.
Select either “Region Start” or “Region End” (the dis-
play will be highlighted), and press the SEQUENCER
[START/STOP] key. The CD will play from “Range
Start” to “Range End” and then stop.
If you want to adjust the location, use the VALUE
controllers to modify the “Range Start” or “Range
End” settings, or move the cursor to a parameter
other than “Range Start” and “Range End” and
repeat step 5 to make the setting once again.
If you want to move the track playback start location
to the beginning of the track, press the [LOCATE] key.
8 When you have finished setting “Range Start” and
“Range End,” select the page menu command “Desti-
nation.”
A dialog box will appear.
Specify the destination to which the ripped sample will
be written.
Select RAM if you want to rip the sample into sample
memory (RAM). In this case, you can also set Sample
No. (L), (R) to specify the sample number that will be
written. Normally you can leave this unchanged.
Select MEDIA if you want to rip the sample to media.
Use drive select to select the drive, and use the Open
and Up buttons to select the directory in which the
data will be saved. Also specify a name for the WAVE
file that will be saved.
9 Press the OK button to execute ripping, or press the
Cancel button to cancel without executing.
When you press the OK button, the “Obey Copyright
Rules” dialog box will appear.
Carefully read “About copyright” (☞QS p.iii), and if
you consent to the terms, press the OK button to
begin ripping. If you do not consent to the terms,
press the Cancel button to cancel the operation.
Reading the analog audio output of an audio CD into
a sample
Here’s how analog audio data from an audio CD track can
be loaded into a sample.
In the same way as when inputting the output of your CD
player to the TRITON Extreme’s AUDIO IN 1, 2 jacks, use
audio cables to connect the audio output of the CD-ROM
or CD-R/RW drive connected to the USB A connector to
the TRITON Extreme’s AUDIO INPUT 1, 2.
You can use the TRITON Extreme’s SEQUENCER
[START/STOP] key etc. to control operations such as
playback and stop on your CD-ROM or CD-R/RW drive.
1 Use audio cables to connect the audio outputs of your
CD-ROM or CD-R/RW drive (connected to the USB A
connector) to AUDIO INPUT 1, 2 of the TRITON
Extreme.
2 Insert an audio CD.
3 Access the Sampling mode P5: Audio CD, Ripping
page.
4 Use “Media” (media select) to select the drive that
contains the audio CD, and use “Track” to select the
track that you want to read.
Raise the “Volume.”
Some USB A connector CD-ROM or CD-R/RW
drives cannot be controlled in this way, so this setting
may not affect the volume.
5 In the P0: Recording, Input/Setup page, make Input
settings as follows.
“Input” Analog
Input1 “Level” 127, “Pan” L000, “BUS Select” L/R
Input2 “Level” 127, “Pan” R127, “BUS Select” L/R
6 Specify the recording method in Recording Setup.
“Source BUS” L/R
“Trigger” Sampling START SW
Sampling will start when you press the SAMPLING
[START/STOP] key.
“Resampling” Manual
7 In REC Sampling Setup, make settings for the sample
that will be recorded.
“Save to” RAM: if you want to write the sample into
sample memory (RAM)
“Save to” MEDIA: if you want to write the sample to
media
“Sample Mode” Stereo
“Sample Time” maximum


