


Using the mixer functions & effects
110
r
E-80 Music Workstation
Chorus for Keyboard parts
Chorus broadens the spatial image of the sound and
creates a stereo impression. You can choose from 8
types of Chorus.
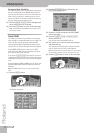
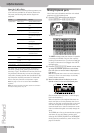
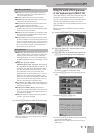
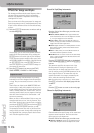
(1) Press the KEYBOARD [EFFECTS] button to call up
the following page.
On this page, you can switch the CHORUS processor
on and off by pressing the [OFF/ON] button icon to
the right of its “display”.
If you only need another chorus type, press the CHO-
RUS display and use the [DATA÷ENTRY] dial or the
[DEC]/[INC] buttons to select it. If you also need to
change certain aspects of that effect…
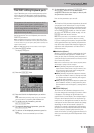
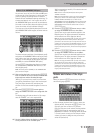
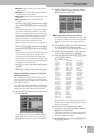
(2) Press the KEYBOARD CHORUS [EDIT] field to access
the Chorus parameters.
The display changes to:
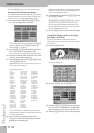
(3) Press the [ON] (or [OFF]) field to switch the proces-
sor on (icon lights) or off (icon goes dark).
You can also do so on the EFFECTS page (see above).
(4) Press the field of the effect type you wish to use.
The options are:
● Chorus1~Chorus3—These are conventional chorus
effects that add spaciousness and depth to the sound.
● Flanger—This is an effect that sounds somewhat like a
jet airplane taking off and landing.
● GM2 Chorus—This Chorus effect is Roland’s standard
type for GM2-compatible tone generators.
● Delay—This is a full-fledged delay effect that can be
used instead of a chorus or flanger. As you will see, there
are a lot of parameters you can program.
If you don’t want to edit the effects parameters, con-
tinue with the next step, otherwise jump to step (6).
(5) Press [Back] to return to the display page with the
“modules”.
—or—
Press the [EXIT] button to return to the main page.
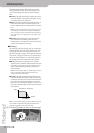
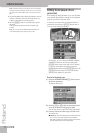
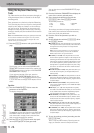
(6) After selecting a chorus type, you may want to
fine-tune some of its parameters. If so, proceed as
follows:
• Press the field of the parameter you wish to change
(the number of fields and their functions depend on
the selected type).
[CHORUS LEVEL] allows you to set the output level of
the Chorus processor. Setting this parameter to “0”
means that you no longer hear the effect in question.
[OUTPUT] allows you to specify where the processor’s
output signal should go: to the MAIN outputs
(“Main”), the Reverb processor (“Rev”) or both
(“Main+Rev”). The latter two options mean that the
chorus signal is also processed by the reverb effect
you select.
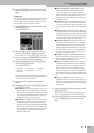
● Filter Type (Off, LPF, HPF)—This allows you to specify
whether or not the incoming signal should be filtered
before being processed by the chorus. This may be help-
ful to avoid a cluttered sound image or to preserve the
“punch” of bass signals. Select “OFF” if you don’t need
any filtering. “LPF” cuts the frequency range above the
“Cutoff Freq”. “HPF” cuts the frequency range below the
“Cutoff Freq”.
● Cutoff Freq (200~8000Hz)—Basic frequency of the fil-
ter. This has no effect if you select “OFF” as filter type.
● Pre Delay (0.0~100.0 ms)—Adjusts the delay time from
the direct sound until the chorus sound is heard.
● Rate Sync (Hz, Note)—Use this parameter to specify
whether (“Note”) or not (“Hz”) the modulation rate
should be synchronized to the Arranger or Recorder
tempo. Depending on your choice, the setting range of
the following parameter refers to a speed (Hz) or a note
value.
● Rate [Hz] (0.05~10.00Hz)
Rate [Note] (1/64T, 1/64, 1/32T, 1/32, 1/16T, 1/32., 1/
16, 1/8T, 1/16., 1/8, 1/4T, 1/8., 1/4, 1/2 T, 1/4., 1/2,
1/1 T, 1/2., 1/1, 2/1 T, 1/1., 2/1)—Specifies the modula-
tion speed. This can be either a frequency (Hz) or a note
value, depending on how you set the “Rate Sync” param-
eter above. “T” means “triplet” and a “.” refers to a dotted
note. “2/1” means that each cycle takes two measures/
bars. The advantage of working with a note value is that
the chorus will undulate in sync with the current
Arranger or Recorder tempo.
● Depth (0~127)—This parameter sets the depth at which
the chorus sound is modulated. Higher values result in a
more pronounced modulation.
● Phase (0~180 [deg])—Spatial spread of the sound (i.e.
the “stereoness” of the effect).
● Chorus Feedback (0~127)—This parameter sets the
level at which the chorus sound is re-input (fed back)
into the chorus. By using Feedback, a denser Chorus
sound can be created. Higher values result in a greater
feedback level.
Parameter values can be set by turning the
[DATA÷ENTRY] dial, by pressing the [DEC]/[INC] but-
tons or by pressing the [DATA÷ENTRY] dial and using
the on-screen numeric pad.
Chorus 1~3 and Flanger parameters