


Example 2: Adding tracks
E-80 Music Workstation
r
177
sequencer has a second Quantize function that you
can use more selectively (i.e., for notes that are defi-
nitely late/early). See p. 180.
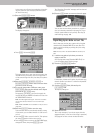
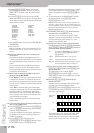
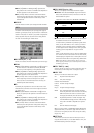
(17) Specify what should be recorded by activating the
corresponding RECORDING SELECT button icons:
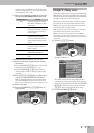
(18) Select the desired sound for your new track.
(19) Select the bar where playback and/or recording
should start:
• Press the RECORDER [TOP¥|√] button to return to the
beginning of the song (measure “1”). —or—
• Use the RECORDER [‰] (or [º]) button to select a
measure slightly ahead of where you want to start
recording.
(20) Press the [PLAY÷STOP¥®÷ª] button or play the first
notes (if you selected COUNT IN= “Wait Note”).
Note: The [PLAY÷STOP¥®÷ª] function can also be assigned to
the D Beam controller or an optional footswitch (see “Play/
Stop” on p. 74, “Play/Stop Song” on p. 76, “Play/Stop” on p. 77).
(21) Play the new part.
(22) Press the RECORDER [PLAY÷STOP¥®÷ª] button to
stop recording.
Example 2: Adding tracks
Here’s how to add a track to a song in the E-80’s Song
RAM memory. This is only meaningful after recording
at least one part or after playing back an existing song.
See page 174 for how to start a new song.
Please bear with us and perform all indicated steps to
get a feel for the way the 16-track Sequencer “ticks”.
Besides, what you learn here will also come in handy
for recording your own Music Styles.
Note: See also “Easy editing and useful functions” on p. 179 for
some additional functions that are not covered here.
Note: If the song you wish to supplement contains MAKEUP
TOOLS settings, be sure to “freeze” those data and to save your
new version before changing it. See “Before saving your settings”
on page 148.
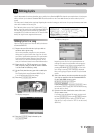
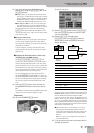
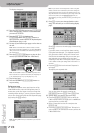
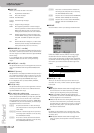
(1) Press the [16-TRK¥SEQ.] button.
The display changes to:
The “MEAS” field at the top of the display informs
you about the current measure. The tempo and time
signature are displayed next to it. Use the RECORDER
[º] and [‰] buttons to jump to another measure or
[TOP¥|√] to return to the beginning of the song.
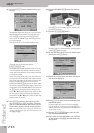
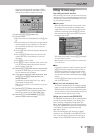
(2) Press the RECORDER [REC¥∏] button.
RECORDING SELECT Meaning
NOTE Only note messages are recorded.
(Pitch Bend, modulation, etc., data
are ignored.)
AFTERTOUCH Aftertouch messages are recorded.
This option should only be activated
if you really wish to record After-
touch messages.
CONTROL CHANGE Control change messages, such as
modulation (CC01), expression
(CC11), etc. (CC00 and CC32 bank
select messages also belong to this
group.)
PROGRAM CHANGE Program change messages. Only
necessary if the track should use
different sounds.
PITCH BEND Left/right movements of the
BENDER/MODULATION lever.
SYSTEM EXCLUSIVE SysEx messages for the MASTER
track.
PLAY/STOP
16-TRK
SEQ.
REC
●