


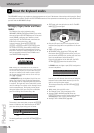

Quick Start
62
r
E-80 Music Workstation
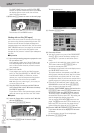
You have just selected the more detailed recording
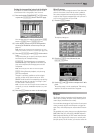
function (the “sequencer”). The display changes to:
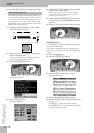
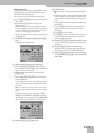
The colored bars in the right part of the display indi-
cate the tracks that already contain data.
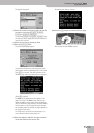
(3) Press the RECORDER [REC¥∏] button.
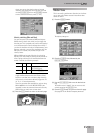
The display changes to:
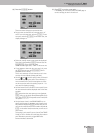
(4) Press the [REC¥TRK] field and use the [DATA÷ENTRY]
dial or the [DEC]/[INC] buttons to select the track
you want to record to.
For our example, select “11”.
If necessary, press the [REC¥TYPE] field and use the
[DATA÷ENTRY] dial or the [DEC]/[INC] buttons to select
“LW1”. This allows you to use the LW1 part for play-
ing an organ line (using the Harmonic Bars section)
or to record using a sound of an optional SRX-series
expansion board.
You can select sounds of an SRX-series expansion
board for any track you like. Some boards contain
loops (or grooves) whose tempo is automatically syn-
chronized to the song tempo.
(5) Assign the desired sound to the track selected for
recording.
See “Selecting sounds for the Keyboard parts” on
p. 29. You can play on the keyboard to check whether
the sound matches the mood of the part you wish to
record.
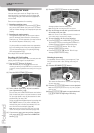
(6) Specify what should be recorded by activating the
corresponding RECORDING SELECT button icons.
(7) For this example, switch on NOTE, CONTROL
CHANGE, PROGRAM CHANGE and PITCH BEND. See
page 177 for an explanation.
(8) Press the RECORDER [TOP¥|√] button.
The sequencer returns to the beginning of the song
(measure “1”).
(9) Press the [PLAY÷STOP¥®÷ª] button.
The sequencer now counts in one measure, after
which recording starts.
Note: See page 81 for setting the Count-In function.
(10) Play the new part.
(11) Press the RECORDER [PLAY÷STOP¥®÷ª] button to
stop recording.
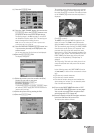
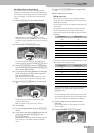
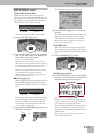
The display changes to:
The track that contains your new part is highlighted
(left column) for easy identification. That row also
contains a horizontal bar to signal that the track now
contains data.
(12) Listen to your song (page 60).
If you like it, save it, if you’re not happy with your
part, go back to “Adding more parts” on p. 61.
In step (3), however, press the [REC¥MODE] field and
use the [DATA÷ENTRY] dial or the [DEC]/[INC] buttons
to select “Replace”.
Note: See p. 179 if you want to change just single notes or
other aspects of your song (which is called “editing”).
REC
●
TOP
PLAY/STOP