


Using the 16-track Sequencer
176
r
E-80 Music Workstation
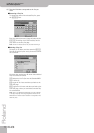
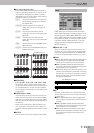
• Press the [GUITAR¥MODE] “display” and use the
[DATA÷ENTRY] dial to select “Acoustic” or “Electric”.
(Select “Off” if you want to use the track for some-
thing else.)
• Press the [SETTINGS] field to jump to the GUITAR
MODE page and set up your “guitar”. See page 36 for
details. Note, however, that the available sound have
slightly different names:
• Press the [EXIT] button to return to the REALTIME REC
STANDBY page.
• Skip to step (11).
Note: The “DOUBLING” function (Guitar Mode Options) is not
available here, because only one track can be recorded at any
one time.
(10) Assign the desired sound to the recording track
you selected.
See “Selecting sounds for the Keyboard parts” on
p. 29. You can play on the keyboard to check whether
the sound matches the mood of the part you wish to
record.
You can select sounds of an SRX-series expansion
board for any track you like. Some boards contain
loops (or grooves) whose tempo is automatically syn-
chronized to the song tempo.
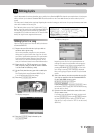
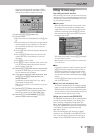
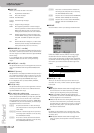
(11) Specify how the data will be added to the track
during recording (REC MODE):
Select “Replace” if the track contains data you wish
to replace with new data. This erases all data of the
selected track from the place where you start record-
ing until the end. (“Replace” is selected by default for
empty tracks.)
Select “Mix” to add new notes to the ones already
recorded on the selected track. This recording mode is
particularly useful for recording the rhythm track
(10) because you can first record the bass and snare
drums, then add a few tom hits here and there and
record the HiHat, for example.
(“Mix” is selected by default for tracks that already
contain data.)
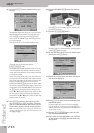
(12) If you don’t want to start and stop recording man-
ually, use the PUNCH fields:
• Press the [PUNCH¥IN] field and use the [DATA÷ENTRY]
dial or the [DEC]/[INC] buttons to specify the measure
where recording should start.
If you start playback a few bars before this position,
the sequencer will activate recording as soon as it
reaches this measure.
• Press the [PUNCH¥OUT] field and use the
[DATA÷ENTRY] dial or the [DEC]/[INC] buttons to spec-
ify the measure where recording should end.
Recording is deactivated when the sequencer reaches
this position. Playback will continue, however and
needs to be stopped using the [PLAY÷STOP¥®÷ª] but-
ton.
• To take advantage of the PUNCH IN/OUT function,
you need to switch on the [PUNCH¥IN] and/or
[PUNCH¥OUT] button icon.
Note: The Punch In/Out function can also be assigned to an
optional FC-7 pedal unit (see p. 76) or a footswitch (see p. 77).
For those applications, there is no need to set the PUNCH IN &
OUT positions beforehand. But you still need to press the
[FOOT¥PUNCH¥IN÷OUT] field.
(13) If necessary, press the [OCTAVE] field and set the
required octave transposition (–4~4).
This allows you to record “special noises” (usually
assigned to the lowest notes numbers), like the ones
of fingers sliding over guitar strings, etc., if the
selected sound provides them.
(14) Specify how long the count-in should be before
recording starts: press the [COUNT-IN] field and use
the [DATA÷ENTRY] dial or the [DEC]/[INC] buttons to
select one of the following options.
(15) If you want to record tempo changes, press the
[TEMPO¥REC¥SW] field and use the [DEC]/[INC] but-
tons to select “On”.
This option allows you to use the TEMPO
[√SLOW][FAST®] buttons and/or [TAP] to vary the
tempo while recording. Those changes are recorded
to the MASTER track.
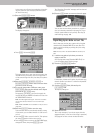
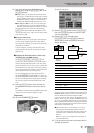
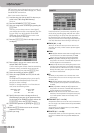
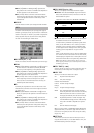
(16) Press the [INPUT¥QUANTIZE] field and set the
desired resolution.
Quantize corrects the timing of your notes by shift-
ing them to the nearest grid mark. Use the
[DATA÷ENTRY] dial or the [DEC]/[INC] buttons to spec-
ify the number of steps per measure (i.e., the resolu-
tion). Here is an example:
The setting range is: Off, 1/4, 1/8, 1/8T, 1/16, 1/16T,
1/32, 1/32T and 1/64. As this Quantize function
changes the way in which your notes are recorded,
you may want to select “Off” here. The 16-track
ELECTRIC
01: Jazz Man
02: OpenHard 1
03: Dist Guitar
04: OpenHard 2
05: Warm Drv
06: Strat Clean
07: CleanHalf
08: Distorsion
09: Overdrive
10: Power
11: Power 2
ACOUSTIC
01: Nylon
02: Steel 2
03: Steel 3
04: Steel 4
05: Steel 5
06: 12 Strings
07: Nyl + Steel
08: Nyl + Steel 2
Off No count-in. Recording starts as soon as you
press the [PLAY÷STOP¥®÷ª] button (while
[REC¥∏] flashes).
1 Meas Recording starts after a 1-bar count-in.
2 Meas Recording starts after a 2-bar count-in.
Wait Note Recording starts as soon as you play a note on
the keyboard. (There will be no count-in.)
12341
12341
12341
This is how you
played it.
1/8
1/16