


Recording Styles from scratch
E-80 Music Workstation
r
205
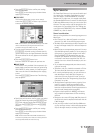
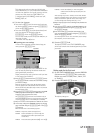
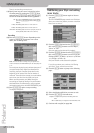
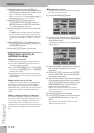
■Octave
The field next to [KEY] allows you to transpose the
keyboard in octave steps, which may be convenient
for extremely high or low notes – or for using the
special “noises” of certain sounds.
(14) Press the [OCTAVE] field and use the [DATA÷ENTRY]
dial to transpose the keyboard up or down (–4~+4
octaves).
(15) The current tempo value may be a bit fast for
recording, so change it by pressing the tempo field
and using the [DATA÷ENTRY] dial or the [DEC]/[INC]
buttons.
The tempo value you set here is recorded and
regarded as preset tempo. You can change it at any
stage in STYLE COMPOSER mode, so start by selecting
a tempo that allows you to record the music the way
you want it to sound.
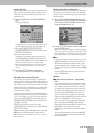
INPUT QUANTIZE is a function that corrects minor
timing problems. It shifts the notes whose timing is
not exactly right to the nearest “correct” unit.
Always select a resolution value that is fine enough
to accept all note values you play. If the shortest
notes of your accompaniment are 1/16th-note trip-
lets, set the INPUT QUANTIZE value to “1/16t”.
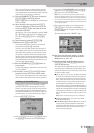
(16) Press the [INPUT¥QUANTIZE] field and use the
[DATA÷ENTRY] dial to specify the quantize value.
The preset value, “1/16”, is OK for most situations. If
you do not want quantize your playing while record-
ing, set this parameter to “Off”.
You can also quantize the track after recording it
(page 213).
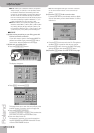
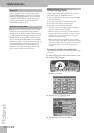
To record a guitar part onto the selected track (only
available for the Accomp tracks):
• Press the [GUITAR¥MODE] “display” and use the
[DATA÷ENTRY] dial to select “Acoustic” or “Electric”.
(Select “Off” if you want to use the track for some-
thing else.)
• Press the [SETTINGS] field to jump to the GUITAR
MODE page and set up your “guitar”. See page 36 for
details. Note, however, that the available sound have
slightly different names:
• Press the [EXIT] button to return to the STL
COMPOSER REC STANDBY page.
Note: The “DOUBLING” function (Guitar Mode Options) is not
available here, because only one track can be recorded at any
one time.
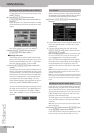
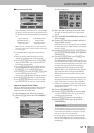
(17) Press the [REC¥MODE] field in the lower left corner
and use the DATA ENTRY [DEC]/[INC] buttons to
select the recording mode.
● Replace—Everything you record replaces the data of the
selected track. This mode is automatically selected when
you activate the record function for a track that does
not yet contain data. If you select a track that already
contains data, this parameter is set to “Mix” but could be
changed to “Replace” if you wanted to overwrite the
previous version.
● Mix—The data you record are added to the existing data
of the selected track.
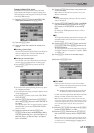
Every Style pattern must have a set length. Setting
the MEASURE LENGTH value now will help you avoid
a lot of confusion once you start recording.
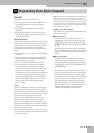
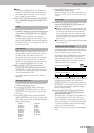
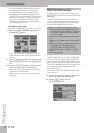
The Arranger tends to add blank bars at the end of a
track, which is usually due to the fact that you
stopped recording a little late (i.e. after the last bar
you played). This means that you often “record” 5
measures instead of 4, for example:
Furthermore, in STYLE COMPOSER mode, all patterns
are looped and played back until you press the
[START÷STOP] button. A wrong number of measures
(5 rather than 4, for example) is very likely to put you
off, so do take the time to set the pattern length
before you start recording.
(18) Press the [MEASURE¥LENGTH] field and use the
[DATA÷ENTRY] dial or the [DEC]/[INC] buttons to
select the desired length.
The setting range is 1~136 (or more, depending on
the time signature) and “Off”. Select “Off” if you
haven’t decided how long the pattern should be. In
that case, the length is set when you stop recording.
It is perfectly possible to specify a different length
value for each track and Division.
Note: Even one-shot patterns are looped in STYLE COMPOSER
mode.
Tempo
Input Quantize
Recording a guitar part
ELECTRIC
01: Jazz Man
02: OpenHard 1
03: Dist Guitar
04: OpenHard 2
05: Warm Drv
06: Strat Clean
07: CleanHalf
08: Distorsion
09: Overdrive
10: Power
11: Power 2
ACOUSTIC
01: Nylon
02: Steel 2
03: Steel 3
04: Steel 4
05: Steel 5
06: 12 Strings
07: Nyl + Steel
08: Nyl + Steel 2
Record mode
Specifying the pattern length
If you press
[START÷STOP]
after bar 4…
…your Style looks like this (5 bars):