


About the sequencer’s main page
E-80 Music Workstation
r
173
14. Using the 16-track Sequencer
Your E-80 contains a powerful sequencer with a host
of edit functions. Even so, you will quickly notice that
the 16-track Sequencer is as simple to operate as it is
powerful.
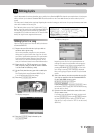
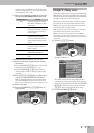
When you press the RECORDER [16-TRK¥SEQ.] button,
the display changes to:
• If you use the 16-track Sequencer to edit a song that
already contains Cover modifications, the Cover set-
tings are ignored and erased when you save the
edited version of your song. We therefore recom-
mend “freezing” the Cover settings before continuing
(see p. 148).
• While in this mode, the [BALANCE] knob does not
allow you to set the balance between the Song and
Keyboard parts (it only affects the volume of the
Song parts).
• While the E-80’s 16-track Sequencer is selected, the
notes played on the keyboard are not transmitted via
MIDI.
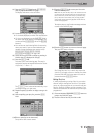
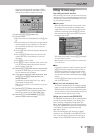
About the sequencer’s main page
Let us first look at the information shown on this page:
The [SOLO] button icon allows you to listen to the
selected track in isolation (it mutes all other tracks). The
selected track is displayed in yellow. To select another
track, simply press its row in the left column of the dis-
play. (You can also use the [ß][†] buttons to select a
track.)
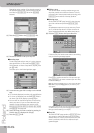
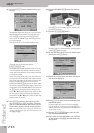
The [MUTE] button icon allows you to temporarily
switch off the selected track, which may be useful
when you want to record or edit additional parts with-
out being distracted by already existing parts.
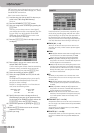
SOLO and MUTE need to be set as follows: First press
the [SOLO] or [MUTE] field, then press the fields of the
tracks you want to solo or mute (you can mute several
tracks).
Note: The MUTE function is not available while the SOLO func-
tion is on. You can, however, select another track at that time,
which is then played back in isolation. The SOLO function, on the
other hand, can be activated while the MUTE function is on.
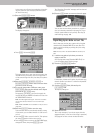
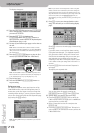
Soloed tracks are flagged with an “S”, while muted
tracks use the letter “M”. The remaining indications in
the second column from the left are:
“q” (note symbol): The track is currently playing. If you
look at the example above, you will notice a vertical line
on top of several horizontal bars. The vertical line refers
to the current position within the song (which is also
indicated in the “MEAS” field). The horizontal bars indi-
cate that a track contains musical data in that position.
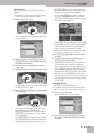
Now look again at the illustration: only the tracks that
contain note data at the current position and that are
not muted have the “q” symbol.
If, while the page above is displayed, you press the
RECORDER [REC¥∏] button, track “1” (which is currently
selected) will be flagged with an “R” (for “Record”). You
can only record one track at any one time.
The button icons in the right-most column are:
General considerations
The 16-track sequencer can be used to record sequen-
tially onto 16 tracks (one track after the other). Since
the 16-track sequencer and the Recorder share the
same RAM memory (they are, in fact, different incarna-
tions of the same concept), you can lay down your first
tracks using the Recorder (with or without Arranger)
and then select the 16-track sequencer to add new
tracks or change existing ones. The Recorder allows for
simultaneous multitrack recording, which is not possi-
ble with the 16-track Sequencer. While you are working
with the 16-track Sequencer, the Arranger is not avail-
able.
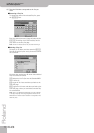
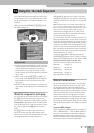
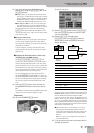
Tracks and MIDI channels
Tracks are assigned to MIDI channels on a 1:1 basis (i.e.
Track 1= MIDI channel 1,… Track 12= MIDI channel 12,
etc.). Since the Keyboard parts have been assigned to
the MIDI channels in such a way as to allow for easy
Minus-One playback using the Recorder (page 41), you
should take a minute to study the table below.
Important notes
16-TRK
SEQ.
TRACK EDIT see page 179
MICRO EDIT see page 193
MASTER TRACK see page 189
INITIALIZE SONG see page 175
STYLE CONVERTER see page 197