


Using the performance functions
72
r
E-80 Music Workstation
● Keyboard Exchange UP2/1—Allows you to switch off
the UP1 part and activate the UP2 part – and vice versa.
Note: If neither UP1 nor UP2 are on when you first press
the ASSIGN SW button, one of them is activated.
● Keyboard Exchange LW2/1—Allows you to switch off
the LW1 part and activate the LW2 – and vice versa.
Note: If neither LW1 nor LW2 are on when you first press
the ASSIGN SW button, one of them is activated.
● MBass/Keyboard Arranger—Allows you to set the
Arranger Chord parameter to “Off” (chord recognition as
well as ABS recognition off, see p. 89) and, at the same
time, select the SPLIT Keyboard mode and activate the
MBS part – and vice versa.
Note: Pressing the ASSIGN SW button you assign this func-
tion to does not mean that the Arranger stops. If you
switched on the Arr Hold function (page 89), the last recog-
nized chord will go on sounding, so that your MBS part may
drown in the accompaniment. We therefore suggest you
assign the “Arranger Hold” function (see above) to the other
ASSIGN SW button and use it to switch off the Arranger
Hold function, so that the Arranger only plays the drum
pattern of the selected Style.
● Piano/Standard—By pressing the ASSIGN SW button,
you alternate between the Standard and Piano Style
Arranger Chord modes. When the former is selected, the
chord recognition area (page 89) is automatically set to
LEFT. When you switch to Piano Style, the chord recogni-
tion area is automatically set to WHOLE. Furthermore,
the Upper 1 part is activated (if it was off).
● Break Mute—This function can only be accessed via the
ASSIGN SW button you assign it to. When you press it,
Arranger playback is muted for the remainder of the cur-
rent measure. This is great for rock’n’roll songs.
(3) Press the [EXIT] button to return to the main page.
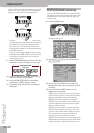
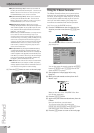
Using the D Beam Controller
The D Beam Controller allows you to control various
aspects of your performance or to add something to
the music, by moving your hand, head, etc., in the air.
You only need to make sure that you do so over the
two “eyes” and within a 40cm (±16”) range. Your
movements are translated into musical expression.
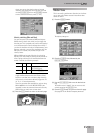
Let’s first try out the DJ GEAR functions.
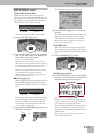
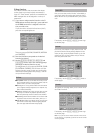
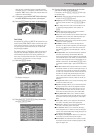
(1) Press the D BEAM button that is assigned to the
function you wish to use (here the [DJ¥GEAR] but-
ton):
This switches on the D Beam controller, while the dis-
play changes to:
You can also select this page by pressing the [MENU]
button‰ [D¥BEAM] field‰ [DJ¥GEAR] field. But the
above method is a lot faster.
(2) Start playback of a Style (page 25) or song
(page 41).
(3) Move your hand towards and away from the D
Beam’s “eyes”.
What you hear now is the “VinylRPM” effect. Now
let’s do some scratching…
(4) Press the [SCRATCH] field.
(5) Again move your hand towards and away from the
D Beam.
Now you should hear a scratch sound.
Try out some other effects by pressing the
[SOUND¥EFX], [INSTRUMENTS] and [CONTROL] fields
and selecting one of the available options.
(6) Press the [EXIT] button to return to the main page.
EXIT