


Select the Master Clock
Synchronize the VS-880EX’s reference clock (the mas-
ter clock) with the digital signal from the digital audio
device.
1. Press [SYSTEM] several times until “System PRM
?” appears in the display.
2. Press [YES].
3. Press PARAMETER [ ] several times until
“SYS MasterClk=” appears in the display.
4. Rotate the TIME/VALUE dial.
MasterClk (Master Clock)
This sets the VS-880EX’s reference clock. In this case,
select “DIGIN1” or “DIGIN2.”
DIGIN1: Based on the digital signal received from
the DIGITAL IN connector (coaxial).
INT: Based on the VS-880EX’s reference clock.
DIGIN2: Based on the digital signal received from
the DIGITAL IN connector (optical).
* When you change the master clock value, clicking noise
may happen. Please turn down the master fader of the VS-
880EX, or the volume of the amplifier beforehand.
5. Press [PLAY (DISPLAY)].
Return to Play condition.
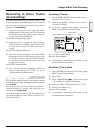
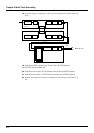
Select an Input Source
Here we will explain how to select an input source,
using the example of recording a digital signal on
tracks 1 and 2. Here we will explain how to select
input sources, using the example of recording a digital
signal (stereo) to tracks 1 and 2. The left channel will
be recorded on track 1, and the right channel on track
2.
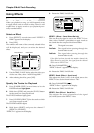
Using [STATUS]
1. Press [FADER (EDIT)] several times to let the
FADER indicator light orange. (Input Mixer)
2. While pressing [REC], press the STATUS buttons
for Tracks 1 and 2.
The STATUS indicators light red.
3. While pressing the STATUS button for Track 1,
press [SELECT (CH EDIT)] on Channel 8.
4. While pressing the STATUS button for Track 2,
press [SELECT (CH EDIT)] on Channel 7.
5. As described in “Recording to the Tracks” (p. 42),
record and check the contents.
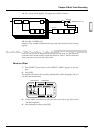
Using [YES]/[NO]
1. Press [FADER (EDIT)] several times to let the
FADER indicator light green. (Track Mixer)
2. Press [SELECT (CH EDIT)] on Channel 1.
3. Press PARAMETER [ ] [ ] to let “TR1
Assign” appears in the display.
4. Rotate the TIME/VALUE dial to let “TR1 Assign
IN7” appears in the display.
5. Press [YES].
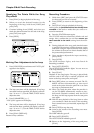
If “Digital In Lock” is Displayed
This indicates that the reference clock for the sam-
ple rate is set by the digital signal from the DIGI-
TAL IN connector. You can record using the digi-
tal connection.
If “Digital In Unlock” is Displayed
This indicates that no digital signal is being
received from the DIGITAL IN connector.
Alternatively, it may indicate that the sample rate
selected for the song does not match the sample
rate of the digital device connected to the DIGI-
TAL IN connector. In this state, you cannot record
using the digital connection.
Chapter 3 Multi-Track Recording
56