


With the VS-880EX, there are two functions to recall
mixer settings easily. One is refered to as the
Scene,
and the other one is referred to as the EZ Routing.
According to the circumstances, please use each func-
tion.
Scene:
A Scene stores the current mixer settings, include that
setting values in a song. For example, during mix-
down, you can create a number of mixes with different
settings for volume, pan, equalizer, etc., and compare
those mixes, each one with all of its settings preserved.
This is a very convenient feature.
EZ Routing:
The VS-880EX can store settings related to its mixer
connections. These include settings for routing of
inputs to tracks for recording, for determining where
signals are output, and for determining which output
is to be monitored. For example, these settings, which
stay the same, regardless of the song, include playback
and recording track settings during track bouncing,
and effects settings during mixdown. This makes EZ
Routing convenient in such situations.
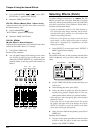
Recording the Current Condition of
the Mixer (Scene)
Up to 8 sets of settings, values included, that define
the total condition of the mixer can be stored for each
song, and can be recalled instantly at the touch of a
button. A stored set of mixer settings is called a
Scene. A Scene includes not only the volume and pan
settings, but also connections (e.g., the track to which
the source from the INPUT 1 jack is recorded), V-track
settings (the track to which each is recorded), and
effects (such as the selection of the effect to be
applied). This feature is convenient when you want to
compare different balances of volume, pan, equalizer,
and other settings during mixdown.
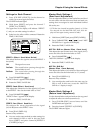
Storing a Scene
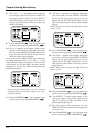
1. Press [SCENE].
The SCENE indicator lights.
2. At this point, the LOC button ([1/5]–[4/8]) act to
store or recall scene.
Indicators light for any LOC buttons ([1/5]–[4/8])
storing scene.
3. Press a LOC button ([1/5]–[4/8]) whose button
indicator does not light. For example, if you want
to record to Scene 1, then press [1/5]. If you wish
to store the settings in Scene 5, hold down
[SHIFT] and press [1/5].
4. Press [SCENE] once more..
The SCENE indicator will go dark. If you wish to halt
the registration procedure, press [SCENE] before step
3.
Recalling a Scene
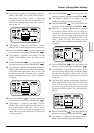
1. Press [Stop].
* You cannot select a Scene during recording or playback.
2. Press [SCENE].
The SCENE indicator lights.
3. At this point, the LOC button ([1/5]–[4/8]) act to
store or recall scene. Indicators light for any LOC
buttons ([1/5]–[4/8]) storing scene.
4. Press a LOC button ([1/5]–[4/8]) whose button
indicator lights. For example, if you want to recall
the Scene 1, then press [1/5]. If you wish to recall
Scene 5, hold down [SHIFT] and press [1/5].
5. Press [SCENE] once more.
The SCENE indicator will go dark. If you wish to halt
the recall procedure, press [SCENE] before step 4.
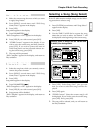
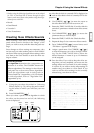
Recalling a Scene Without Affecting
the Current Fader Values
When a Scene is recalled, the fader values will change
to the recalled settings. However, the positions of the
top panel’s faders themselves do not change. This
means that the locations of the faders will not match
their actual values.
If you want just the fader values to remain unchanged
when you recall a Scene, make the following settings.
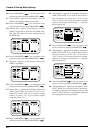
1. Press [SYSTEM] several times until “SYS
Scene/Auto Mix ?” appears in the display.
2. Press [YES].
“SYS Scene Mode=” appears in the display.
3. Use the TIME/VALUE dial to select “KeepF.”
Chapter 5 Storing Mixer Settings
73
Chapter 5