


12
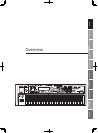
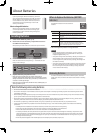
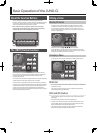
Rear Panel Connections
The JUNO-Gi does not contain an amp or speakers. In order to produce sound, you’ll need to connect the rear panel OUTPUT jacks to an audio device
such as an ampli ed speaker system (subsequently referred to as “speakers”), or use headphones.
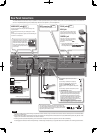
MIDI connectors
p. 133
For connecting MIDI device.
PEDAL jacks
p. 30
HOLD jack
Here you can connect a pedal switch
(such as one from the DP series; sold
separately) and use it as a Hold pedal.
CONTROL jack
Here you can connect an expression
pedal (EV-5; sold separately) and use
it to control various parameters or
functions.
* Use only the speci ed expression pedal (EV-5; sold
separately). By connecting any other expression pedals, you
risk causing malfunction and/or damage to the unit.
NOTE
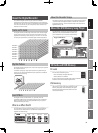
• To prevent malfunction and/or damage to speakers or other devices, always turn down the volume, and turn o the power on all devices before
making any connections.
• When connection cables with resistors are used, the volume level of equipment connected to the inputs (AUDIO INPUT jacks) may be low. If this
happens, use connection cables that do not contain resistors.
• Howling could be produced depending on the location of microphones relative to speakers. This can be remedied by:
1. Changing the orientation of the microphone(s). 2. Relocating microphone(s) at a greater distance from speakers. 3. Lowering volume levels.
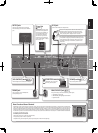
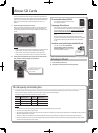
LINE OUT jacks
of your stereo
system
OUTPUT jacks of your keyboard
Output jack of your digital
audio player
If you connect a guitar or bass, set this to
“GUITAR.”
If you’re using a condenser microphone,
connect it to the balanced (XLR) jack and
choose the “PHANTOM ON” setting.
(Phantom power is not supplied to the phone
jack.)
If you’re using a dynamic microphone, choose
the “PHANTOM OFF” setting.
* Always turn the phantom power o when connecting
any device other than condenser microphones that
require phantom power. You risk causing damage if
you mistakenly supply phantom power to dynamic
microphones, audio playback devices, or other devices
that don’t require such power. Be sure to check the
speci cations of any microphone you intend to use by
referring to the manual that came with it.
(This instrument’s phantom power: 48 V DC, 10 mA Max)
Always turn the phantom power o when connecting
AUDIO INPUT jacks
p. 92
Connect the equipment that you’ll be recording on the
Digital Recorder.
Use the LINE jacks to connect your audio player or audio
device.
Connect your microphone or guitar to the GUITAR/MIC jack
as shown in the illustration.
To adjust the level, use the [LEVEL]
knob located at the left of the jacks.
Adjust the knob so that the front
panel PEAK indicator lights orange
during the loudest passages. If this
indicator lights red, input overload
has occurred.
it to control various parameters or
Use only the speci ed expression pedal (EV-5; sold
separately). By connecting any other expression pedals, you
risk causing malfunction and/or damage to the unit.
Use only the speci ed expression pedal (EV-5; sold
separately). By connecting any other expression pedals, you
risk causing malfunction and/or damage to the unit.
referring to the manual that came with it.
(This instrument’s phantom power: 48 V DC, 10 mA Max)
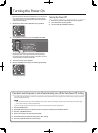
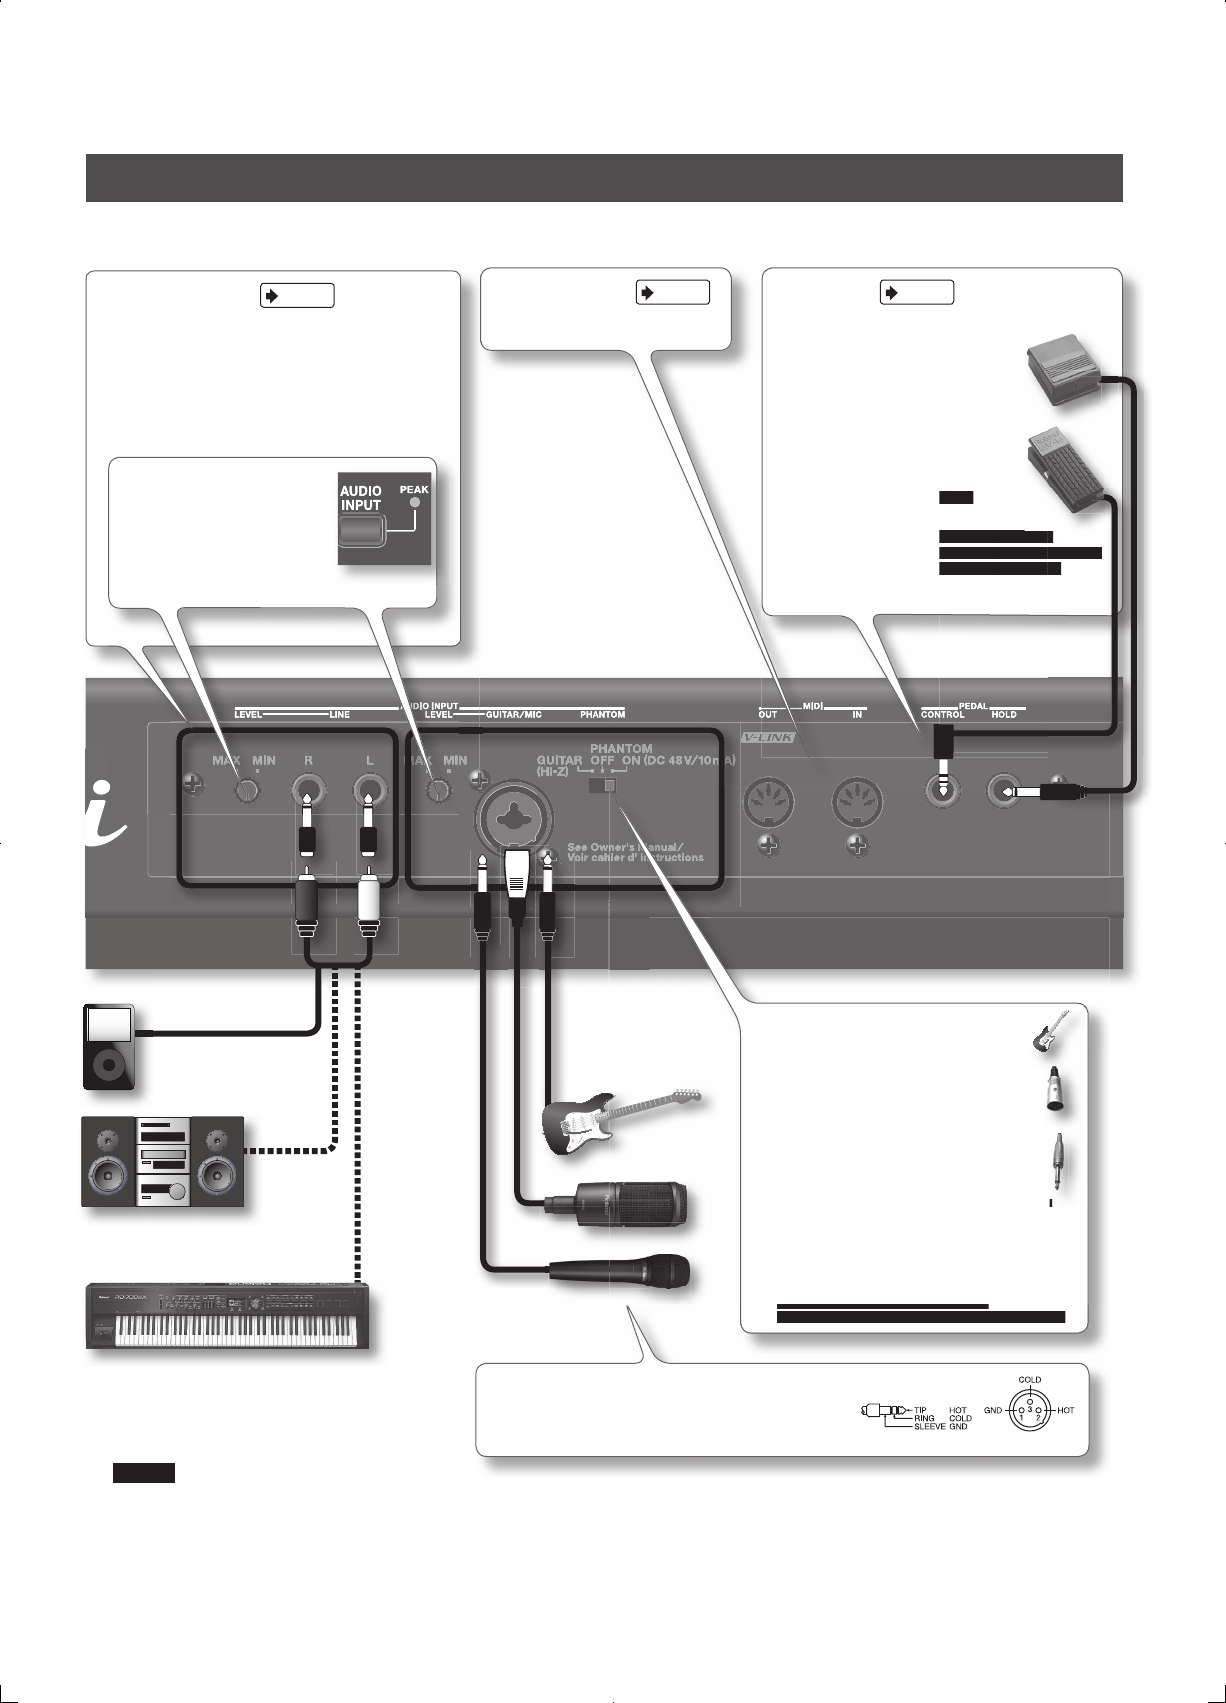
This instrument is equipped with balanced (XLR/TRS) type
jacks. Wiring diagrams for these jacks are shown below. Make
connections after rst checking the wiring diagrams of other
equipment you intend to connect.