


133
Overview
Appendix
USB Memory
Song Player
Digital Recorder
Synthesizer
Selecting Sounds Perform. Functions Editing/Eects Other Settings
Rec/Play/Edit Eects Rhythm Pattern
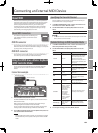
About MIDI
MIDI (Musical Instrument Digital Interface) is a standard speci cation
that allows musical data to be transferred between electronic musical
instruments and computers. If a MIDI cable is connected between
devices equipped with MIDI connectors, you’ll be able to play
multiple devices from a single MIDI keyboard, perform ensembles
using multiple MIDI instruments, program the settings to change
automatically as the song progresses, and more.
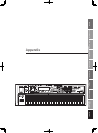
About MIDI Connectors
The JUNO-Gi is equipped with the following two
types of MIDI connectors, each of which has the
following role.
MIDI IN connector
This connector receives MIDI messages that are sent from an external
MIDI device. When the JUNO-Gi receives MIDI messages, it can respond
by playing notes, switching sounds, etc.
MIDI OUT connector
This connector transmits MIDI messages to an external MIDI device.
Use it when you want to control an external MIDI device.
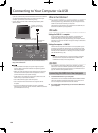
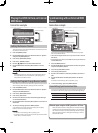
Using the JUNO-Gi as a Master Keyboard
( MIDI Controller Mode)
You can connect external MIDI devices to the JUNO-Gi’s MIDI OUT
connector, and use the JUNO-Gi to control the connected MIDI
devices.
Connection example
MIDI IN connector
MIDI sound module
JUNO-Gi
MIDI OUT connector
1. Press the [MIDI CTRL] button so it’s lit.
The MIDI CONTROLLER screen will appear, and the JUNO-Gi will be in
MIDI Controller mode.
When you press one of the [0]–[9] buttons, the program change
message assigned to that button will be transmitted.
You can use the knobs, sliders or buttons to transmit control change
messages (refer to “Detailed Settings in MIDI Controller Mode”).
2. To exit MIDI controller mode, press the [MIDI CTRL] button to
turn o the button’s illumination.
NOTE
The Digital Recorder, D Beam controller, [S1] [S2] buttons, Arpeggio
and Chord Memory will not operate when you’re in MIDI controller
mode.
Specifying the Transmit Channel
Set the JUNO-Gi’s transmit channel so it matches the channel your
external MIDI device is using for reception.
1. In the MIDI CONTROLLER screen, use the cursor buttons to
move the cursor to the “MIDI Ch” value.
2. Use the VALUE dial or the [DEC] [INC] buttons to set the
value.
Value 1–16
MEMO
For details on how to set the receive channel of your external MIDI
device, refer to its owner’s manual.
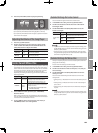
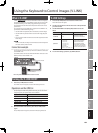
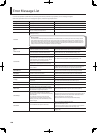
Detailed Settings in MIDI Controller Mode
1. In the MIDI CONTROLLER screen, use the cursor buttons to
select the parameter that you want to edit.
2. Use the VALUE dial or the [DEC] [INC] buttons to set the
value.
Parameter Value Explanation
Local Sw OFF, ON
Speci es whether MIDI messages
will be sent to the JUNO-Gi’s own
internal sound generator when
you operate the JUNO-Gi.
When Local Sw is ON, the volume
will be the value speci ed by “SMF
Level” (p. 83).
MIDI Ch 1–16
Speci es the channel on which
MIDI messages will be transmitted.
Button 0–9
Selects the number of the button
for which you’ll assign an MSB,
LSB, and PC.
PC 1–128
Program Change number that is
transmitted
MSB 0–127, OFF
MSB that is transmitted
(If this is “OFF,” LSB will also be
turned OFF.)
LSB 0–127, OFF
LSB that is transmitted
(“OFF” will be automatically
selected if MSB is “OFF.”)
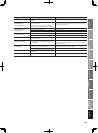
Controller
RHYTHM SLIDER,
TRACK 1–4 SLIDER,
MASTER SLIDER,
SONG TOP SWITCH,
BWD SWITCH,
FWD SWITCH,
STOP SWITCH,
PLAY SWITCH,
REC SWITCH,
RHYTHM SWITCH,
TRACK 1–4 SWITCH,
1-4 5-8 SWITCH,
KNOB 1–6
Selects the controller for which
the setting is to be changed.
MIDI Message
CC01–31,
CC33–127, PITCH
BEND, AFTER-
TOUCH
Speci es the MIDI message
assignment for the controller.
3. To save your settings, press the [WRITE] button.
Connecting an External MIDI Device