


34
Synthesizer 3 (Editing/E ects)
If you want to create an original sound on the JUNO-Gi, you can edit a
live set.
On the JUNO-Gi, it’s not possible to edit or rewrite the tones
themselves. However, you can select the tones that are played by a live
set, and make relative adjustments (o sets) to the values of each tone.
The simplest way to create your own sound is to choose a live set that’s
close to what you have in mind, and then try exchanging di erent
tones to combine the sounds in di erent ways.
You can save the edited result in a user live set.
Basic Operations in the LIVE SET EDIT
Screen
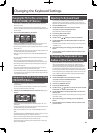
Displaying the LIVE SET EDIT screen
1. Select the live set that you want to edit (p. 22).
MEMO
If you want to create a live set from scratch, initialize the live set as
described in “Initializing a Live Set” (p. 35).
2. Press the [MENU] button.
3. Use the VALUE dial or cursor buttons to select “1. Live Set
Edit,” and then press the [ENTER] button.
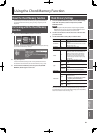
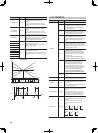
The LIVE SET EDIT screen will appear.
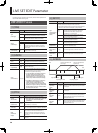
Layer (U indicates Upper, L indicates Lower)
Layer (U indicates Upper, L indicates Lower)
MEMO
Use the cursor [ ] [ ] buttons to scroll the LIVE SET EDIT screen to
left or right. If the screen shown in the illustration does not appear,
continue pressing the cursor [ ] button until the screen appears.
Moving within the LIVE SET EDIT screen
4. Use the following buttons to move within the LIVE SET EDIT
screen.
Button Explanation
Cursor [
] [ ]
Move the cursor left/right. When the cursor reaches
the edge of the screen, the screen will scroll to the
left or right.
[SHIFT]+[
] [ ]
Scroll the screen left/right.
Function Buttons
[1]–[5]
Jump to the screen indicated by the button.
[6] (PAGE g)
Moves between pages in the order shown below.
LIVE SET EDIT 1 g 2 g 3 g 1 g …
[5] (PRO EDIT)
(LIVE SET EDIT 3
screen only)
Moves to the PRO EDIT screen.
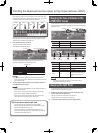
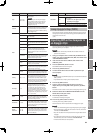
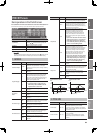
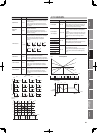
LIVE SET EDIT 1 LIVE SET EDIT 2 LIVE SET EDIT 3
PRO EDIT
LIVE SET EDIT 1
LIVE SET EDIT 2
LIVE SET EDIT 3
For details on each screen, refer to the following pages.
Screen Explanation Page
LIVE SET EDIT 1 Layer settings 1 p. 36
LIVE SET EDIT 2 Layer settings 2 p. 37
LIVE SET EDIT 3 Settings for the entire live set p. 38
PRO EDIT
Detailed settings for each tone assigned
to the layers
p. 39
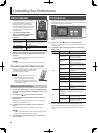
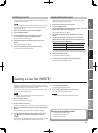
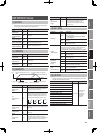
Layer On/O
Each layer’s on/o setting is indicated as shown below.
Layer (highlighted means on)
Layer (highlighted means on)
5. You can turn each layer on/o by holding down the [SHIFT]
button and pressing the [1]–[4] buttons.
Button Layer
[SHIFT]+[1] U1 (Upper 1) On/O
[SHIFT]+[2] U2 (Upper 2) On/O
[SHIFT]+[3] L1 (Lower 1) On/O
[SHIFT]+[4] L2 (Lower 2) On/O
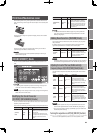
Entering a value
6. Use the cursor buttons to move the cursor to the parameter
that you want to edit, and use the VALUE dial or the [DEC]
[INC] buttons to change the value.
When you’ve nished editing
7. When you’ve nished editing, press the [EXIT] button.
You will return to the LIVE SET PLAY screen.
Saving
If you return to the LIVE SET PLAY screen without saving your changes,
an “*” is shown at the left side of the live set group.
If you turn o the power or switch to a di erent live set while this “*” is
displayed, the changes you made will be discarded. If you want to keep
your changes, you must save the live set.
8. Press the [WRITE] button and proceed as described in
“Saving a Live Set (WRITE)” (p. 35).
Editing a Live Set (LIVE SET EDIT)