


124
Editing a Pattern (PATTERN EDIT)
In addition to using the patterns that are provided, you are also free to
create your own patterns. Your edited content can be saved either as a
user pattern or a song pattern.
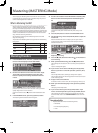
Displaying the PATTERN EDIT screen
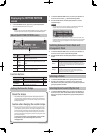
1. In the RHYTHM PATTERN screen, press the [2] (PTN EDIT)
button.
The PATTERN EDIT screen will appear.
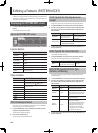
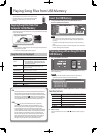
About the PATTERN EDIT screen
Function buttons
Button Explanation
[1] (SETUP)
Speci es the time signature and length of the
pattern.
[2] (NOTE SET) Speci es the type, duration, and volume of the note.
[3] (CLR STEP)
Clears all notes from the vertical axis of the cursor
position.
[4] (CLR NOTE)
Clears all notes from the horizontal axis of the cursor
position.
[5] (SCALE) Speci es the scale grid.
[6] (WRITE) Saves the pattern.
[SHIFT]+
[6] (INIT)
Initializes the pattern.
Other controllers
Controller Explanation
Cursor buttons Select the position at which to enter a note
Keyboard
Specify the scale
(equivalent to the cursor [
] [ ] buttons)
[ENTER]
Enters/deletes a note
[DEC] [INC]
[
] (PLAY)
Plays the pattern
[n] (STOP)
Stops the pattern
[
]
Moves the editing location to the beginning
[
]
Moves the editing location toward the beginning
[
]
Moves the editing location toward the end
INIT (Initializing a Pattern)
If you want to create a pattern from scratch rather than by modifying
an existing one, you can initialize the pattern.
1. In the PATTERN EDIT screen, hold down the [SHIFT] button
and press the [6] (INIT) button.
A con rmation message will appear.
2. Press the [5] (EXEC) button.
To cancel, press the [6] (CANCEL) button.
SETUP (Specify the Time Signature and
Length)
Here’s how to specify the time signature and length of the pattern.
1. In the PATTERN EDIT screen, press the [1] (SETUP) button.
2. Use the cursor buttons to move the cursor to the item that
you want to edit, and use the VALUE dial or [DEC] [INC] to
edit the value.
Parameter Value Explanation
Pattern Beat
2/4–7/4, 5/8–7/8, 9/8,
12/8, 9/16, 11/16, 13/16,
15/16, 17/16, 19/16
Pattern time signature
This can be set only for an
empty pattern.
Measure Length
1–32 Pattern length
* You can’t set this shorter than the number of
measures that contain data.
3. To close the setting window, press the [6] (CLOSE) button or
the [EXIT] button.
SCALE (Specify the Scale of the Grid)
This speci es the scale of the grid.
1. In the PATTERN EDIT screen, press the [5] (SCALE) button.
The grid’s scale will change each time you press the button.
Parameter Value Explanation
Scale
16th notes, 32nd notes,
8th note triplets, 16th note triplets
Grid scale
NOTE SETUP (Specify The Note’s Type,
Duration, and Velocity)
Here’s how to specify the type, duration, and velocity of the notes
you’ll be entering.
1. In the PATTERN EDIT screen, press the [2] (NOTE SET) button.
2. Use the cursor buttons to move the cursor to the item that
you want to edit, and use the VALUE dial or [DEC] [INC] to
edit the value.
Parameter Value Explanation
Note Type
Refer to “note:”
(p. 49)
Selects the type of note to enter.
Gate Time 5–200%
Selects the gate time (duration) of the
note message to enter, as a proportion
of the note value you selected in Note
Type.
Velocity 1–127
Selects the velocity (volume) of the
note message to enter.
Input by
Keyboard
OFF, ON
If this is On, you’ll be able to enter
notes using the keyboard.
• The sixteen white keys from the
right are used to enter notes
(the black keys are ignored).
• The velocity you use when
pressing a key will be entered
as the note-on velocity.
3. To close the setting window, press the [6] (CLOSE) button or
the [EXIT] button.