


13
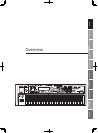
Overview
Appendix
USB Memory
Song Player
Digital Recorder
Synthesizer
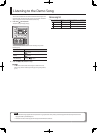
Selecting Sounds Perform. Functions Editing/Eects Other Settings
Rec/Play/Edit Eects Rhythm Pattern
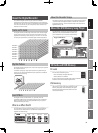
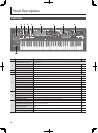
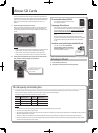
PHONES jack
You can connect a set of headphones
(sold separately) here.
S
SONG/CLICK OUT jack
p. 83
This jack will output one of the following audio signals.
• USB Memory Song Player
• USB Memory Song Player’s click tone
• Digital Recorder
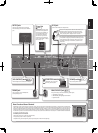
OUTPUT jacks
Connect your speakers here. To employ
monaural output, connect to the L/MONO
jack.
USB COMPUTER connector
p. 132
With a USB cable, you can connect
the JUNO-Gi to your computer.
USB COMPUTER connector
With a USB cable, you can connect
the JUNO-Gi to your computer.
13
S
o
n
g
P
l
a
y
e
r
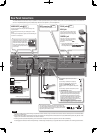
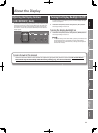
About Functional Ground Terminal
Depending on the circumstances of a particular setup, you may experience a discomforting sensation, or perceive that the surface feels
gritty to the touch when you touch this device, microphones connected to it, or the metal portions of other objects, such as guitars. This
is due to an in nitesimal electrical charge, which is absolutely harmless. However, if you are concerned about this, connect the ground
terminal (see gure) with an external ground. When the unit is grounded, a slight hum may occur, depending on the particulars of your
installation. If you are unsure of the connection method, contact the nearest Roland Service Center, or an authorized Roland distributor,
as listed on the “Information” page.
Unsuitable places for connection
• Water pipes (may result in shock or electrocution)
• Gas pipes (may result in re or explosion)
• Telephone-line ground or lightning rod (may be dangerous in the event of lightning)
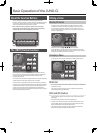
[LCD CONTRAST] knob
p. 17
This knob adjusts the contrast of the display.
SD card slot
p. 15
Insert an SD card here. When
the JUNO-Gi is shipped from
the factory, the included SD
card is inserted and the SD
card protector is fastened
with screws. If you want to
replace the card, remove the
screws as described in “About
SD Cards” (p. 15).
y
DC IN jack
Connect the included AC adaptor here.
Place the AC adaptor so the side with the indicator (see
illustration) faces upwards and the side with textual
information faces downwards. The indicator will light
when you plug the AC adaptor into an AC outlet.
To prevent the inadvertent disruption of power to your
unit (should the plug be pulled out accidentally), and to
avoid applying undue stress to the DC IN jack, anchor
the power cord using the cord hook, as shown in the
illustration.
D
i
g
i
t
a
l
R
e
[POWER] switch
p. 16
This turns the power on/o .