


28
Controlling Your Performance
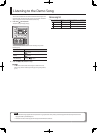
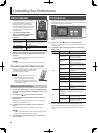
D Beam Controller
The D Beam controller can be used simply
by waving your hand over it. It can be used
to apply various e ects, depending on
the function that is assigned to it. On the
JUNO-Gi, the D Beam controller can be used
not only to modify the sounds, but also to
control the pitch of a monophonic (solo)
synthesizer sound.
1. Press either the D BEAM [SOLO
SYNTH], [EXPRESSION], [ASSIGNABLE]
button to turn on the D Beam
controller.
Button Explanation
[SOLO SYNTH] button
You can play a monophonic synthesizer
by moving your hand above the D Beam
controller.
[EXPRESSION] button Lets you add expression.
[ASSIGNABLE] button
Operates the function assigned to the D Beam
controller.
2. While you play the keyboard to produce sound, place your
hand above the D Beam controller and move it slowly up
and down.
To turn o the D Beam controller, once again press the button you
pressed in step 1; it will go out.
MEMO
When you turn on the power, the D Beam controller will be o .
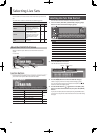
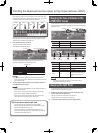
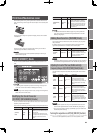
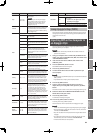
The usable range of the D Beam controller
The following diagram shows the usable range of
the D Beam controller. Waving your hand outside
this range will produce no e ect.
NOTE
The usable range of the D Beam controller
will become extremely small when used
under strong direct sunlight. If it does not
function as you expect, adjust the sensitivity as
appropriate for the brightness of your location.
➝ “D Beam Sens” (p. 83)
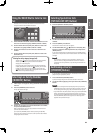
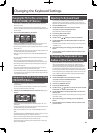
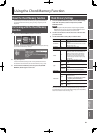
D Beam Controller Settings
1. Hold down the [SHIFT] button, and press the D BEAM button
([SOLO SYNTH], [EXPRESSION], [ASSIGNABLE]) that you want
to assign.
2. Use the cursor [
] [ ] buttons to select a parameter.
3. Use the VALUE dial or the [DEC] [INC] buttons to select the
desired value.
For details on the parameters and values that you can assign, refer to
“System Menu [5] (D BEAM)” (p. 83).
4. If you want to keep your settings, press the [6] (WRITE)
button.
Setting for the D Beam controller are saved for system settings.
MEMO
You can use the function buttons shown below the screen to move
to other setting screens of the D Beam controller.
5. Press the [EXIT] button a number of times to return to the
previous screen.
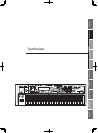
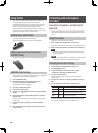
[S1] [S2] buttons
You can assign various performance-related functions to the [S1] and
[S2] buttons. When you turn the [S1] or [S2] button on/o , the assigned
function will be switched or turned on/o .
1. Hold down the [SHIFT] button and press the [S1] or [S2]
button.
2. Use the cursor [
] [ ] buttons to select a parameter.
“Switch 1” is the setting for the [S1] button, and “Switch 2” is the setting
for the [S2] button.
3. Use the VALUE dial or the [DEC] [INC] buttons to select the
desired value.
Parameter Value Explanation
Assign
The function assigned to the [S1], [S2] buttons
TRANSPOSE UP
Shift the pitch of the keyboard
upward in semitone steps (a
maximum of six semitones).
TRANSPOSE
DOWN
Shift the pitch of the keyboard
downward in semitone steps (a
maximum of ve semitones).
TAP TEMPO
Used to set the keyboard tempo to
the interval at which you press the
button.
MONO/POLY
Specify whether the tone will play
polyphonically (POLY) or monopho-
nically (MONO).
PORTAMENTO Turn the Portamento on/o .
HOLD Turn the Hold on/o .
MFX1–2 SW Switch the multi-e ects 1–2 on/o .
CHORUS SW Switch the chorus on/o .
REVERB SW Switch the reverb on/o .
SYS CTRL 1–4 SRC
Transmit the MIDI message speci ed
by the System setting “Sys Ctrl 1–4
Source.”
LAYER 1–4 SW
Turns the Layer Switch On/O for the
speci ed layer
Type
The way in which the [S1], [S2] buttons will operate when
pressed.
* Depending on the Assign setting, this may not be
available.
LATCH
The on/o status will alternate each
time you press the button.
MOMENTARY
The assigned function will turn on
while you press the button, and will
turn o when you release it.
4. Press the [EXIT] button to return to the previous screen.
The [S1] [S2] settings are saved as live set settings. If you want to keep
these settings, press the [WRITE] button to save them in the live set
(p. 35).