


109
DCA groups
DCA groups
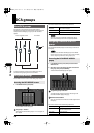
1.
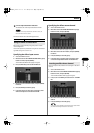
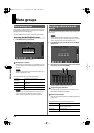
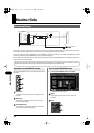
Access the DCA GROUP ASSIGN popup for the desired
DCA group.
fig.ScrDCAGroupAssign.eps
2.
Verify that the target DCA group is correct.
3.
Move the cursor to the desired channel select button,
and press [ENTER] to select it.
4.
Press [F8 (CLOSE)] to close the popup.
When the DCA GROUP ASSIGN popup is displayed, you can
press a top panel [SEL] to turn on/off the corresponding
channel’s assignment to the DCA group.
You can specify a name and color label for each DCA group. A
name of up to six characters can be specified, and you can
choose one of eight colors as the color label.
The NAME EDIT popup is used to edit the name and select a color
label.
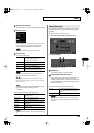
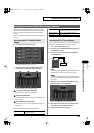
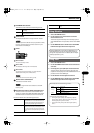
1.
Access the DCA GROUP screen.
2.
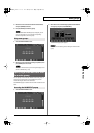
Move the cursor to the DCA group fader of the desired
DCA group, and press [F7 (NAME EDIT)].
fig.ScrChNameEdit.eps
The NAME EDIT popup will appear.
For details on name editing, refer to “Editing the channel name”
(p. 50).
You can use the AUX/MTX/DCA layer of the fader module section
to control DCA groups from the panel.
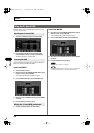
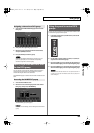
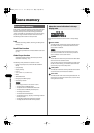
1.
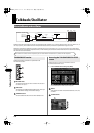
In the layer section, press [AUX/MTX/DCA] to access the
AUX/MTX/DCA layer.
fig.LayerBtn.eps
2.
Use the faders of fader module 13 (DCA1)–16 (DCA4) to
adjust the level of the DCA groups.
3.
By pressing [SOLO], you can operate the solo settings of
all channels belonging to the corresponding DCA group.
4.
By pressing [MUTE], you can operate the mute settings of
all channels belonging to the corresponding DCA group.
You can also use the fader module 13–16 to operate the DCA 1–
4, while you access the DCA GROUP screen and turn [F6 (DCA 1-
4 ON FADER)] on.
Assigning a channel to a DCA group
Specifying a name and color label
for the DCA group
Accessing the NAME EDIT popup
Using the panel to control DCA
groups
M-300_e.book 109 ページ 2010年6月24日 木曜日 午後2時26分