100
Truncate
This command deletes unwanted data that lies beyond the
“S (Edit Range Start)” and “E (Edit Range End).” Use this
command when you wish to delete silence at the beginning
or end of the waveform data.
If you wish to delete unneeded (unplayed) sample data
after setting the start address, loop start address, and
end address, use the Utility “Truncate” found in 3.1:
Loop Edit, Edit2 page.
1 Use “SMPL” (2.1–1a) to select the sample that you wish
to edit, and use “S (Edit Range Start)” and “E (Edit Range
End)” (2.1–2b) to specify the editing range.
You can press the [START/STOP] key to hear the por-
tion that will be left by the “Truncate” command.
2 Select “Truncate” to open the following dialog box.
3 The editing range will be shown in Range “Start” and
“End.”
4 Use “Truncate” to select the portion that will be deleted.
Front & End: The sample data that lies before the “S (Edit
Range Start)” and after the “E (Edit Range End)” will be
deleted.
Front: The sample data that lies before the “S (Edit Range
Start)” will be deleted.
End: The sample data that lies after the “E (Edit Range
End)” will be deleted.
5 In “Save to No.,” specify the save destination sample
number. By default, an unused sample number will be
selected. If you have checked “Overwrite,” this cannot be
set.
For a stereo sample, “Save to No.(L)” and “(R)”
will be displayed. Specify the save destination sample
number for the L channel and R channel respectively.
6 If you wish to delete the original sample data and over-
write it with the edited sample data, check “Overwrite”.
Normally, you will leave “Save to No.” at its default set-
ting, and execute without checking “Overwrite.” (
☞p.99
“*”: About “Overwrite”)
7 To execute the Truncate command, press the [F8] (“OK”)
key. To cancel, press the [F7] (“Cancel”) key.
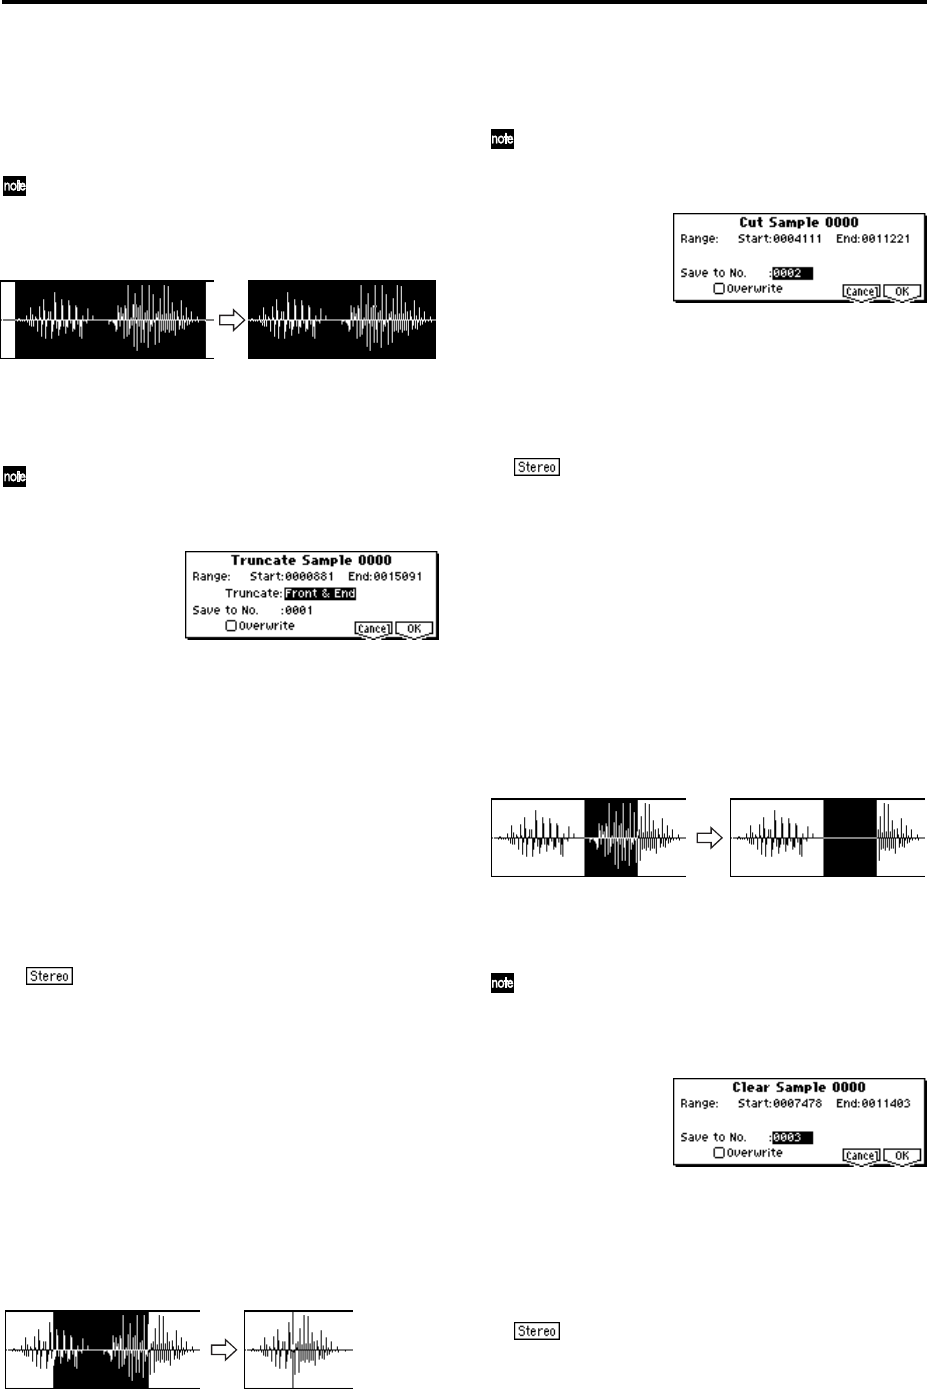
Cut
This command deletes the data between the “S (Edit Range
Start)” and “E (Edit Range End).” Sample data located after
the deleted portion will be moved forward.
1 Use “SMPL” (2.1–1a) to select the sample that you wish
to edit, and use “S (Edit Range Start)” and “E (Edit Range
End)” (2.1–2b) to specify the editing range.
You can press the [START/STOP] key to hear the por-
tion that will be deleted by the “Cut” command.
2 Select “Cut” to open the following dialog box.
3 The range to be edited is shown by Range “Start” and
“End.”
4 In “Save to No.,” specify the save destination sample
number. By default, an unused sample number will be
selected. If you have checked “Overwrite,” this cannot be
set.
For a stereo sample, “Save to No.(L)” and “(R)”
will be displayed. Specify the save destination sample
number for the L channel and R channel respectively.
5 If you wish to delete the original sample data and over-
write it with the edited sample data, check “Overwrite”.
Normally, you will leave “Save to No.” at its default set-
ting, and execute without checking “Overwrite.” (
☞p.99
“*”: About “Overwrite”)
6 To execute the Cut command, press the [F8] (“OK”) key.
To cancel, press the [F7] (“Cancel”) key.
Clear
This command converts the data between “S (Edit Range
Start)” and “E (Edit Range End)” to zero values. Sample
data before and after the edited range will not move.
1 Use “SMPL” (2.1–1a) to select the sample that you wish
to edit, and use “S (Edit Range Start)” and “E (Edit Range
End)” (2.1–2b) to specify the editing range.
You can press the [START/STOP] key to hear the por-
tion that will be changed to zero-level by the “Clear”
command.
2 Select “Clear” to open the following dialog box.
3 The range to be edited is shown by Range “Start” and
“End.”
4 In “Save to No.,” specify the save destination sample
number. By default, an unused sample number will be
selected. If you have checked “Overwrite,” this cannot be
set.
For a stereo sample, “Save to No.(L)” and “(R)”
will be displayed. Specify the save destination sample
number for the L channel and R channel respectively.
5 If you wish to delete the original sample data and over-
write it with the edited sample data, check “Overwrite”.
Normally, you will leave “Save to No.” at its default set-
ting, and execute without checking “Overwrite.” (
☞p.99
“*”: About “Overwrite”)


