


112
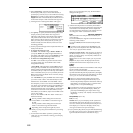
3 Select “Sustaining” as the time stretch method.
Press the [F8] (“OK”) key to execute Time Stretch, or
press the [F7] (“Cancel”) key to cancel without executing.
If the L and R of a stereo sample are different in
length, blank data will automatically be added to the end
of the shorter sample so that it matches the longer side.
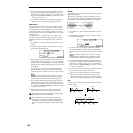
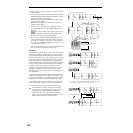
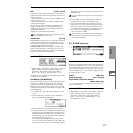
4 A dialog box for executing Time Stretch will appear.
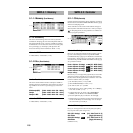
5 Set “Quality” to specify the desired audio quality of the
sample produce by Time Stretch. The range is 0–7.
Although it will depend on the sample, higher settings
will produce better results. However, be aware that
higher settings will also require a longer time to execute.
Since you can try this as many times as you like, you
should normally start with about 4, and raise or lower
the setting gradually.
6 Set the proportional length of the sample that will be cre-
ated by Time Stretch.
• To specify the length as a ratio
Set “Ratio.” The available range is 50.00%–200.00%. If
you specify 50.00%, the sample length will be halved.
(The tempo will double.) If you specify 200.00%, the sam-
ple length will double. (The tempo will be halved.)
• To match an existing BPM tempo value
Set “Beat” as the number of quarter-note beats. When
you change “Beat,” the “Source BPM” value will be
changed automatically.
“Source BPM” will indicate the playback BPM value at
the original key. This BPM value is automatically calcu-
lated according to the length from the start address to the
end address (if loop is off) or from the loop start address
to the end address (if loop is on). If you already know the
BPM value and the calculated value is incorrect, change
it to the correct value.
Use “New BPM” to specify the BPM value of the sample
you wish to create. “Ratio” will automatically be calcu-
lated from the “Source BPM” and “New BPM” values.
For example if you have a one-measure 120 BPM sample
in 4/4 time, and would like to change it to 150 BPM, you
would set “Beat” to 4. The “Source BPM” will be calcu-
lated automatically. If the “Source BPM” is not calculated
as 120 due to inaccuracies in the start address (or loop
start address) or end address, adjust “Source BPM” to the
correct value of 120.
Next, set “New BPM” to 150. The “Ratio” will be calcu-
lated automatically.
It is not possible to make settings that would cause
“Source BPM” or “New BPM” to exceed the range of
40–480.
It is not possible to make settings that would cause
“Ratio” to exceed the range of 50.00–200.00.
Depending on the sample, the length may not be
exactly as you specify, due to limitations in processing
accuracy.
7 To execute the Time Stretch operation, press the [F8]
(“OK”) key. To cancel without executing, press the [F7]
(“Cancel”) key.
When you press the [F8] (“OK”) key, the Time Stretch
dialog box will appear.
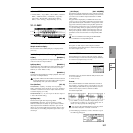
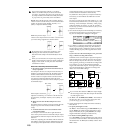
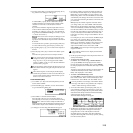
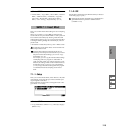
8 Audition the sample that was created by Time Stretch.
The sample before being time-stretched is assigned to the
note number C2 of the keyboard, and the sample that
was time-stretched is assigned to note number C#2. You
can change the “Index” to check the waveform.
Index [Source(C2), Result(C#2)]:
Select the index for the sample whose waveform you
wish to display.
If you select Source, the original waveform before time-
stretching will be selected.
If you select Result, the time-stretched sample will be
selected.
To select an index, hold down the [ENTER] key and
play a note on the keyboard. The index that includes
the note you played will be selected.
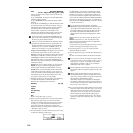
Sample waveform display: This shows the waveform of
the selected sample. As in 3-1: Loop Edit, Edit2 page, “S
(Start), “LpS (Loop Start),” and “E (End)” addresses are
shown by a solid line.
In the case of a stereo sample, you can press the
[F3] (“L/R”) key to switch the display between the L
channel and R channel of the sample data. (
☞2.1–2c)
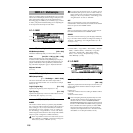
S (Start):
E (End):
Specifies the start address and end address of the sample
for the currently selected index.
When you execute Time Stretch, the addresses will be
specified automatically, but the playback may be slightly
skewed due to inaccuracies in the end address, etc. If this
occurs, you can correct the addresses manually.
When you change the start address, the loop start
address will also be changed simultaneously. If you
wish to independently adjust the start address and loop
start address, save the data in step
0, and then make
settings in the 3.1: Loop Edit Edit2 page.
To audition the sound in the specified range, play the
keyboard or press the [AUDITION] key. When you
press the [AUDITION] key, the sample in the range
specified by “S (Start)” and “E (End)” will sound at the
original key.
Zero (Use Zero): (☞2.1–2b)
L/R: (☞2.1–2c)
ZOOM: When you press the [F8] (“Zoom”) button the
zoom buttons will appear, allowing you to zoom-in or
zoom-out vertically or horizontally on the sample wave-
form display (
☞2.1–2d). Press the [F8] (“Zoom”) key
once again to return to the previous display.
9 If you press the [F5] (“Strch”) key, the Time Stretch dialog
box will appear, and you can re-do the time stretch once
again. Execute Time Stretch as described in step
6.