113
SMPL
1.1
2.13.14.15.15.27.1
0 Save the sample that you created. Press the [F6] (“Save”)
key, and the Save dialog box will appear.
In “Save to No.,” specify the save destination sample
number. By default, an unused sample number will be
selected. If “Overwrite” is checked, this cannot be
selected.
If you wish to delete the original sample data and over-
write it with the edited sample data, check “Overwrite”.
Normally, you will leave “Save to No.” at its default set-
ting, and execute without checking “Overwrite.” (
☞p.99
“
*1
: About “Overwrite””)
In the case of a stereo sample, the dialog box will
indicate “To Sample No. (L)” and “To Sample No. (R).”
Specify the save destination sample for the L channel and
R channel.
To execute the Save operation, press the [F8] (“OK”) key.
To cancel without saving press the [F7] (“Cancel”) key.
A By repeating steps 9–0 you can create more samples as
desired.
B Press the [F7] (“Exit”) key to exit the Time Stretch opera-
tion.
The index will specify the last-saved sample number.
If you wish to use the saved sample in Program mode
or Sequencer mode, you must either execute “Conv. To
Prog” (
☞p.97, 1.1–3f), or use Program mode “Multi-
sample” (
☞PROG 2.1–2b, 2.1–3) to select the multisam-
ple and create a program.
Be aware that the created sample will be lost if you exit
Time Stretch without saving the sample in the Save dia-
log box.
Time Stretch requires vacant samples, multisamples,
and relative parameters in order to execute. Before you
execute, make sure that there is sufficient free space. If
there is not, an error will occur.
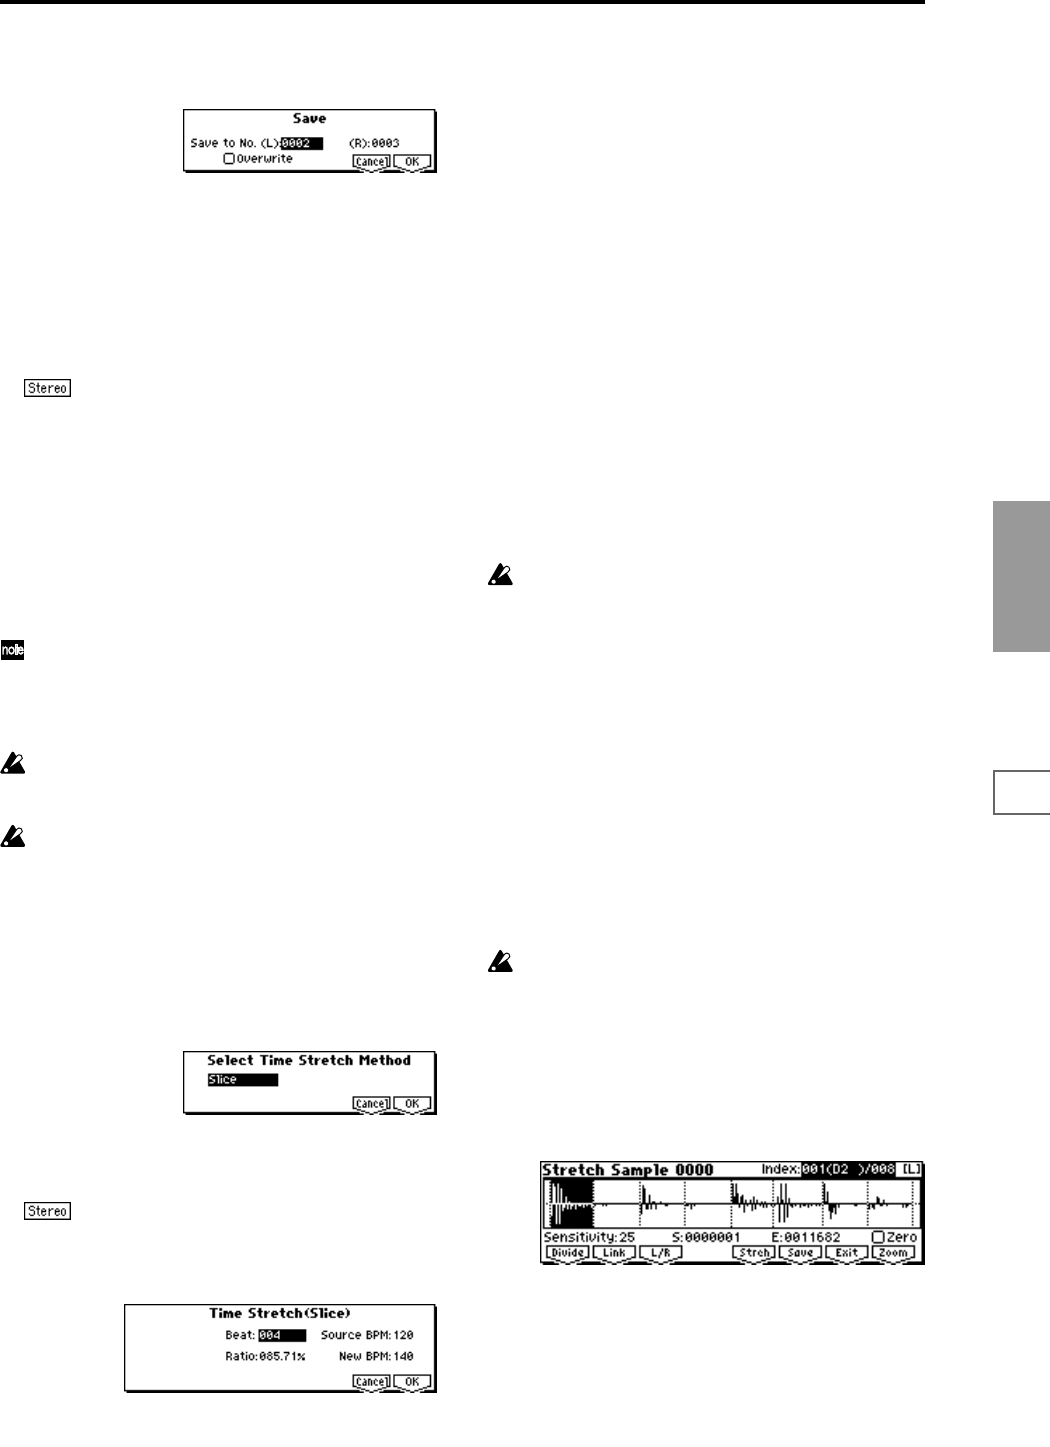
To use Time Stretch (Slice)
1 Use “SMPL” (3.1–1b) to select the sample that you wish
to time stretch as Slice.
2 From the Edit2 page “UTILITY,” choose “Time Stretch”
to open the following dialog box.
3 Select “Slice” as the time stretch method.
Press the [F8] (“OK”) key to execute Time Stretch, or
press the [F7] (“Cancel”) key to cancel without executing.
If the L and R of a stereo sample are different in
length, blank data will automatically be added to the end
of the shorter sample so that it matches the longer side.
4 A dialog box for executing Time Stretch will appear.
5 Specify the number of quarter note beats and tempo of
the currently selected sample. If you already know the
BPM value, set “Source BPM.” If you do not know the
BPM, setting “Beat” will cause the BPM to be calculated
automatically. The settings here are also used as the refer-
ence values when detecting the attacks at which the sam-
ple is divided.
Beat: Specify the number of quarter note beats. When
you change “Beat,” the “Source BPM” will indicate the
BPM value for playback at the original key. This BPM
value is automatically calculated according to the length
from the start address to the end address (if loop is off) or
from the loop start address to the end address (if loop is
on). If you already know the BPM value and the calcu-
lated value is incorrect, change “Source BPM” to the cor-
rect value.
For example if you have a one-measure 120 BPM sample
in 4/4 time, you would set “Beat” to 4. The “Source
BPM” will be calculated automatically. If the “Source
BPM” is not calculated as 120 due to inaccuracies in the
start address (or loop start address) or end address,
adjust “Source BPM” to the correct value of 120.
Source BPM: Specify the tempo at the original key of the
original waveform.
“Source BPM” cannot be set or displayed outside the
range of 40–480.
6 Set the proportional length of the sample that will be cre-
ated by Time Stretch.
• To specify the length as a ratio
Set “Ratio.” The available range is 50.00%–200.00%. If
you specify 50.00%, the sample playack time will be
halved. (The tempo will double.) If you specify 200.00%,
the sample playback time will double. (The tempo will be
halved.)
The tempo of the sample created by execution will be cal-
culated automatically from the “Ratio” and “Source
BPM,” and displayed in “New BPM.”
• To match a desired BPM tempo value
Set “New BPM” to the desired BPM value of the sample
that will be created. “Ratio” will automatically be calcu-
lated from the “Source BPM” and “New BPM” values.
It is not possible to set or display “New BPM” outside
the range of 40–480. It is not possible to set or display
“Ratio” outside the range of 50.00–200.00.
7 To execute Time Stretch, press the [F8] (“OK”) key. To
cancel without executing, press the [F7] (“Cancel”) key.
When you press the [F8] (“OK”) key, the attacks will be
detected and the sample will be divided automatically,
and time stretch will be performed.
The Time Stretch dialog box will appear.
8 Audition the results that were created by Time Stretch.
The original sample (before being time-stretched) is
assigned to the C2 note of the keyboard. The time-
stretched sample is assigned to C#2. Sliced (divided)
samples will be assigned consecutively upward, starting
from D2 on the keyboard.


