


114
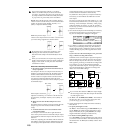
Index [Source(C2), Result(C#2),
xxx: 001...090(zzz: D2...G9)/yyy: 001...090]:
Select s the index for the sample whose waveform you
wish to display.
If you select Source, the original waveform before time-
stretching will be selected.
If you select Result, the time-stretched sample will be
selected.
If you set this to xxx(zzz)/yyy, an individually sliced sam-
ple will be selected. xxx is the selected index, and yyy
indicates the total number of sliced samples. zzz indi-
cates the number of notes that are assigned to the
selected index. A maximum of 90 samples can be
assigned to the keyboard. If the sample was sliced into
more than 90 samples, this will be displayed as 90.
To select an index, hold down the [ENTER] key and
play a note on the keyboard. The index that includes
the note you played will be selected.
When you execute Time Stretch, the addresses will be
specified automatically. However, playback may be
slightly offset due to inaccuracies in the end address,
etc. If this occurs, set “Index” to Result, and use “S
(Start)” and “E (End)” to re-specify the addresses.
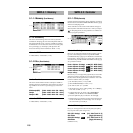
Sample waveform display: This displays the waveform
of the selected sample. If the “Index” is other than
Result, the locations at which the sample is sliced will be
indicated by a dotted line (vertical). If “Index” is set to
xxx(zzz)/yyy, the sample of the selected index will be
highlighted. If “Index” is other than xxx(zzz)/yyy, the
Start, Loop Start, and End addresses will be indicated by
solid lines (vertical).
In the case of a stereo sample, you can press the
[F3] (“L/R”) key to switch the display between the L
channel and R channel of the sample data. (
☞2.1–2c)
ZOOM: When you press the [F8] (“Zoom”) button the
zoom buttons will appear, allowing you to zoom-in or
zoom-out vertically or horizontally on the sample wave-
form display (
☞2.1–2d). Press the [F8] (“Zoom”) key
once again to return to the previous display.
9 If the slice locations are not appropriate, use “Sensitivity”
to modify the sensitivity at which the attacks are
detected, thus changing the slice locations.
Sensitivity [00...30]:
S (Start):
E (End):
Zero (Use Zero):
Divide:
Link:
Refer to “Time Slice” steps 6 and 7.
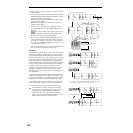
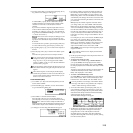
0 When you press the [F5] (“Strch”) key, the Time Stretch
dialog box will appear, and you can re-do the time
stretch. Execute Time Stretch using the same procedure
as in step
4–7. If the sample slice locations are not
appropriate, this will also affect the result of Time
Stretch. For details on setting the slice locations, refer to
“Time Slice,” steps
6 and 7.
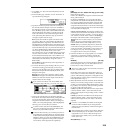
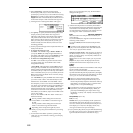
A Save the sample you created. Press the [F6] (“Save”) key,
and the Save dialog box will appear.
In “Save To No.,” specify the save destination sample
number. By default, an unused sample number will be
selected. If “Overwrite” is checked, this cannot be set.
If you wish to delete the original sample data and over-
write it with the edited sample data, check “Overwrite”.
Normally, you will leave “Save to No.” at its default set-
ting, and execute without checking “Overwrite.” (
☞p.99
“
*1
: About “Overwrite””)
If you execute this command with “Overwrite”
checked, the original sample data will be deleted, and
overwritten by the edited sample data. Thus, in the
Time Stretch dialog box that appears after execution,
the edited sample data will automatically have its
attacks detected and sliced, and displayed in “Index”
Source.
In the case of a stereo sample, the display will
show “To Sample No. (L)” and “To Sample No. (R).”
Specify the L channel and R channel save destination
sample numbers respectively.
To execute the Save, press the [F8] (“OK”) key. To cancel
without executing, press the [F7] (“Cancel”) key.
B By repeating steps 0–A you can create more time
stretched samples as desired.
C Press the [F7] (“Exit”) key to end the Time Stretch opera-
tion.
The last-saved sample number will be set for the index.
If you wish to use the saved sample in Program mode
or Sequencer mode, you must either execute “Conv. To
Prog” (
☞p.97, 1.1–3f), or use Program mode “Multi-
sample Select” (
☞PROG 2.1–2b, 2.1–3) to select the
multisample and create a program.
Be aware that the created sample will be lost if you exit
Time Stretch without saving the sample in the Save dia-
log box.
Before executing Time Stretch on a long sample, you
should first divide the sample into measures. In some
cases, it may not be possible to assign the sample to the
note number or edit the slice locations.
Time Stretch requires vacant samples, multisamples,
and relative parameters in order to execute. Before you
execute, make sure that there is sufficient free space. If
there is not, an error will occur.
If you open the time slice (Slice) dialog box on the same
sample, it will be sliced in the same way as previously.
These slice locations will also be used if you execute
“Time Slice” (
☞3.1–2e), so that you can execute time
stretch without having to make the settings again.
If you wish to detect the attacks again or to re-do the
operation, change the “Sensitivity” after you open the
dialog box.