


116
Here you can make settings for multisamples. You can create
indexes for a multisample, and then assign a sample to each
index. (These basic settings can also be performed in 1.1:
Recording page.) In addition, you can delete, copy, or insert
an index, and perform detailed editing such as adjusting the
level and pitch of the sample for each index.
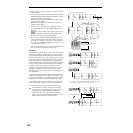
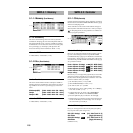
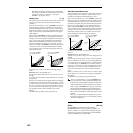
4.1–1: Edit1
4.1–1a: MS, Index, Keyboard & Index
MS (Multisample Select) [000...999]
Selects the multisample that you wish to edit (☞1.1–1a).
Index [xxx (001...128)/yyy (001...128)]
Select s the index that you wish to edit (☞1.1–1a).
To select an index, hold down the [ENTER] key and play a
note on the keyboard. The index that includes the note you
played will be selected. The specified key will be the base
key, and will be displayed in gray in “Keyboard & Index.”
Keyboard & Index
(☞1.1–1a)
4.1–1b: SMPL, Orig.K, TopK
SMPL (Sample Select)
[----: ---No Assign----, 0000...3999]
This shows the number and name of the sample that is
assigned to the selected index. You can also select a sample
here (
☞1.1–1b).
Orig.K (Original Key) [C–1...G9]
Specifies the original key of the sample (☞1.1–1b).
TopK (Top Key) [C–1...G9]
Specifies the highest key in the zone of the index. The zone
is defined by this “Top Key” (
☞1.1–1b).
■ 4.1–1c: INSERT, CUT, COPY, CREATE
INSERT
This creates an index. When you press the [F3] (“INSERT”
key, a new index will be created according to the “Pstn (Posi-
tion)” setting (1.1–3b, 4.1–3a). At this time, the contents of
the index that was cut or copied by “CUT” or “COPY” (i.e.,
the “Zone Range,” “Orig.K Position,” “Level” and “Pitch”)
will be assigned at the same time. (The sample will automat-
ically be copied or assigned to a different number.)
If it is not possible to create a new index when you exe-
cute “CREATE” or “INSERT,” a dialog box will appear.
If this occurs, refer to “CREATE” (1.1–1c).
If you have not yet executed “CUT” or “COPY,” such as
immediately after power-on, the new index will be cre-
ated according to the “Create (Create Zone Preference)”
settings (1.1–3b, 4.1–3a) “Position,” “Zone Range,” and
“Orig.K Position” as same as “CREATE.”
CUT
When you press the [F4] (“CUT”) key, this deletes the
selected index. At the same time, the contents of the deleted
index are copied to the “INSERT” buffer.
COPY
When you press the [F5] (“COPY”) key, this copies the con-
tent of the selected index to the “INSERT” buffer.
CREATE
This creates an index. When you press the [F6] (“CREATE”)
key, a new index will be created according to the settings of
“Position,” “Zone Range,” and “Orig.K Position” (1.1–3b,
4.1–3a) (
☞1.1–1c).
■ 4.1–1d: UTILITY
☞“Delete SMPL,” “Copy SMPL,” “Move SMPL,” “Rename
SMPL,” “SMPL To Stereo,” “Delete MS,” “Copy MS,”
“Move MS,” “Rename MS,” “MS To Stereo/MS To
Mono,” “Conv. To Prog,” “Keyboard Disp.” (1.1–3f),
“Pitch BPM Adj.” (4.1–2b)
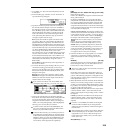
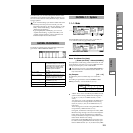
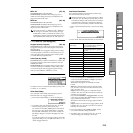
4.1–2: Edit2
4.1–2a: Level, Pitch, Constant Pitch
Level [–99...+99]
Adjusts the playback level of the sample. Use this when you
need to adjust the level balance between samples within a
multisample.
0: Unity level
–: The level will be lowered. At a setting of –99 there will be
no sound.
+: The level will be raised.
Since in Sampling mode the playback unity level will
normally be the maximum level, adjustments in the +
direction will have no effect. If Volume (CC#07) or
Expression (CC#11) has been assigned to as the B-mode
function of a REALTIME CONTROLS knob [1]–[4] and
these controllers have been operated, or if these MIDI
messages have been received to lower the playback
unity level, then adjustments in the + direction will be
valid (PROG 2.1–2e Sample Parameter: Level).
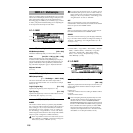
SMPL 4.1: Multisample
4.1–1a
4.1–1b
4.1–1d
4.1–1c
4.1–2a
4.1–2b