106
1 Use “SMPL” (2.1–1a) to select a sample.
2 In the Edit2 page “UTILITY,” choose “Grid” to open the
following dialog box.
3 Check “Grid” to turn on the grid display.
4 Set “Resolution” to the desired grid interval – . The
spacing of the grid will be determined by this setting and
by “ (Grid Tempo)” (2.1–2b).
5 To execute the setting, press the [F8] (“OK”) key. To can-
cel without executing, press the [F7] (“Cancel”) key.
Here you can specify the portion of the sample that will be
played back, set sample parameters for playback loop etc.,
and edit the sample. Sample parameters that were loaded
into internal sampling memory in Media mode can also be
edited in the same way. You can make detailed edits in sin-
gle-sample steps while watching the sample waveform dis-
play.
3.1–1: Edit1
3.1–1a: MS, Index, Keyboard&Index
MS (Multisample Select) [000...999]
Selects the multisample whose loop and other sample
parameters you wish to edit (
☞1.1–1a).
Index [xxx (001...128)/yyy (001...128)]
Selects the index whose loop and other sample parameters
you wish to edit. Your edits will apply to the sample
assigned to this index , and the waveform will appear in the
“sample waveform display” (
☞1.1–1a).
To select an index, hold down the [ENTER] key and play a
note on the keyboard. The index that includes the note you
played will be selected. The specified key will be the base
key, and will be displayed in gray in “Keyboard & Index.”
Keyboard & Index
(☞1.1–1a)
3.1–1b: SMPL, Lp, Tune, Rev
SMPL (Sample Select)
[----: ---No Assign----, 0000...3999]
This shows the sample number and name, and the range of
the selected index. If you change “SMPL,” the sample you
specify will be assigned to this index. The sample you select
here will appear in the “sample waveform display” (
☞1.1–
1a).
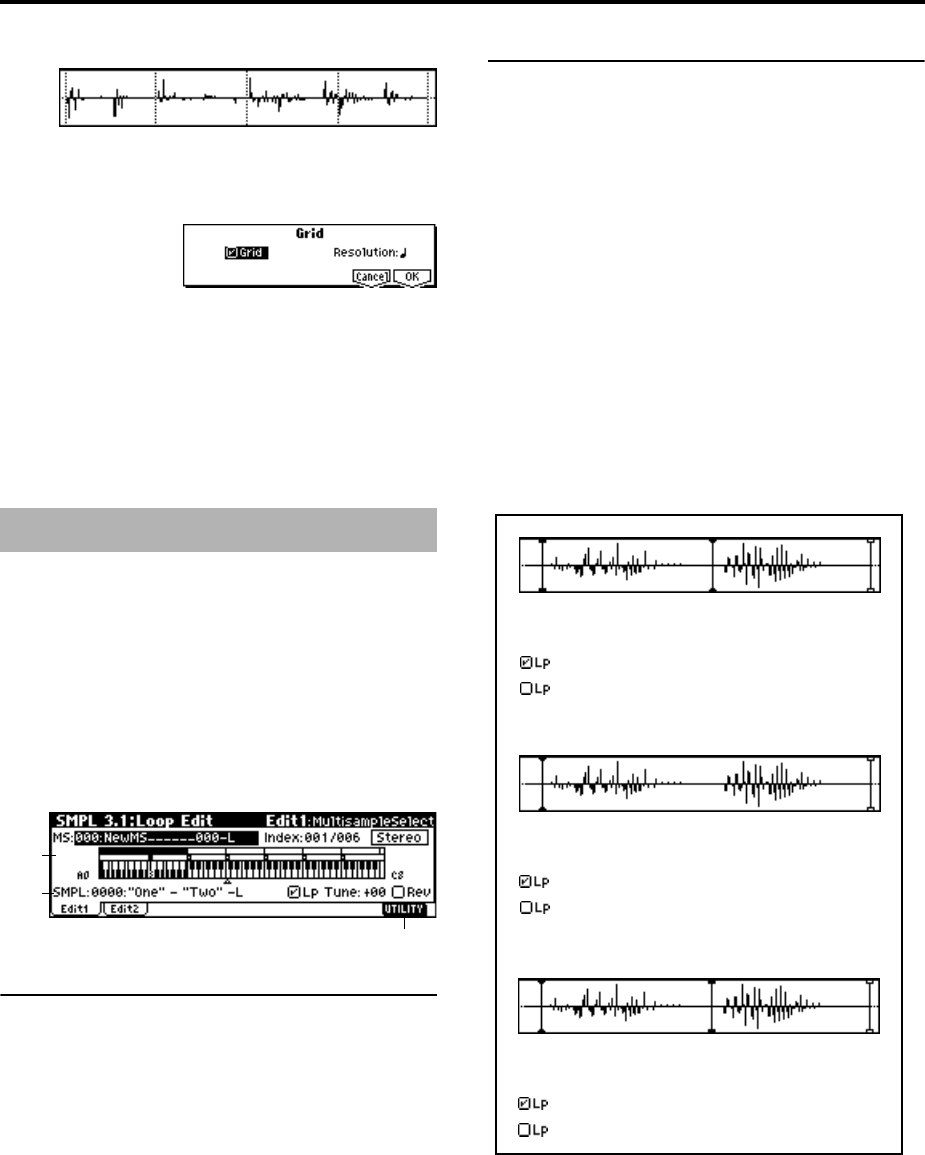
Lp (Loop) [Off, On]
Specify whether the sample will be looped.
On (checked): The sample will play back repeatedly from
“LpS (Loop Start)” to “E (End)”; i.e., “S (Start)” → “E (End)”
→ “LpS (Loop Start)” → “E (End)” → “LpS (Loop Start)” →
... (
☞3.1–2b)
Off (unchecked): The sample will playback once (“one-
shot”) from “S (Start)” → “E (End).”
This will be checked automatically if “Auto Loop” (1.1–3c)
was checked when you sampled.
Tune (Loop Tune) [–99...+99]
When looping is on (“Lp” is checked), you can adjust the
playback pitch of the loop from “S (Start)” to “E (End)” over
a range of ±99 cents. When you loop data that was sampled
from a musical instrument etc., the pitch of the looped por-
tion may sometimes be incorrect. Use this parameter to com-
pensate for such cases.
Rev (Reverse) [Off, On]
On (checked): The sample will be played backward, from
“E (End)” (end address) to “LpS (Loop Start)” (loop start
address).
SMPL 3.1: Loop Edit
3.1–1a
3.1–1b
3.1–1c
Start Loop Start End
"One" - "Two" - "Two" - "Two" - ...
"One" - "Two"
"One"
"Two"
"One" - "Two" - "One" - "Two" - "One" - "Two" - ...
Start
Loop Start
End
"One" - "Two"
"One"
"Two"
"Two" - "One" - "Two" - "One" - "Two" - "One" -...
"Two"
Start
Loop Start
End
"One"
"Two"


