


75
SEQ
1.1
1.22.12.23.13.23.33.44.14.24.34.45.15.26.17.17.2
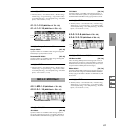
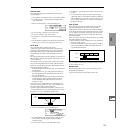
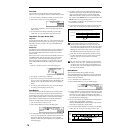
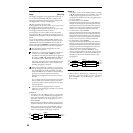
You can even input notes as shown in the following dia-
gram.
Deleting a note or rest
To delete a note or rest, press the [F6] (“Back”) key. The
location will move backward by the amount specified in
4, and the data in that interval will be deleted.
Auditioning the next note before input
If you wish to make sure of the next note before you actu-
ally input it, press the [PAUSE] key (the LED will light).
Now when you press a key, you will hear sound but the
note will not be input. Press the [PAUSE] key once again
(the LED will go dark) to cancel the pause mode and
resume input.
8 When you are finished with step recording, press the [F8]
(“Done”) key. If you press the [COMPARE] key, you will
return to the condition of before you began step record-
ing.
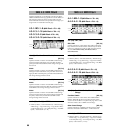
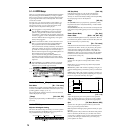
Event Edit
Here you can edit individual events of music data that were
input.
1 Use “Track Select” to select the track that you wish to
edit, and use the Track Edit tab “Measure (From)” field to
specify the measure at which you wish to begin editing.
2 If you selected Track01–16 in “Track Select,” selecting this
command will open the Set Event Filters dialog box.
In the Set Event Filters dialog box you can select the
types of events (musical data) that will appear and can be
edited in the event edit window.
For “Note” you can set “Btm (Bottom)” and “Top” to
specify the range of notes. These settings can also be
entered by holding down the [ENTER] key and pressing
a key. Normally you will leave these set at C–1 and G9.
“Control Change” lets you specify the control change
number. Normally you will leave this set at ALL.
If you selected Master Track in “Track Select,” this dialog
box will not appear.
You can also check various other events (“Pitch Bend,”
“Program Change,” “After Touch,” and “Poly After
Touch”).
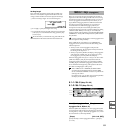
3 Press the [F8] (“OK”) key to open the Event Edit dialog
box.
4 Use the cursor keys [ ], [ ], [ ], [ ] to select the
event that you wish to edit.
You can also press the [F1] (“JUMP”) key and use “M
(Measure)” and “Index” so that the events of the measure
being edited and the index number within that measure
are displayed at the beginning of the dialog box.
5 Select the event that you wish to edit, and use the
[VALUE] dial etc. to modify its value(s).
• By modifying the value of the “Bt” (Beat. Tick)
location within the measure, you can move the event
within the measure.
• You can edit each event by modifying its data
value(s). When you select a note event, it will sound.
6 You can press the keys located at the function of the dia-
log box to edit events as follows.
Inserting an event
Select the “Bt” location where you wish to insert an
event, and press the [F4] (“Insert”) key to insert an event.
Deleting an event
Select the event that you wish to delete, and press the
[F5] (“Cut”) key to delete the event.
Moving an event
You can use the [F5] (“Cut”) key and [F4] (“Insert”) key
to move an event (by “cut and paste”).
Use the [F5] (“Cut”) key to delete the event that you wish
to move, then use the [F4] (“Insert”) key to insert it at the
desired location.
You can also move an event by modifying its “Bt” value.
Copying an event
Select the event that you wish to copy, and press the [F6]
(“Copy”) key. Then select the copy destination and press
the [F4] (“Insert”) key to insert the event at that location.
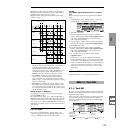
7 The end of the pattern is indicated as End of Pattern.
When you are finished event editing, press the [F8]
(“OK”) key. If you press the [COMPARE] key, you will
return to the state before you began event editing.
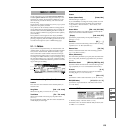
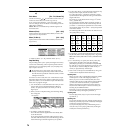
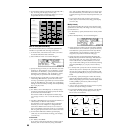
The following table shows the types of musical data that
can be edited by “Event Edit” and the range of their val-
ues.
*1
:Be aware that since the time signature is recorded in the
master track, modifying it from any track will affect the
same measure of all tracks, causing them to be played in
that time signature.
*2
:Note data and velocity values can also be entered by
holding down the [ENTER] key and playing a note on
the keyboard.
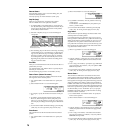
Pattern numbers will be displayed in locations in which a
pattern has been “put” (placed). At the end of the track there
will be an indication of End of Track.
Step Time =
Step Time =
Step Time =
Tie
On
Press E and C
ON
Press G
Off
Release E (continue holding C)
Event data
Measure
Index no.
Location within the
measure (beat, clock)
BAR (displayed only)
(Measure line)
Meter: 1/4...16/16 *
1
(Time signature)
C–1...G9 *
2
(Note data)
Val: 1...127 *
2
(Velocity)
L: 000.000...15984.000
(Length: beats, clocks)
P.Aft
(Polyphonic after
touch)
C–1...G9
(Note number)
Val: 0...127
(Value)
Ctl.C
(Control change)
#: 0...101
(Control change num-
ber)
Val: 0...127
(Value)
PROG
(Program change)
Bnk: A...D, 000...127,
G, g(d), - - -
(Program bank)
No.: 0...127, 1...128
(G, g(d))
(Program number)
AftT
(After Touch)
0...127
(value)
BEND
(Pitch bend)
–8192...+8191
(value)