


115
SMPL
1.1
2.13.14.15.15.27.1
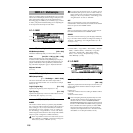
Crossfade Loop
When pitched instrumental samples such as strings or
winds are looped to sustain a note, the sound will “jump” or
“skip” repeatedly during playback if there is a significant
difference between the waveforms at the loop start and loop
end locations.
In order to solve such problems, Crossfade Loop causes the
sound to change gradually from the end to the beginning of
the loop.
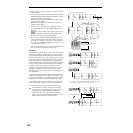
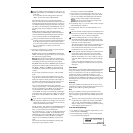
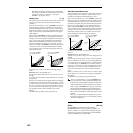
In actuality, the sample data is created as follows. A specific
length (the “Crossfade Length”) of the waveform immedi-
ately before the beginning of the loop is taken and mixed
with the end portion.
At this time, the waveform level of the portion immediately
before the end (the length specified by “Crossfade Length”)
will gradually decrease, and the waveform level immedi-
ately before the beginning of the loop will gradually
increase as the two are mixed.
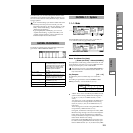
1 Use “SMPL” (3.1–1b) to select the sample that you wish
to crossfade.
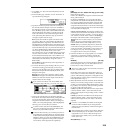
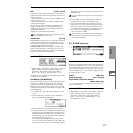
2 From the Edit2 page “UTILITY,” choose “Crossfade
Loop” to open the following dialog box.
3 In “Crossfade Length,” specify the length of the sample
that you wish to crossfade.
If you set this as %, “Crossfade Length” will be calcu-
lated automatically. Specify the proportion of the “Cross-
fade Length” relative to the length between the loop start
and loop end. If you set this to 50%, crossfade will be per-
formed on the second half of the region between loop
start and loop end.
If the length from the beginning of the sample to the
loop start is shorter than the length from the loop start
to the loop end, “Crossfade Length” can be set only up
to the length from the beginning of the sample to the
loop start. In this case, a setting of 100% will not be pos-
sible.
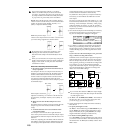
4 Set “Curve” to specify how the volume will change in the
crossfaded region.
Linear: The volume will change linearly.
Power: The volume will change non-linearly. Sometimes
a setting of Linear will produce the impression that the
volume has dropped in the middle of the curve. In such
cases, use Power.
5 In “Save to No.,” specify the save destination sample
number. By default, an unused sample number will be
selected. If “Overwrite” is checked, this cannot be set.
In the case of a stereo sample, the display will
indicate “Save to No.(L)” and “Save to No.(R).” Specify
the save destination sample numbers for the L channel
and R channel respectively.
If you wish to delete the original sample data and over-
write it with the edited sample data, check “Overwrite”.
Normally, you will leave “Save to No.” at its default set-
ting, and execute without checking “Overwrite.” (
☞p.99
“
*1
: About “Overwrite””)
6 To execute Crossfade Loop, press the [F8] (“OK”) key. To
cancel without executing, press the [F7] (“Cancel”) key.
Sound
Playback Repeated playback
(first half of loop)
(second half of loop)
Gradually changes to first half
Loop
Start
Loop
End
Crossfade
Length
Loop
Start
Loop
End