


79
SEQ
1.1
1.22.12.23.13.23.33.44.14.24.34.45.15.26.17.17.2
7 To execute the Create Control Data command, press the
[F8] (“OK”) key. To cancel without executing, press the
[F7] (“Cancel”) key.
Executing the Create Control Data command will use
up a substantial amount of sequencer memory. This
means that if there is only a small amount of free mem-
ory remaining, it may not be possible to create the data.
If this occurs, you should first use “Quantize” to quan-
tize the data, deleting unneeded control data. Alterna-
tively, you can apply the Quantize function to the data
that was inserted by Create Control Data.
Ers. Ctrl Data (Erase Control Data)
Here’s how you can erase various types of data from the
region you specify.
1 In “Track Select,” specify the track from which you wish
to erase control data. If you wish to erase tempo data, set
this to the Master Track. In this case, “Kind” in step
5
will be Te mp o.
2 Select “Create/Ers. Ctrl” to access the dialog box.
3 Specify the region from which the control data will be
erased. Use “From Measure” to “To Measure” to specify
the measures, and “Beat. Tick” to specify the beat and
clock. (By default, “From Measure” and “To Measure”
will be set to the region you specified in the Track Edit
page.)
4 Set “Mode” to Erase.
5 “Kind” to the type of musical data (event) that you wish
to erase.
Ctl.C: Control change data will be erased. In this case,
use “#” to specify the control change number.
AftT: Aftertouch data will be erased.
BEND: Pitch bend data will be erased.
6 To execute the Erase Control Data operation, press the
[F8] (“OK”) key. To cancel without executing, press the
[F7] (“Cancel”) key.
If you wish to erase all control changes from a certain
range of measures, it is also possible to do this by using
“Erase Measure” and selecting Ctl.C as the data to be
erased. However if you use the Erase Control Data
described above, you can specify the range using “Beat.
Tick,” and erase only specific control change data.
Quantize
This command corrects the timing of musical data that has
already been input.
When you execute the Quantize operation, the musical data
will be affected as follows.
•When you execute Quantize on note data, the timing of
the note-on will be corrected, but the length (duration of
the note) will not be affected.
• If the Quantize resolution is set to Hi, the timing will be
adjusted to units of the base resolution (/192), so note
data will not be affected. However, continuous
controller data such as joystick or after touch which
occupies a large amount of memory will be processed so
that two or more data events of an identical type existing
at a single interval of the timing resolution will be
combined into a single event, thus conserving memory.
Similarly, two or more data events of an identical type
existing at the identical timing will be combined into one,
also conserving memory.
1 In “Track Select,” specify the track.
2 Select “Quantize” to access the dialog box.
3 Specify the range that will be quantized. In “From Mea-
sure” and “To Measure,” specify the measures. In
“Beat.Tick” specify the beat and clock. (By default, “From
Measure” and “To End of Measure” will be the range that
you specified in the Track Edit page.)
4 Use “Kind” to select the type of musical data (events)
that will be quantized.
All: All musical data will be quantized.
Note: Note data will be quantized. Use the “Range”
parameters “Btm (Bottom)” and “Top” to specify the
range of notes. This is useful when you wish to quantize
only specific notes (for example, just the snare sound of
the drum track). “Btm (Bottom)” sets the lower limit of
the notes. If you wish to quantize all notes, set this to C–
1. “Top” sets the upper limit of the notes. If you wish to
quantize all notes, set this to G9. The note can also be set
by holding down the [Enter] key and playing a key.
Ctl.C: Control changes will be quantized. To limit the
type of control changes, use “#” to specify the number.
AftT: Both channel pressure and poly key pressure data
will be quantized.
BEND: Pitch bend data will be quantized.
PROG: Program change data will be quantized.
5 In “Resolution,” specify the timing resolution to which
the data will be corrected.
By setting a lower resolution you can save more memory,
but the timing of the playback may not be acceptable.
6 In “Offset,” specify the number of clock by which the
data will be moved forward or backward relative to the
standard timing. A setting of 96 will be , and 48 will be
. Positive (+) settings will adjust the data forward, and
negative (–) settings will adjust the data backward. This
allows you to simulate “pushing” or “dragging” the beat.
7 In “Intensity,” specify the degree of sensitivity to which
the timing will be corrected; i.e., how close to the loca-
tions specified by
5 and 6 the data will be moved.
With a setting of 0, no correction will take place. With a
setting of 100, the data will be moved all the way to the
timing intervals specified by
5 and 6.
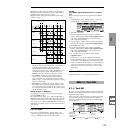
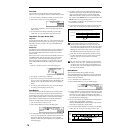
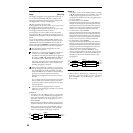
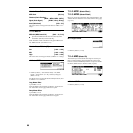
Location
0
3:00 3:24 3:48 3:72 4:00 4:24 4:48
After touch
127
100
Previous data
Start location End location
End Value
Start Value
default value
Example: The controller is aftertouch. Starting location is 3:48, ending location is 4:24,
and end value is set to 100. This will cause the aftertouch value to begin
changing from 3:48, and reach a value of 100 at 4:24.