


92
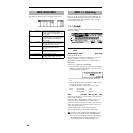
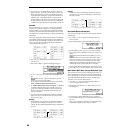
Count Down (Count Down REC) [Off, 4, 8, 3, 6]
When you begin sampling with “Mode (REC Mode)” set to
Manual, this parameter specifies whether there will be a
count-down before sampling begins.
Off: When you press the [START/STOP] key from sampling
standby mode, sampling will begin immediately.
4, 8, 3, 6: When you press the [START/STOP] key from sam-
pling standby mode, sampling will begin after a count-
down of the specified length, based on the tempo of “
(Tempo).” If you specify 4, the count will be 4-3-2-1-0, and
sampling will begin on the count of 0.
This will not be displayed if “Mode” is set to Auto.
(Tempo) [040...240]
This sets the tempo of the count-down when “Count Down”
is used.
The tempo specified here will also be used when the LFO or
delay time of the insert effect is controlled by the BPM/
MIDI SYNC function during sampling (
☞p.219). This can
also be set by the REALTIME CONTROLS C-mode
[TEMPO] knob.
Pre Trigger (Pre Trigger REC) [000...500ms]
When sampling the sound that occurs before sampling is
actually triggered, this setting specifies the time length that
will be “pre-sampled.”
When sampling in auto mode (“Mode (REC Mode)” Auto),
sampling will begin when the input signal exceeds the spec-
ified threshold level “Threshold.” However depending on
the “Threshold” settings, the early portion of the attack
sound may be lost, and in such cases you can use “Pre Trig-
ger.”
Also, when sampling manually (“Mode (REC Mode)” Man-
ual) and using “Count Down,” you may intend to play your
instrument etc. at precisely the downbeat but actually be
slightly ahead of the beat. In such cases, you can use Pre
Trigger REC to sample without loosing the beginning of the
note.
If you increase this value, you will always be sampling
more than you need. Normally you should leave this
set at 000ms, and set it to a minimal value only when
necessary.
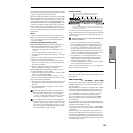
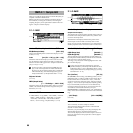
1.1–2c: Recording Level
Recording Level [–inf, –72.0... 0.0...+18.0dB]
Adjust the final level of the signal that will be sampled.
This can also be set in the Input/Pref page.
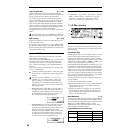
When you press the [REC/WRITE] key you will enter sam-
pling standby mode, and you will be able to adjust the sig-
nal level.
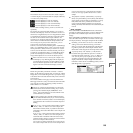
Initially you should set this to 0.0, and make adjustments so
that the level of the bar is as high as possible without
exceeding 0 dB. If 0 dB is exceeded, “CLIP!” will be dis-
played. This indicates that the sampling signal level is exces-
sive. Adjust the level so that “CLIP!” does not appear.
In order to sample with the maximum dynamic range,
use the [LEVEL] knob to adjust the level as high as pos-
sible without making “ADC OVER!” appear. Then set
“Lvl” (Input/Pref page) to 127, and adjust “Recording
Level” (Recording page, Input/Pref page) as high as
possible without making the “CLIP!” indication appear.
In the sampling standby mode after you press the [REC/
WRITE] key, the sound that is output from the AUDIO
OUTPUT L/MONO, R and from the headphones will be
adjusted by the “Recording Level,” but when you cancel
sampling standby or cancel sampling, the sound will be
output at the 0 dB level. If you have lowered the
“Recording Level” below 0 dB, please be careful of sud-
den changes in volume.
If the sound is still distorted even if you lower the
“Recording Level,” it is possible that distortion is
occurring in the input stage of the AUDIO INPUT, or
that distortion is being caused by the settings of the
internal effect.
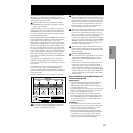
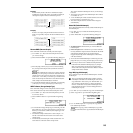
Excessive signal levels in the input stage of the AUDIO
INPUT can be verified in the Recording page, Input/
Pref page. If an indication of “ADC OVER!” appears
above the “Recording Level” bar display, the distortion
is due to excessive levels in the input stage of the
AUDIO INPUT. Adjust the [LEVEL] knob until the
“ADC OVER!” display no longer appears.
(see diagram below)
If there is still distortion even after [LEVEL] has been
lowered, it is possible that the distortion is being caused
by the settings of the internal effect. Lower the Input 1,
2 “Lvl” (Input/Pref page), or adjust the effect settings.
(see diagram below)
If you have sampled at a low input level, you can exe-
cute Normalize in Utility “Norm./Level Adj.” (2.1–2e)
to amplify the level to the maximum possible without
clipping.
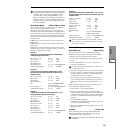
AUDIO INPUT
ADC
Analog to Digital
Converter
[LEVEL]
(MIN...MAX)
"Lvl" (1.1–3a)
[127=0dB]
"Pan" (1.1–3a)
ADC OVER!
L-Mono
R-Mono
Stereo
"Mode" (1.1–2a)
Insert
Effect
CLIP!
"Recording Level" (1.1–2c)
[–inf ... 0.0dB ... +18.0dB]