


● When song data plays back with the wrong
sounds
When song data created using the SC-55 or the SC-155 is
played back by this unit, the sounds that were intended may
not be selected. This can occur for one of the following two
reasons.
1. The wrong Variation number was selected
When a Variation number for which sounds do not exist is
selected on this unit, the display will show a message of No
INSTRUMENT (or for the Drum Part, No DRUM SET). Even if
the relevant Part is not displayed, this message will be dis-
played briefly when any Part receives such data.
The data which specifies sounds is usually placed in the begin-
ning of the song data, so check whether this message appears
when the song data starts. If this message appears, it is possi-
ble that a control change Bank Select message (or for the
Drum Part, a program change) within the song is incorrect.
(p.126) Refer to the instrument list (p.154), and modify the data
value so that an existing sound is selected.
2. The wrong sound map was selected
On this unit, the lower byte (LSB) of a control change Bank
Select message (control change 32) can be used to switch
sound maps (p.126).
Control Change 32 values
00: The map selected by the panel buttons will be used.
01: The SC-55 map will be selected.
02: The SC-88 map will be selected.
03: The Native map will be selected.
If values other than these are transmitted to this unit, a map for
which this unit has no sounds will be selected, so a message
of No INSTRUMENT will appear. In the case of the SC-
55/155/55mkII, the LSB of this Bank Select message is
ignored, so sound selection will not be affected regardless of
the value that is transmitted. However since Bank Select mes-
sages are used as a pair of upper and lower values (MSB and
LSB), it is best to input 00 as the lower value (LSB) in your
song data.
● Using screen display data for the SC-55
series
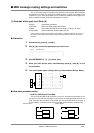
❍ About screen display data
The level indicator area in the center of the SC-55/55mkII/SC-
88/VL/Pro display (bar display) is able to display 16 x 16 dot
graphics that are transmitted to it as exclusive messages. By
transmitting this data together with the song data, you can
make the display change as the song progresses.
The SC-88/VL/Pro can hold 10 pages of display data.
Exclusive messages can be used to display a specific page,
and to adjust the duration for which each page will be dis-
played (p.193).
Also, text can be displayed in the INSTRUMENT display area,
allowing song titles or lyrics to be displayed.
Even display data for the SC-55/55mkII can be used without
change to produce the same display. In this case, the data will
be displayed as the first page of the 10 pages.
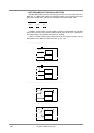
❍ Frame Draw function (p.110)
The SC-88/Pro has a Frame Draw function. This function
allows you to create display data for each page using the front
panel buttons, and to transmit the data you create as an exclu-
sive message. By using this to create data in the appropriate
sequence and timing, you can create display data with move-
ment.
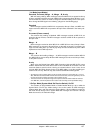
● How to use a Part other than Part 10 as a
Drum Part, so that two Drum Sets can be
used simultaneously
❍ About the Part mode
Each Part 1--16 can be used either for normal sounds (Normal
Part) or for a drum set (Drum Part). This selection is made by
the Part Mode setting. (p.27)
The mode of a Drum Part can be either Drum1 or Drum2.
Since the same Drum Set will automatically be selected for
Parts that have the same Part Mode, this means that up to 2
types of drum set can be used simultaneously.
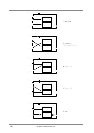
For example if you set the Part Mode of Part 10 and Part 11
respectively to Drum1 and Drum2, you could select STAN-
DARD1 Set for Part 10 and JAZZ Set for Part 11. If the Part
Mode of both Parts 10 and 11 were set to Drum1, selecting
STANDARD1 Set for Part 10 would automatically select
STANDARD1 Set for Part 11 as well.
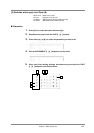
❍ Settings via MIDI
To set the Part Mode using MIDI messages, you need to use
system exclusive messages.
For example if you wish to set the Part Mode of Part 11 to
Drum2, transmit the following message. (p.197)
F0 41
10 42 12 40 1A 15 02 0F F7
10 : Device ID (17)
40 1A 15 :
Address (USE FOR RHYTHM PART of Part 11)
02 : Data (Part Mode Drum2)
To select a Drum Set after setting the Part Mode, transmit a
program change to Part 11.
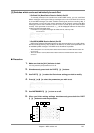
● Using Aftertouch
First connect a device that is able to transmit aftertouch mes-
sages to this unit. Be aware that some MIDI keyboards are not
able to transmit aftertouch messages.
When this unit receives aftertouch messages, the way in which
it responds will depend on its settings. With the factory settings
or immediately after this unit has been initialized by a GS
Reset etc., aftertouch messages will have no effect, so you will
need to change the settings if you want aftertouch to do some-
thing.
Aftertouch parameters are divided into the following two
groups.
• Channel aftertouch (CAf):
These messages apply an effect to the entire Part of a
given channel. For example if you hold down a "C-E-
G" chord and then press strongly on just the "C" note,
the effect will apply to all notes "C-E-G."
• Polyphonic aftertouch (PAf):
These messages apply an effect independently for
each note number. For example if you hold down a "C-
E-G" chord and then press strongly on just the "C"
note, the effect will apply only to the "C" note.
Of the Channel Aftertouch parameters, the following seven can
be set from the panel (p.30).
Chapter 7. MIDI and the unit
143