


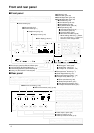

Front and rear panel
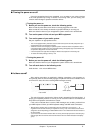
■ Front panel
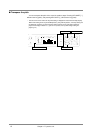
■ Rear panel
MIDI IN B
POWER
VOLUME
PHONES
PART
INSTRUMENTPART
INSTRUMENT
LEVEL
PAN
REVERB
CHORUS
KEY SHIFT
MIDI CH
SELECT
EFX ON/OFF
USER
INST
VIB RATE
AT TACK
VIB DEPTH
CUTOFF
DECAY
VIB DELAY
RESONANCE
RELEASE
PARTDELAY
DELAY
PREVIEW
(
PUSH
)
EFX VALUEEFX PARAMEFX TYPE
ALL
MUTE
SC
-
55
MAP
SC
-
88
MAP
LEVEL
PAN
12345678910111213141516
REVERB
CHORUS
K SHIFT
MIDI CH
INPUT
COMPUTER
INPUT
VOLUME
PC
-
2
PC
-
1
MIDI
RLRL
OUTPUT 2
RL
OUT/THRU IN A
IN
B
Mac
MIDI
OUTPUT 1
● All button (p.34)
● Mute button (p.25, 34)
● SC-55 Map button (p.25, 34)
● SC-88 Map button (p.25, 34)
● Part buttons (p.18)
● Level buttons (p.25, 34)
● Reverb buttons (p.50)
● Key Shift buttons (p.25, 34)
● Delay buttons (p.50)
● Instrument buttons (p.18)
● Pan buttons (p.25, 34)
● Chorus buttons (p.50)
● MIDI Channel buttons (p.22)
* While holding down the [l] button,
you can press the [r ] button to
make the value change faster.
6
● Power switch (p.9)
● Volume knob (p.9)
● Preview switch (p.11)
● Headphone jack (p.15)
● Display screen (p.37)
● Bar display (p.23, 37)
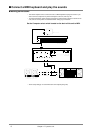
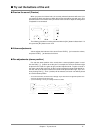
● Audio output 1 jacks (p.8)
● Audio input jacks (p.15)
● Audio input volume knob (p.15)
● MIDI IN A connector (p.130)
● MIDI IN B connector (rear) (p.135)
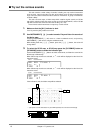
●
Effect (orange) (p.56)/User Edit(red) indicator (p.97)
● User Inst button(p.97)/Effect button(p.56)
● Select button(p.56)/Effect ON/OFF button(p.56)
● Select (p.31)/Effect ON/OFF indicator(p.56)
● Effect type buttons (p.56)
● Vibrato Rate buttons (p.31)
● Envelope Attack buttons (p.31)
● Effect parameter buttons (p.56)
● Vibrato Depth buttons (p.31)
●
Filter Cutoff Frequency buttons
(p.31)
● Envelope Decay buttons (p.31)
● Effect value buttons (p.56)
● Vibrato Delay buttons (p.31)
● Filter Resonance buttons (p.31)
● Envelope Release buttons (p.31)
● MIDI IN B connector (front) (p.135)
When IN B Select is set to Rear (the factory setting), the front MIDI IN
B connector cannot be used.
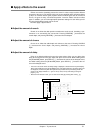
● MIDI OUT/THRU connector
This connector functions either as MIDI OUT or MIDI THRU,
depending on the setting of OUT/THRU Select (p.136). When the
unit is shipped, this is set to MIDI OUT.
● Computer connector
A special computer cable (sold separately) can be
connected here. The type of cable required will
depend on your computer. When the Computer
switch located at the left is set to MIDI, the comput-
er connector cannot be used (p.120).
● Computer switch
Set this switch depending on the type of computer
connected to the Computer connector, or the soft-
ware you are using. Turn the power off before chang-
ing the setting of this switch. If you wish to use the
MIDI connectors, set this switch to MIDI. (p.120)
● Audio output 2 jacks
At the factory settings, no sound will be sent from output2
jacks.(p.29)