


Editing a Normal Voice
MOTIF XS Owner’s Manual
108
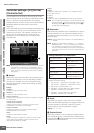
Voice mode Song mode Pattern mode Mixing mode Master mode Utility mode File mode
Performance
mode
Sampling
mode 1
Sampling
mode 2
Reference
1 Element Out 1 – 8*
Determines which Insertion Effect (A or B) is used to
process each individual Element. The “thru” setting lets
you bypass the Insertion Effects for the specified element.
When INSERTION CONNECT (2) is set to “ins L,” the
signal from each Element is output to the Insertion L
regardless of the setting here.
Settings: thru (through), ins A (Insertion A), ins B (Insertion B)
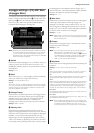
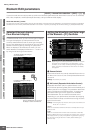
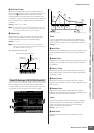
2 INSERTION CONNECT (Insertion Connection)
From this display you can set the effect routing for Insertion
Effects A and B. The setting changes are shown on the
diagram in the display, giving you a clear picture of how
the signal is routed. For details, see page 69.
Settings: parallel, ins A F B, ins B F A, ins L
parallel
Signals processed with the Insertion Effect A and B block will be sent
to Master Effect, Master EQ, Reverb and Chorus block.
ins A F B
Signals processed with the Insertion Effect A will be sent to the
Insertion Effect B and signals processed with the Insertion Effect B is
sent to Master Effect, Master EQ, Reverb and Chorus block.
ins B F A
Signals processed with the Insertion Effect B will be sent to the
Insertion Effect A and signals processed with the Insertion Effect A is
sent to Master Effect, Master EQ, Reverb and Chorus block.
ins L
The Insertion Effects A and B are unified, then used as the Vocoder.
Signals processed with the Vocoder block will be sent to Master Effect,
Master EQ, Reverb and Chorus block.
n When “ins L” is selected, “ins L” is shown in the tab menu of
the [SF2] button and the tab menu of the [SF3] button
disappears.
n For detailed instructions on using the Vocoder, see page 109.
n When “ins L” is selected, the audio signal will be output from
this instrument in mono.
3 Insertion A (Insertion A Category/Type)*
4 Insertion B (Insertion B Category/Type)*
Determines the Effect type for Insertion A and B. From the
Category column, you can select one of the Effect
Categories, each of which contains similar Effect types.
From the Type column, you can select one of the Effect
Types listed in the selected Category.
Settings: Details about the Effect categories and types are described
on page 70.
5 Chorus (Chorus Category/Type)*
Selects a Chorus Effect type after selecting a category.
From the Category column, you can select one of the Effect
Categories, each of which contains similar Effect types.
From the Type column, you can select one of the Effect
types listed in the selected Category.
Settings: Details about the Effect categories and types are described
on page 70.
6 Reverb (Reverb Type)*
Determines the Reverb Effect type. It is not necessary to
select a Category because there is only one category in
Reverb.
Settings: Details about the Effect types are described on page 70.
7 Chorus Send*
Adjusts the chorus send level. The higher the value the
deeper the Chorus.
Settings: 0 – 127
8 Reverb Send*
Adjusts the reverb send level. The higher the value the
deeper the reverb.
Settings: 0 – 127
9 CHORUS TO REVERB
Determines the Send level of the signal sent from the
Chorus Effect to the Reverb Effect. The higher the value,
the deeper the Reverb that is applied to the Chorus-
processed signal.
Settings: 0 – 127
) Reverb Return
Determines the Return level of the Reverb Effect.
Settings: 0 – 127
! Chorus Return
Determines the Return level of the Chorus Effect.
Settings: 0 – 127
@ Reverb Pan
Determines the pan position of the Reverb effect sound.
Settings: L63 (far left) – C (center) – R63 (far right)
# Chorus Pan
Determines the pan position of the Chorus effect sound.
Settings: L63 (far left) – C (center) – R63 (far right)
A
B
A
B
A
B
Vocoder
A to B
B to A
parallel
ins L