


Start Guide
Step 5: Creating a Pattern
MOTIF XS Owner’s Manual
38
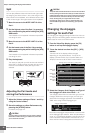
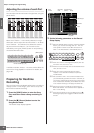
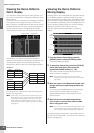
Viewing the Demo Pattern’s
Patch display
From the Patch display called up via the [F4] button, you
can confirm what “Phrase” is assigned to each track of the
Pattern Section.
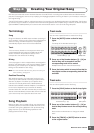
A “Phrase” is a short musical/rhythmic passage consisting
of a single track for a single instrument, such as drum,
bass, and guitar. This MIDI sequence data can be used as
small building blocks for a Song, and can be assigned to
any track and any Section. A single Pattern provides
memory space for 256 of your own original User Phrases.
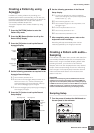
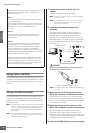
As indicated in this display, the performance data is
recorded to the Phrase then the Phrase is assigned to the
recording track. Note that the created Phrase can be
assigned to a different track of the same/different Section.
Try changing the Phrase for each track and assign each
Phrase to an empty track.
n Please keep in mind that Phrases are provided only for the
Demo Patterns and the number of provided Phrases differs
depending on the Demo Pattern. When you want to use a
Phrase assigned to a different Pattern, execute the Copy
Phrase function by using the [SF5] Copy button. For details,
see page 212.
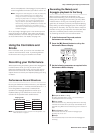
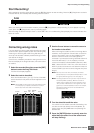
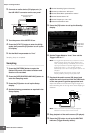
Viewing the Demo Pattern’s
Mixing display
A Mixing refers to the multi-timbral tone generator settings
for the Pattern playback. A Mixing consists of 16 Parts,
which correspond to the tracks, and in this display you can
adjust the various mixing related parameters for each Part.
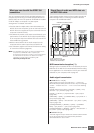
From the Pattern Play display, press the [MIXING] button to
call up the Mixing display, letting you confirm the Mixing
settings for each Part: Voice, volume, pan, etc.
Now, let’s adjust the Mixing parameters in the Mixing
display.
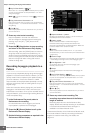
1 From the Pattern Play display, press the
[MIXING] button to enter the Mixing mode.
The Mixing display will appear.
2 To select the desired Part, press the [TRACK]
button (the lamp lights), then press the
appropriate Number button [1] – [16].
Here, select the Part corresponding to the track to
which the Phrase is assigned.
n If you want to confirm to which track the Phrase is
assigned, press the [EXIT] button to return to the Pattern
Play display.
3 Move the cursor to the Bank and Number, then
change the Voice by specifying the Bank and
Number.
If you press the [PROGRAM] button (the lamp lights),
you can select the desired Voice by using the
appropriate Bank buttons, Group buttons and the
Number buttons.
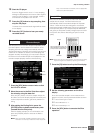
4 Move the cursor to the desired parameter,
such as pan or volume, then rotate the data
dial to change the value.
n If you wish to edit more detailed Mixing parameters, enter
the Mixing Edit mode by pressing the [EDIT] button. For
more information about the Mixing Edit, see page 233.
The Mixing settings are included in each Pattern and can
be stored as an entire Pattern. For instructions on storing a
Pattern, see page 218.
Phrase number Phrase name
Tra ck 1
Tra ck 2
:
Tra ck 16
Phrase 001
Phrase 002
:
Phrase 003
Tra ck 1
Tra ck 2
:
Tra ck 16
Phrase 002
Phrase 003
:
Phrase 004
Phrase 001
Phrase 002
Phrase 003
Phrase 004
:
MIDI data
MIDI data
MIDI data
MIDI data
:
Section A
Section B
Part
number
Voice
Pan
Volume