


Editing MIDI Events (Pattern Edit)
MOTIF XS Owner’s Manual
220
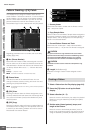
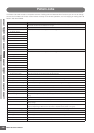
Voice mode Song mode Pattern mode Mixing mode Master mode Utility mode File mode
Performance
mode
Sampling
mode 1
Sampling
mode 2
Reference
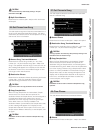
¢ [F4] Erase
This menu appears as soon as Recording starts. During
Pattern recording, pressing the key while holding the [F4]
button erases all the note events of the pressed key. This is
useful in loop recording since it allows you to quickly delete
wrong notes played for a specific key.
∞ [F5] Click
This is the same as in the Song Record mode. See
page 188.
Realtime Recording Procedure
This section explains how to record your performance
using the Realtime Recording features. Please keep in
mind that the procedure differs depending on the Record
Type and Record Track set from the Record Setup display.
The operation is same as the one in the Song Record
display (page 189).
Editing MIDI Events (Pattern Edit)
The Pattern Edit mode lets you edit the already recorded Phrases or insert the new data to the Phrases. It can be used to
correct mistakes as well as add dynamics or effects such as vibrato to refine and finish the Phrase.
Press the [EDIT] button from the Pattern Play mode to go to the Pattern Edit mode.
n The Pattern Edit mode gives you comprehensive, detailed controls for editing the MIDI events of individual Pattern tracks. MIDI events are
messages (such as note on/off, note number, program change number, etc.) that make up the data of a recorded phrase.
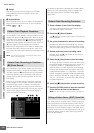
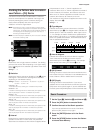
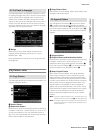
n Like the Song Edit mode, Pattern Edit consists of the Event List display and the Insert Event window. The Event List display lets you correct
or delete already inserted MIDI events and the Insert Event window lets you insert new events to the Pattern. By using the Insert Event
window, you can input the events one by one. The Event List display will always appear when the Pattern Edit mode is first called up.
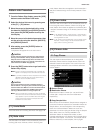
Editing the recorded data
Here in outline form is the process of correcting or deleting
already recorded events.
1 Select a track to be edited in the Pattern Play
display.
If you wish to edit a certain phrase, press the [F4]
button to call up the Patch display (page 212), then
select the desired Phrase.
2 Press the [EDIT] button to enter the Pattern
Edit mode.
The Event List display (page 221) of the Pattern
appears.
n You can select the desired track with the Number buttons
[1] – [16] by pressing the [TRACK] button (the lamp lights)
after entering the Pattern Edit mode.
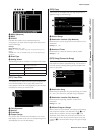
3 Move the cursor to the event or parameter to
be edited.
Use the [L]/[M] (Cursor Up/Down) button to move the
cursor to the desired timing. Press the [G] (Rewind)/
[H] (Fast Forward) button to move the cursor by
single measures. Use the [<]/[>] (Cursor Left/Right)
button to move the cursor to the parameter to be
edited.
n For details about each event and parameter, see page 76.
n Use the View Filter function (page 221) to help you quickly
find desired events.
4 Change the parameter settings or location of
the event.
Edit the value by using the [INC/YES], [DEC/NO]
buttons and the data dial. The edited event will flash on
the display.
Change the event location by editing the MEAS
(measure), BEAT, and CLOCK.
Press the [F6] button to delete the event at the cursor
location.
5 After you’ve finished editing a parameter,
press the [ENTER] button to confirm and enter
the edit (the event will stop flashing).
If the cursor is moved to a new event while the current
event is still flashing, editing of the current event is
cancelled.
6 Press the [EXIT] button to go back to the
Pattern Play display.
7 Press the [STORE] button to call up the Pattern
Store window (page 218), then store the
created Pattern.