


Start Guide
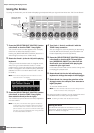
Step 3: Selecting and Playing a Performance
MOTIF XS Owner’s Manual
30
••••••••••••••••••••••••••••••••••••
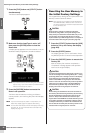
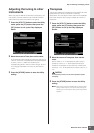
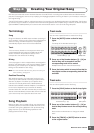
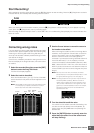
Split
You can play different Voices with the left and right hands
by assigning one Voice to Part 1, with a note range in the
lower section of the keyboard, and a different Voice to Part
2, with a note range in the higher section of the keyboard.
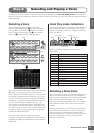
1 Move the cursor to the NOTE LIMIT HI of the
Part 1.
2 Set the highest note of the Part 1 by pressing
the corresponding key while holding the [SF6]
KBD button.
The illustration of the keyboard indicates the specified
note range in color.
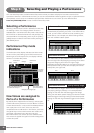
3 Move the cursor to the NOTE LIMIT LO of the
Part 2.
4 Set the lowest note of the Part 2 by pressing
the corresponding key while holding the [SF6]
KBD button.
The illustration of the keyboard indicates the specified
note range in color.
5 Play the keyboard.
The notes you play with your left hand sound the Piano
Voice (Part 1), while the notes you play with your right
hand sound the different Voice (Part 2) you have
selected.
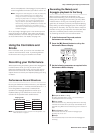
Adjusting the Part levels and
••••••••••••••••••••••••••••••••••••
storing the Performance
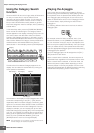
1
Adjust the Volume settings of Parts 1 and 2 by
using the Control sliders.
2 Store the settings as a User Performance by
pressing the [STORE] button.
For details, see page 142.
If you are editing a Performance and you select a different
Performance without storing your edited one, all the edits
you’ve made will be erased.
The preset data of the Performances is stored in the User Bank
memory. Storing the Performance data you created erases the
preset Performance data. If you wish to restore the preset data
of the Performance, execute the Factory Set Job in the Utility
mode, resulting that your original data will be erased.
Consequently, make sure to save any important data to an
external USB storage device to avoid losing your important
data.
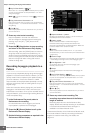
Changing the Arpeggio
settings for each Part
Try changing the Arpeggio settings for each Part. You can
assign the rhythm or backing pattern that best matches the
desired style of music to the Performance.
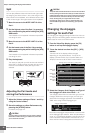
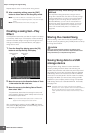
1 From the Voice Play display, press the [F4]
button to call up the Arpeggio display.
2 Press the desired one from the [SF1] – [SF5]
buttons.
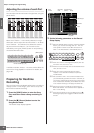
The lower half of the display will be changed
depending on the pressed button. The top of the
display (Common Switch, Sync Quantize Value and
Tempo) is common to all the Sub Function buttons.
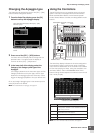
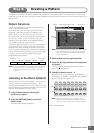
3 Select the Category, Sub Category and Type of
the Arpeggio for each of the Parts 1 – 4.
The Category determines the instrument type, the Sub
Category determines the rhythm type, and the Type
determines the Arpeggio type itself. Set the BANK to
“PRE” when using a Preset Arpeggio type.
Note that the Arpeggio Hold parameter is useful as well
as the Arpeggio type selection. When this parameter is
set to “on,” the Arpeggio playback continues even if the
note is released. This parameter should be set to “on”
when the Drum Voice is assigned to the Part and you
Part 1: Piano Voice Part 2: Other Voice
CAUTION
CAUTION
Settings common to the [SF1] – [SF5] buttons
Step 2
Settings for
Part 1
Settings for
Part 2
Settings for
Part 3
Settings for
Part 4
Arpeggio Hold parameter