


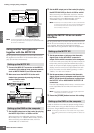

Connecting to
a Computer
Controlling a DAW on Your Computer from the MOTIF XS
MOTIF XS Owner’s Manual
52
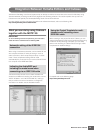
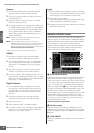
Cubase
1 Pull down the [Devices] menu and select [Device
Setup] to call up the “Device Setup” window.
2 Click the [+] button and add the “Mackie Control” or
“Yamaha MOTIF XS.”
3 Select the device of “Mackie Control” or “Yamaha
MOTIF XS” added to the list.
4 Set the MIDI Input Port to “Yamaha MOTIF XS6(7, 8)-2”
or “YAMAHA MOTIF XS6(7, 8) Port2” or “mLAN MIDI In
(2)” or “MOTIF XS Remote,” then set the MIDI Output
Port to “Yamaha MOTIF XS6 (7, 8)-2” or “YAMAHA
MOTIF XS6(7, 8) Port2” or “mLAN MIDI Out (2)” or
“MOTIF XS Remote.”
n Unlike with the Mackie Control, the MOTIF XS does not
support UserA and UserB (FootSw).
n When connecting the MOTIF XS to a computer via an
IEEE1394 cable, starting Cubase (with the Extension Module
installed) executes the above settings automatically. The
Extension Module can be downloaded from the following URL:
http://www.yamahasynth.com/download/
* Mackie Control is the trademark of Mackie Designs, Inc.
SONAR
1 Pull down the [Options] menu and select [MIDI
Devices] to call up the “MIDI Devices” window.
2 Add “Yamaha MOTIF XS6(7, 8)-2” or “mLAN MIDI In
(2)” to the Input Device, then add “Yamaha MOTIF
XS6(7, 8)-2” or “mLAN MIDI Out (2)” to the Output
Device.
3 Pull down the [Options] menu and select [Control
Surfaces] to call up the Control Surface window.
4 Click the [+] button, select “Mackie Control,” then set
the Input Port to “Yamaha MOTIF XS6(7, 8)-2” or “mLAN
MIDI In (2)” and set the Output Port to “Yamaha MOTIF
XS6(7, 8)-2” or “mLAN MIDI Out (2).”
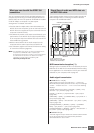
Digital Performer
1 In the Audio/MIDI setup of a Macintosh computer,
connect Port 2 of the interface to Port 2 of the tone
generator. When there is only one Port for the tone
generator, add the new Port, then connect it to the
interface.
2 Pull down the [Setup] menu and select [Control
Surfaces] to call up the Control Surface window.
3 Click the [+] button.
4 Select “Mackie Control” in the Driver section.
5 In the box for setting “Unit” and “MIDI,” select “Mackie
Control” in the “Unit” section and select “MOTIF XS
New Port 2” in the “MIDI” section.
Logic
1 Set the software to be controlled to “Logic” in the Utility
mode, then press the [REMOTE ON/OFF] button so that
its lamp lights to enter the Remote Control mode.
2 Start Logic on the computer.
Logic automatically recognizes the MOTIF XS as Logic
Control and performs the required settings.
3 Set both the Input Port and the Output Port to “Yamaha
MOTIF XS6 (7, 8) Port 2.”
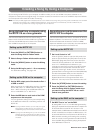
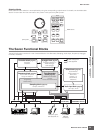
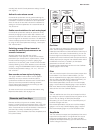
Remote Control mode
To enter the Remote Control mode, press the REMOTE
[ON/OFF] button (the lamp flashes). The REMOTE display
appears (like those shown below), and the panel controls
(such as buttons, knobs, sliders, and data dial) are
enabled for Remote operation of the computer software
(their normal functions are disabled). Press this button
again to exit from the Remote Control mode.
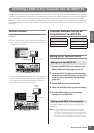
1 Knob Functions/Values
Indicates the function assigned to the knob and the current
value. When the same function is assigned to all eight
knobs, the function is indicated only at the column of knob
1. The knob function can be specified by pressing one of
the [F1] – [F5] and [SF1] – [SF4] buttons after selecting a
page in the Page Select (5) menu. For details about the
functions of the knobs for each DAW software, refer to the
Remote Control Function List in the Data List 2 (PDF
documentation) which can be downloaded from the online
Yamaha Manual Library. Visit the following URL, enter
“MOTIF XS” in the Model Name box, then click “Search.” In
the results. you can find “Data List 2” for the MOTIF XS.
Yamaha Manual Library URL:
http://www.yamaha.co.jp/manual/
2 Channel number
Indicates the channel number. The background of the
selected channel number turns black. The channel number
can be changed by using the [F4] E Bank and [F5] Bank
F buttons.
3 LEVEL METER
Indicates the volume level of playback for each channel in
real time.
1
5
4
2
3