


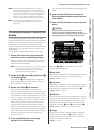
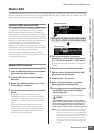
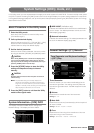

Using as a Master Keyboard (Master mode)
MOTIF XS Owner’s Manual
255
Voice mode
Song mode
Pattern mode
Mixing mode
Master mode
Utility mode
File mode
Performance
mode
Sampling
mode 1
Sampling
mode 2
Reference
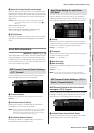
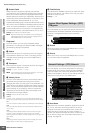
4 Knob Ctrl Assign (Knob Control Assign)
From this display you can set which row of Knob functions
will be lit and selected. When set to “zone,” selecting the
Master lights no lamp and automatically calls up the Knob/
Slider functions specifically set for each respective Zone
(page 257).
Settings: Differs depending on the Mode setting above. Note that
“zone” can be selected only when the Zone Switch (3) is
set to “on.”
When the Mode is set to Voice:
tone 1, tone 2, ARP FX, zone
When the Mode is set to Performance, Pattern or Song:
tone 1, tone 2, ARP FX, reverb, chorus, pan, zone
5 [F6] Get Name
Pressing the [F6] button assigns the name of the currently
selected Voice/Performance/Song/Pattern to the Master
name.
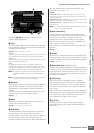
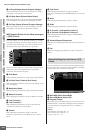
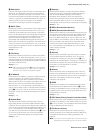
Zone Edit parameters
[MASTER] ➞ [EDIT] ➞ [1] – [8]
These parameters are for editing the individual Zones that
make up a Master. To call up the Zone Edit display, press
the [EDIT] button in the Master Play mode, then press any
of the Number buttons [1] – [8]. Press the [EXIT] button to
return to the Master Play display.
From this display you can set how each Zone transmits
MIDI messages when you play the keyboard.
1 Transmit Channel
Determines the MIDI Transmit Channel for each Zone.
Settings: 1 – 16
2 Int Switch (Internal Switch)
Determines whether or not MIDI data for each Zone is
transmitted to the internal tone generator.
n When the Local Control parameter is set to “off” on the MIDI
display (page 267) in the Utility mode, MIDI data for each
Zone will not be transmitted to the internal tone generator,
even if the Int Switch parameter is set to “on.”
3 Ext Switch (External Switch)
Determines whether or not MIDI data for each Zone is
transmitted to an external MIDI device.
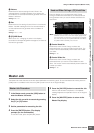
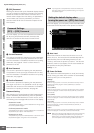
From this display you can set the pitch- and keyboard-
related parameters for each Zone—allowing you to set up
Zone splits and determine the pitch range for each Zone.
1 Octave
Determines the amount in octaves by which the range of
the Zone is shifted up or down. You can adjust the offset up
or down over a maximum range of three octaves.
Settings: -3 – +0 (Default) – +3
2 Transpose
Determines the amount in semitones by which the range of
the Zone is shifted up or down.
Settings: -11 – +0 (Default) – +11
3 Note Limit Low
4 Note Limit High
Determines the lowest and highest notes of the range for
each Zone.
Settings: C -2 – G8
n You can also set the note directly from the Keyboard, by
holding down the [SF6] button and pressing the desired key.
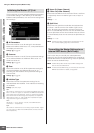
MIDI Transmit Switch for the Voice related
messages—[SF1] Program
From this display, you can determine whether or not MIDI
messages controlling Voice selection for each Zone are
transmitted to the internal/external tone generator.
1 Int Bank Select (Internal Bank Select)
Determines whether or not to transmit Bank Select MSB/
LSB messages to the internal tone generator.
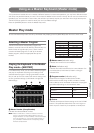
MIDI Transmit Channel/Switch Settings
—[F1] Transmit
1
2
3
Note Range Setting for each Zone—
[F2] Note
MIDI Transmit Switch Settings—[F3] Tx
Switch (Transmit Switch)
1
2
3
4
1
2
3
4