


MOTIF XS Owner’s Manual
Creating a Voice/Performance by Using the Sampling Function
167
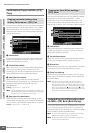
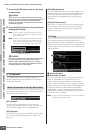
Voice mode
Song mode
Pattern mode
Mixing mode
Master mode
Utility mode
File mode
Performance
mode
Sampling
mode 1
Sampling
mode 2
Reference
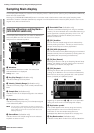
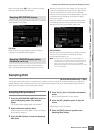
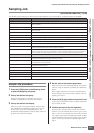
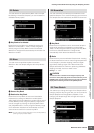
When the Trigger Mode (8) is set to “manual,” pressing
this button starts Sampling immediately.
During Sampling, a graphic representation of the recorded
audio appears in the display.
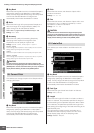
[F6] Stop
Press this button to stop Sampling. When Sampling is
complete, the FINISHED display appears.
When the [SF1] Confirm is turned on before Sampling
starts, the FINISHED display below appears as soon as
Sampling is finished. From this display, you can hear and
confirm the Sample by pressing the [SF1] Audition button.
If you are satisfied with the sound, press the [ENTER]
button to fix the Sampling result as Sample data. If you are
not satisfied with the Sampling result, press the [EXIT]
button then try again.
When [SF1] Confirm is turned off before Sampling starts,
the Sampling operation will automatically fix the Sample
data and return to the Setup display (page 164).
[SF1] Audition
You can hear the recorded Sample by holding this button.
This lets you check whether the Sampling has been
executed appropriately or not.
n When [SF1] Confirm (page 166) is turned off before the
Sampling starts, the Sampling operation will automatically fix
the Sample data and return to the Setup display (page 164).
Please note that the instrument returns to the STANDBY
display after Sampling is finished when Record Next is turned
on in the Setup display.
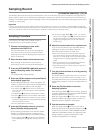
Sampling Edit
[INTEGRATED SAMPLING] ➞ [EDIT]
The Sampling Edit mode gives you comprehensive, detailed controls for editing the recorded Sample and changing the
Sample settings. Press the [EDIT] button from the Sampling Main display to call up the Sampling Edit display. Press the
[EXIT] button to go back to the Sampling Main display.
Sampling Edit procedure
1
Press the [INTEGRATED SAMPLING] button to
enter the Sampling mode. (The indicator
lights.)
The Sampling Main display (page 162) appears.
2 Select a Waveform and Key Bank.
Select a Waveform and Key Bank to which the Sample
to be edited is assigned.
3 Press the [EDIT] button to enter the Sampling
Edit mode.
4 Press the [F1] Trim or [F2] Param (Parameter)
button.
Set the desired parameter in each display.
5 Press the [SF1] Audition button to hear the
sound.
Repeat steps 4 and 5 as desired.
6 Press the [EXIT] button to go back to the
Sampling Main display.
Sampling RECORDING display
Sampling FINISHED display (when
Confirm is set to on)