


Installing Optional Hardware
MOTIF XS Owner’s Manual
295
Appendix
Optional DIMM Installation
This section explains how to install DIMM memory modules
to the MOTIF XS.
The MOTIF XS does not necessarily support all
commercially available DIMMs. Yamaha cannot guarantee
operation of DIMMs that you purchase. Before purchasing
DIMMs, please consult your Yamaha dealer, or an
authorized Yamaha distributor (see list at end of the
Owner’s Manual) for advice, or see the following website:
http://www.yamahasynth.com/
•Yamaha recommends that you purchase DIMMs that
conform to the JEDEC* standard. Please be aware,
however, that conformance to this standard does not
constitute a guarantee that the DIMMs will operate
correctly on the MOTIF XS.
*JEDEC (Joint Electron Device Engineering Council) sets
standards for terminal configurations within electronic devices.
• Use only 168-pin DIMMs of 64, 128, 256 or 512 MB
capacity (synchronized DRAM; PC100 or PC133).
• When installing DIMMs, make sure to install them in a
matched pair of the same capacity. You cannot install
only one module and leave the second memory socket
open. Also make sure each DIMM in the pair is of the
same manufacturer and the same type. DIMMs of
different makers and configurations may not work
together.
• When purchasing DIMMs, make sure that the DIMM
design does not utilize more than 18 memory chips per
module. (DIMMs comprised of more than 18 chips do not
operate correctly on the MOTIF XS.)
1 Turn the power of the MOTIF XS off, and
disconnect the AC power cord. Also, make
sure to disconnect the MOTIF XS from any
connected external devices.
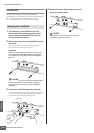
2 Turn over the MOTIF XS so that the keyboard
faces down, giving you direct access to the
underside of the instrument.
To protect the Knobs, Wheels and Sliders from
damage, place the keyboard so the four corners are
supported by something that provides sufficient
support like magazines or cushions. Place supports at
all four corners, taking care not to touch the Knobs,
Wheels and Sliders.
Since the instrument—particularly the MOTIF XS8—is very
heavy, this procedure should not be done alone, but by two or
three people.
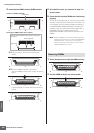
3 Remove the cover from the bottom.
With the rear panel of the MOTIF XS facing you, remove
the screws from the cover by using the Phillips
screwdriver. After removing the screws, slide the cover
away to remove it.
Important
Keep the removed screws in a safe place. They will be used
when re-attaching the cover to the instrument after installing
the DIMMs.
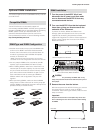
Compatible DIMMs
DIMM Type and DIMM Configuration
64MB x 2 = 128MB 128MB x 2 = 256MB
256MB x 2 = 512MB 512MB x 2 = 1GB
DIMM Installation
View of the keyboard from the bottom
Place supports at all four corners, taking care
not to touch the Knobs, Wheels and Sliders.
CAUTION
↑ Rear side
Bottom