


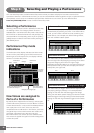


Step 3: Selecting and Playing a Performance
MOTIF XS Owner’s Manual
29
Start Guide
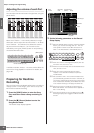
With this method, you can play all the parts of a band by
yourself. This type of Performance also uses different
Arpeggio types assigned to the individual Parts, making it
even easier to sound like a full band. In the example below,
the Drum pattern (by Arpeggio) will be played back
indefinitely even when you release the notes, the Bass line
(by Arpeggio) will be played back by your left hand
performance, and the Guitar backing (by Arpeggio) or
Piano Arpeggio will be played back by your right hand
performance.
In addition, you can change the Arpeggio Type assignment
for each Part by pressing any of the [SF1] – [SF5] buttons.
Using or combining the four methods described above
gives you the ability to create a rich variety of
Performances.
By default, many Performances stored in the User Banks
may be created via the above methods. Try out various
Performances and see which method is used for each.
Creating a Performance by
combining Voices
After checking out the pre-programmed Performances in
the User Banks, try creating your own original
Performance. In this section, we’ll create a Performance by
combining two Voices.
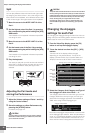
Preparing to create a Performance
••••••••••••••••••••••••••••••••••••
(Initializing the Performance)
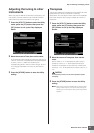
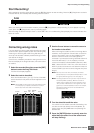
1
In the Performance Play mode, press the [JOB]
button, and then the [F1] button.
The Initialize display is shown. Make sure that the
check box of “All Parameters” is checked. For details
about the Initialize function, refer to page 159.
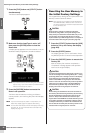
2 Press the [ENTER] button. (The display
prompts you for confirmation.)
3 Press the [INC/YES] button to initialize the
Performance.
Keep in mind that when you execute the Store operation by
pressing the [STORE] button here, the Performance at the
destination will be replaced with the Initialized Performance
above.
n For details about the Store operation, refer to page 142.
4 Press the [PERFORM] button.
The current Performance name will change to
“Initialized Perform” in the display.
n When you initialize a Performance, the Voice at Preset
Bank 1, Voice number 1 is assigned to each of all Parts
and all the Parts are turned on by default.
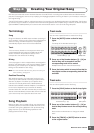
Playing several Voices together
••••••••••••••••••••••••••••••••••••
(Layer)
Try combining two Voices by assigning your favorite Voice
to Part2.
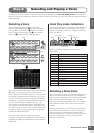
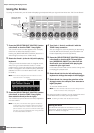
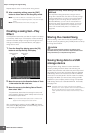
1 In the Performance Play display, press the [F2]
button to call up the Voice display.
From this display, you can confirm what Voices are
assigned to the Parts. You can also confirm that all the
Parts are turned on after executing the Initialize function
above.
2 Move the cursor to the Part 2, then select the
desired Voice by setting a Bank and Voice
number.
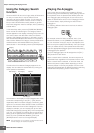
n From this display, you can use the Category Search
function to select a Voice. Like in the Voice mode
(page 24), use the [CATEGORY SEARCH] button. Please
note that the category names printed below the Bank
buttons correspond not to the Performance Category but
to the Voice Category.
3 Move the cursor to the PART SW check box for
Parts 3 and 4, then remove the checkmark by
pressing the [DEC/NO] button.
When the check mark is removed from the check box,
the corresponding part is turned off. Here, turn the Part
1 and 2 on.
4 Play the keyboard.
The Part 1 (Piano Voice) and Part 2 (the Voice you have
selected above) are sounded simultaneously in a layer.
Next, let’s play different Voices with the left and right hands.
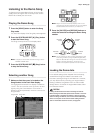
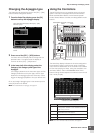
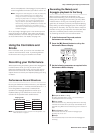
Performance Structure Using the Arpeggio
C1 C2 C3 C4 C5 C6
Part 3
Part 1
Part 4
Part 2
Guitar with the Arpeggio
Piano with the Arpeggio
Drum with the Arpeggio Hold = ON
Bass with the Arpeggio
CAUTION
Voice settings
for Part 1
Voice settings
for Part 2